How to translate words in iOS with a single tap? It’s easier than you think! In today’s digital world, we encounter words and phrases in various languages every day. Imagine being able to instantly understand the meaning of any word you come across, right from your iOS device.
This guide will explore several methods for translating words in iOS with a single tap, from using the built-in Translate app to leveraging third-party apps and Siri.
Whether you’re traveling abroad, reading a foreign language article, or just curious about the meaning of a word, these methods will make translating a breeze. Let’s dive into the world of quick and easy translations on iOS!
Introduction

In today’s digital age, where information flows effortlessly across borders, the ability to understand and communicate in multiple languages is more crucial than ever. The need for quick and easy translation has become a necessity for individuals and businesses alike, and iOS users are fortunate to have a plethora of tools at their fingertips.
Single-tap translation offers a seamless and efficient way to bridge language barriers, empowering iOS users to navigate the global digital landscape with ease. This feature streamlines the translation process, eliminating the need for cumbersome multi-step procedures.
Translation Methods in iOS
iOS provides a range of methods for translating words, each offering unique advantages depending on the user’s specific needs and preferences. These methods include:
- Built-in Translate App:This native iOS app provides a comprehensive translation experience, allowing users to translate text, websites, and even conversations in real-time. Users can choose from a wide array of languages and customize settings to suit their individual requirements. The Translate app also offers features like offline translation, voice input, and text-to-speech capabilities.
- Third-Party Translation Apps:A wide variety of third-party translation apps are available on the App Store, offering specialized features and functionalities. Some popular options include Google Translate, Microsoft Translator, and DeepL Translator. These apps often leverage advanced AI algorithms to provide accurate and natural-sounding translations.
- Siri Shortcuts:Siri Shortcuts enable users to create personalized voice commands for various tasks, including translation. Users can set up a shortcut to translate a specific phrase or website with a single voice command, making translation even more convenient.
- Copy and Paste:A simple yet effective method, copy and paste allows users to translate text by copying it from one app and pasting it into a translation app or website. This method is particularly useful for translating short phrases or words quickly.
Using the Built-in Translate App
The Translate app, pre-installed on iOS devices, offers a simple and efficient way to translate words and phrases with a single tap. This app utilizes Apple’s advanced translation technology to provide accurate and reliable translations.
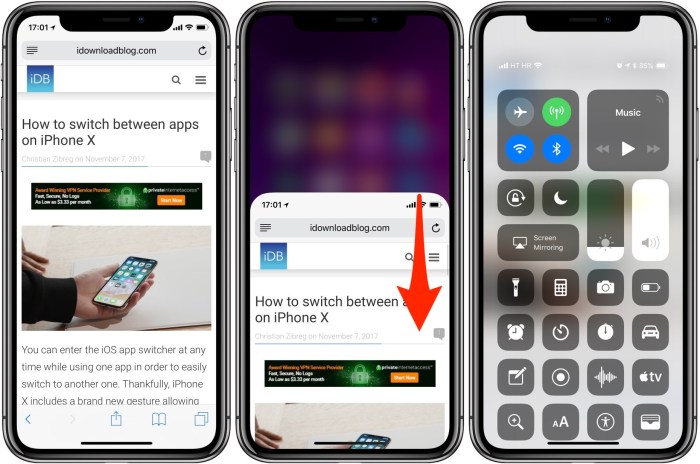
Ever wanted to translate a word on your iPhone without the hassle of switching apps? Just select the word and tap on the translate icon! You can even record yourself using the handy translation feature with the help of How to Record Your iPhone Screen with ScreenRecorder.
That way, you can show off your new language skills to your friends or save a video for future reference. So, next time you’re reading something in another language, remember, a quick tap is all it takes to unlock the world of translation.
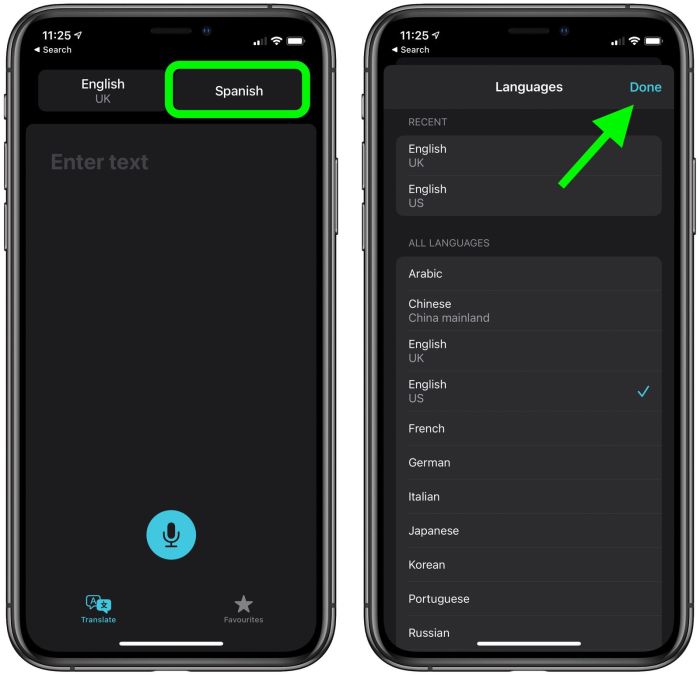
Supported Languages and Features
The Translate app supports a wide range of languages, making it a versatile tool for communication and understanding. You can translate between over 15 languages, including English, Spanish, French, German, Chinese, Japanese, and Korean. The app offers several features to enhance the translation experience, including:
- Real-time translation:The app translates text as you type, providing instant results.
- Voice translation:You can speak the text you want to translate, and the app will convert it into the desired language.
- Conversation mode:The app can translate conversations in real-time, making it ideal for interacting with people who speak different languages.
- Offline translation:You can download language packs to use the app offline, allowing you to translate even without an internet connection.
Examples of Using the Translate App
The Translate app can be used in various contexts for quick and easy translations:
- Traveling:Translate signs, menus, and directions while exploring a new city.
- Shopping:Understand product descriptions and labels in foreign languages.
- Social media:Translate posts and comments from people who speak different languages.
- Learning:Translate words and phrases to enhance your language learning journey.
Leveraging Third-Party Translation Apps

While iOS’s built-in Translate app offers a solid foundation for quick translations, several third-party apps provide more advanced features and customization options. These apps cater to diverse needs, whether you’re a frequent traveler, a language learner, or someone who simply needs occasional translations.
Popular Third-Party Translation Apps
Here’s a look at some popular third-party translation apps available for iOS:
- Google Translate:Google Translate is a well-known and widely used app, known for its accuracy and extensive language support. It offers features like offline translation, camera translation, and voice translation.
- Microsoft Translator:Microsoft Translator provides similar features to Google Translate, including offline translation and voice translation. It also offers a conversation mode, allowing for real-time translations during conversations.
- DeepL Translator:DeepL Translator is renowned for its high-quality translations, particularly in languages like German and French. It offers a clean interface and focuses on accurate and natural-sounding translations.
- iTranslate:iTranslate is a comprehensive translation app that supports a wide range of languages. It offers various features, including text, voice, and image translation, along with offline capabilities.
- SayHi Translate:SayHi Translate is a popular choice for travelers, offering a user-friendly interface and features like voice-to-voice translation and offline translation.
Comparing Third-Party Translation Apps
The best app for you will depend on your specific needs and preferences. Here’s a table comparing some key features of the apps mentioned above:
| Feature | Google Translate | Microsoft Translator | DeepL Translator | iTranslate | SayHi Translate |
|---|---|---|---|---|---|
| Language Support | Extensive | Extensive | Limited, but strong in European languages | Extensive | Extensive |
| Offline Translation | Yes | Yes | Limited | Yes | Yes |
| Voice Translation | Yes | Yes | No | Yes | Yes |
| Conversation Mode | Yes | Yes | No | Yes | Yes |
| Image Translation | Yes | Yes | No | Yes | No |
| Price | Free with optional in-app purchases | Free with optional in-app purchases | Free with optional in-app purchases | Free with optional in-app purchases | Free with optional in-app purchases |
Configuring Third-Party Apps for Single-Tap Translation
Most third-party translation apps allow you to configure single-tap translation functionality, enabling you to translate words or phrases directly from other apps. Here’s how to configure this feature:
Step 1:Download and install the desired translation app from the App Store. Step 2:Open the app and navigate to its settings or preferences. Step 3:Look for a setting related to “single-tap translation” or “text selection translation.” This setting might be labeled differently depending on the app.
Step 4:Enable this setting, which will usually allow you to select text in other apps and translate it with a single tap.
Utilizing iOS Shortcuts

Shortcuts are a powerful feature in iOS that allow you to automate tasks and create custom workflows. You can use Shortcuts to streamline your translation process, making it faster and easier to translate words with a single tap.Shortcuts can be used to translate words from one language to another, making it an efficient tool for quick translations.
They allow you to customize the translation process by choosing specific languages and translation services.
Creating a Shortcut for Single-Tap Translation
To create a Shortcut for single-tap translation, you’ll need to use the Shortcuts app on your iOS device. Here’s a step-by-step guide:
- Open the Shortcuts app on your iPhone or iPad.
- Tap the “+” button in the top right corner to create a new Shortcut.
- Search for “Get Text” in the search bar and add the action to your Shortcut.
- Next, search for “Translate Text” and add that action as well.
- In the “Translate Text” action, you can choose the source and target languages for your translation.
- You can also customize the Shortcut by adding additional actions, such as “Show Result” to display the translated text or “Copy to Clipboard” to copy the translation to your clipboard.
- Once you’ve configured your Shortcut, tap the “Play” button to test it. You can then assign the Shortcut to a specific gesture, such as a single tap on the home screen, for easy access.
Customizing the Shortcut for Specific Word Types or Languages, How to translate words in iOS with a single tap
You can customize your Shortcut to translate specific word types or languages by adjusting the settings within the “Translate Text” action.
- For example, if you want to translate only words, you can use the “Get Text” action to select the specific word or phrase you want to translate.
- You can also choose the desired source and target languages within the “Translate Text” action. This allows you to translate between specific language pairs, such as English to Spanish or French to German.
- By utilizing the “Translate Text” action, you can select from various translation services, including Google Translate, Microsoft Translator, and more.
Utilizing Siri for Translation
Siri, Apple’s virtual assistant, is a handy tool for quick and effortless translations. You can translate words or phrases directly through Siri without needing to open a separate app. Siri’s translation capabilities are seamlessly integrated into iOS, allowing you to effortlessly translate words and phrases using your voice.
Translating Words with Siri
You can translate words with Siri by simply asking. For example, you can say, “Hey Siri, translate ‘hello’ to Spanish.” Siri will then respond with the translated phrase, “Hola.” Siri can translate between a wide range of languages, including:
- English
- Spanish
- French
- German
- Chinese
- Japanese
- Korean
- Arabic
- Russian
- Portuguese
- Italian
- Hindi
- Turkish
Limitations of Siri Translation
Siri’s translation capabilities are not without limitations. For example, Siri may struggle with:
- Complex sentences or idioms
- Technical or specialized terms
- Slang or informal language
In such cases, it’s recommended to use a dedicated translation app for more accurate results. Additionally, Siri’s translation accuracy can be affected by factors such as background noise or unclear pronunciation.
Using Translation Features in Other Apps
Many apps integrate translation features, making it convenient to translate words directly within the app itself. This eliminates the need to switch between apps for translation, streamlining your workflow.
Translation Features in Popular Apps
Many apps have incorporated translation features, allowing users to translate text without leaving the app.
- Google Chrome:Google Chrome’s built-in translator allows users to translate entire web pages with a single click. To translate a webpage, simply click the “Translate” button in the address bar. This feature is available on both desktop and mobile versions of Chrome.
- Facebook:Facebook’s translation feature enables users to translate posts and comments in different languages. When you encounter a post in a foreign language, you can click the “Translate” button to see it in your preferred language.
- WhatsApp:WhatsApp offers a built-in translation feature for messages. Users can long-press a message and tap “Translate” to translate it into their desired language. This feature is available on both Android and iOS.
Translation Integration with Third-Party Services
Some apps leverage third-party translation services to provide seamless translation capabilities. These integrations allow for quick and accurate translations within the app’s context.
- Google Translate:Many apps integrate with Google Translate, allowing users to translate text within the app itself. For example, the popular note-taking app Evernote offers Google Translate integration, enabling users to translate notes directly within the app.
- Microsoft Translator:Similar to Google Translate, Microsoft Translator is integrated into various apps, including the popular email client Outlook. This integration allows users to translate emails without leaving the Outlook app.
Exploring Accessibility Features
iOS is packed with accessibility features designed to make the device usable for everyone, including individuals with visual impairments. These features can also be incredibly helpful for translating text on the screen, making it easier to understand content in different languages.
Using VoiceOver for Text Translation
VoiceOver is a screen reader built into iOS that reads aloud the content displayed on the screen. It can be used to translate text in real-time, allowing users who are blind or have low vision to access information in their preferred language.
- Activating VoiceOver:To activate VoiceOver, go to Settings > Accessibility > VoiceOver and toggle it on. You can customize VoiceOver settings to suit your needs, including voice, speaking rate, and more.
- Translating Text with VoiceOver:Once VoiceOver is activated, you can navigate through the screen using gestures. When you encounter text you want to translate, double-tap the screen to select it. VoiceOver will read the selected text aloud. Then, use the following steps to translate the text:
- Using the Translate App:To translate the text using the built-in Translate app, tap the Translate button in the VoiceOver menu. You’ll be prompted to choose the source and target languages. Once you select the languages, VoiceOver will read the translated text aloud.
- Using Siri:You can also use Siri to translate the selected text. To do this, say “Translate this” followed by the target language. For example, “Translate this to Spanish.” Siri will then read the translated text aloud.
- Using VoiceOver with Third-Party Translation Apps:VoiceOver can also be used with third-party translation apps that support accessibility features. These apps may offer additional features, such as the ability to translate images or audio.
Using Dynamic Type for Text Size
Dynamic Type is a feature in iOS that allows users to adjust the text size across the entire system. This can be incredibly helpful for users with low vision, as they can enlarge the text to make it easier to read.
- Adjusting Text Size:To adjust the text size, go to Settings > Display & Brightness > Text Size and use the slider to set the desired size. You can also use the Zoom feature to magnify specific areas of the screen.
- Impact on Translation:While Dynamic Type doesn’t directly translate text, it can make the translated text easier to read for users with low vision. By adjusting the text size, users can ensure that the translated text is large enough to be easily discernible.
Using Magnifier for Text Magnification
Magnifier is a feature in iOS that allows users to magnify specific areas of the screen. This can be helpful for users with low vision who need to see small details, such as text in a foreign language.
- Activating Magnifier:To activate Magnifier, go to Settings > Accessibility > Magnifier and toggle it on. You can customize Magnifier settings to suit your needs, including magnification level, color filters, and more.
- Using Magnifier for Translation:Once Magnifier is activated, you can use it to zoom in on any text on the screen. You can then use the built-in Translate app or a third-party translation app to translate the magnified text. This allows users to see the translated text in a larger, more readable format.
Optimizing Translation Accuracy: How To Translate Words In IOS With A Single Tap
You’ve mastered the art of translating words on iOS with a single tap, but how can you ensure the translations you’re getting are accurate and reliable? There are a number of factors that can affect the quality of a translation, and understanding these factors will help you choose the best translation service for your needs and improve the accuracy of your translations.
Factors Affecting Translation Accuracy
Several factors can affect the accuracy of translations, and it’s crucial to understand these factors to make informed choices.
- Language Complexity:Some languages are more complex than others, with nuances in grammar, syntax, and idioms that can be difficult to translate accurately. For example, translating between languages with different writing systems (like English and Chinese) can be more challenging than translating between languages with similar writing systems (like English and Spanish).
- Context:The context of the text being translated is essential. A word or phrase can have different meanings depending on the surrounding words, the topic being discussed, and the intended audience. For instance, the word “run” can have multiple meanings: “to move quickly on foot,” “to operate a business,” or “to flow.” The context determines the correct meaning.
Did you know you can translate words in iOS with a single tap? Just select the text you want to translate, tap the share icon, and choose “Translate.” It’s super handy for understanding foreign language articles or texts. Speaking of things you might want to share, make sure you turn off Activation Lock when selling your AirPods, like you can learn more about here.
You’ll want to make sure the buyer can actually use the AirPods without your old Apple ID, and turning off Activation Lock does just that. Back to translating, you can even choose the language you want to translate to, making it a super useful tool for any language learner.
- Quality of the Translation Service:The quality of the translation service you use can significantly impact the accuracy of your translations. Some services use machine translation, which can be fast but sometimes inaccurate, while others use human translators, which are more accurate but can be more expensive.
- Technical Terminology:Specialized terms in fields like medicine, law, or technology can be challenging to translate accurately. It’s important to use a translation service that specializes in the relevant field or to consult with a subject matter expert.
Choosing the Best Translation Service
Selecting the right translation service is crucial for ensuring accurate translations. Here’s how to choose wisely:
- Consider Your Needs:Think about the type of text you need translated, the language pair involved, and your budget. For casual conversations or short texts, a basic machine translation service might suffice. However, for formal documents or complex texts, a professional human translation service is recommended.
- Research and Compare Services:Explore different translation services and compare their features, pricing, and customer reviews. Look for services that specialize in the language pair and field you need.
- Check for Certifications:Some translation services are certified by industry organizations, which can indicate their commitment to quality and accuracy.
- Test the Service:Before committing to a service, try it out with a small sample of text to see how it performs.
Improving Translation Accuracy
While translation services are constantly improving, you can take steps to enhance the accuracy of your translations:
- Provide Context:When using a translation service, provide as much context as possible about the text you’re translating. This includes the topic, the intended audience, and any relevant background information.
- Use Human Review:Even if you’re using a machine translation service, it’s always a good idea to have a human review the translation to catch any errors or inaccuracies.
- Verify the Translation:Once you have a translation, take the time to verify its accuracy by comparing it to the original text and checking for any inconsistencies or misunderstandings.
- Learn the Basics of the Language:Even a basic understanding of the target language can help you identify potential errors in translations. For example, knowing the difference between formal and informal language can help you choose the appropriate translation.
Security and Privacy Considerations
Translating words on your iPhone is convenient, but it’s essential to be aware of the security and privacy implications involved. Translation apps often collect and process your data, including the text you translate, your location, and your usage patterns.
Understanding how this data is used and how to protect your privacy is crucial.
Yo, ever wanna translate a word in iOS super fast? Just select it and tap the little magnifying glass icon. Boom! Translation. Now, if you’re tired of dealing with beta bugs, you can totally ditch the iOS 14 or iPadOS 14 beta programs by following the steps outlined here.
Once you’re back on stable software, you can keep on translating words with that handy magnifying glass!
Protecting Personal Information
It’s important to be mindful of how you use translation apps to protect your personal information. Here are some tips:
- Avoid translating sensitive information, such as financial details, medical records, or personal identification numbers. These could be intercepted and misused by malicious actors.
- Be cautious about using translation apps on public Wi-Fi networks, as your data may be less secure. Consider using a VPN to encrypt your internet traffic.
- Review the privacy policies of the translation apps you use. Pay attention to how they collect, store, and use your data.
- Consider using translation apps that offer end-to-end encryption, which helps to secure your data from unauthorized access.
- Regularly check the permissions granted to translation apps on your device. Ensure they only have access to the data they need to function.
Selecting Privacy-Focused Translation Services
When choosing a translation service, prioritize those that have strong privacy policies and security measures in place. Look for apps that:
- Offer end-to-end encryption to protect your data during transmission.
- Do not sell your data to third parties. Look for services that clearly state they don’t engage in data sharing.
- Provide clear and concise information about how they collect and use your data in their privacy policy.
- Have a strong track record of protecting user privacy and security.
Last Point
From using the built-in Translate app to utilizing Siri’s voice translation capabilities, iOS offers a variety of options for translating words with a single tap. No matter your preference, there’s a method that will suit your needs. So, go ahead and explore the world of languages with ease, all from the comfort of your iOS device.
You’ll be surprised at how simple and efficient translation can be!
Clarifying Questions
Can I translate words in any app with a single tap?
Not all apps have built-in translation features, but many do. You can also use third-party apps that offer translation overlays or use Shortcuts to create a single-tap translation action within any app.
Is there a way to customize the translation language?
Yes! Most translation apps and services allow you to select your preferred languages. You can set a default language or change it for each translation.
Are there any privacy concerns with using translation services?
It’s important to choose reputable translation services that prioritize user privacy. Always review their privacy policies and ensure your data is handled securely.