Pro Tip: How To Take Fancy, Single-Window Screenshots On Mac
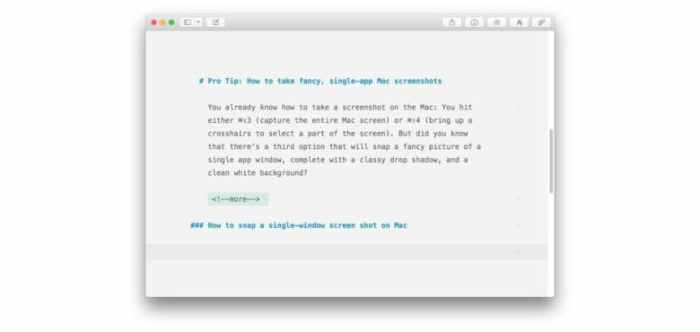
Pro Tip: How to take fancy, single-window screenshots on Mac – you know those super clean screenshots you see on websites and social media? Yeah, those are usually taken with a little extra finesse. We’re talking about screenshots that look professional, not just a quick snapshot of your screen.
It’s actually easier than you might think to get that high-quality look on your Mac.
Forget about the basic screenshot tools that come built-in with your Mac. We’re going to dive into a hidden gem called “Grab” that’s designed to capture those perfect single-window screenshots. We’ll cover everything from taking the shot to making it look even better, all while keeping it simple enough for anyone to follow.
Ready to level up your screenshot game?
Taking Fancy Single-Window Screenshots on Mac
Want to take professional-looking screenshots of your Mac windows that are more than just plain captures? This article will teach you how to take fancy single-window screenshots on your Mac. These screenshots are perfect for sharing your work, creating presentations, or simply showcasing your Mac’s capabilities.
We’ll explore the built-in tools and some handy third-party apps that will help you create visually appealing screenshots.
Taking Single-Window Screenshots
Single-window screenshots are perfect for capturing a specific app or document without the distractions of other windows or your desktop background. Here’s how to take a single-window screenshot on your Mac:
- Press Shift + Command + 3to take a screenshot of your entire screen.
- Press Shift + Command + 4to select a specific area of your screen.
- Press Shift + Command + 4, then press the spacebarto select a specific window. Once the window is highlighted, click your mouse to capture the screenshot.
Understanding the Tools
macOS provides a set of built-in tools for capturing screenshots, making it easy to document your work or share visuals. These tools are accessible through keyboard shortcuts, offering quick and efficient ways to capture your screen. However, when it comes to creating professional-looking screenshots of single windows, these default tools might fall short of your needs.
Taking fancy, single-window screenshots on your Mac is super easy. You can use the Command + Shift + 4 shortcut to select a specific area, but if you want to make it look even more professional, try adding a little blur to the background.
It’s like a little magic trick! Speaking of magic, check out How to customize the endlessly editable Control Center in iOS 18 , which is basically like having a mini-control panel at your fingertips. Once you’ve got that awesome screenshot, don’t forget to share it on social media!
Default macOS Screenshot Tools
The default macOS screenshot tools offer a basic level of functionality. These tools are accessible through keyboard shortcuts, providing a quick and easy way to capture your screen.
- Command + Shift + 3:This shortcut captures the entire screen, saving the screenshot as a PNG file on your desktop.
- Command + Shift + 4:This shortcut allows you to select a specific area of your screen to capture. Drag your cursor to define the area you want to capture, and the screenshot will be saved as a PNG file on your desktop.
- Command + Shift + 4, then Spacebar:This shortcut enables you to capture a specific window on your screen. Click on the window you want to capture, and the screenshot will be saved as a PNG file on your desktop.
Limitations of Default Tools for Single-Window Screenshots
While the default macOS screenshot tools are convenient, they lack the flexibility and control required for creating professional-looking single-window screenshots. For instance, the default tools do not allow you to customize the background, remove the title bar, or adjust the shadow.
These limitations can make your screenshots look less polished and professional, especially when you need to create high-quality visuals for presentations, articles, or online content.
Grab Application
For capturing professional-looking screenshots of single windows, the “Grab” application offers a powerful alternative. This application provides a range of advanced features that allow you to create high-quality screenshots with customizable settings.
Using Grab for Single-Window Screenshots
Grab is a built-in Mac app that’s perfect for capturing single windows. It’s a simple yet powerful tool for creating clean screenshots without any unnecessary clutter.
Selecting the Desired Window
To select the window you want to capture, you’ll need to open Grab and then click on the “Selection” tool. This will change your cursor into a crosshair. Now, simply click and drag over the window you want to capture.
Grab will automatically detect the window’s boundaries and capture only the visible portion.
This is especially useful for capturing specific applications or portions of your screen without capturing the surrounding desktop.
Adjusting the Screenshot’s Quality and Format
Once you’ve captured your screenshot, Grab allows you to adjust its quality and format before saving it.
- PNG: PNG is a lossless format, meaning it retains the original image quality. This is ideal for screenshots with sharp edges and text, ensuring no information is lost.
- JPEG: JPEG is a lossy format, meaning it compresses the image, potentially reducing its quality. However, JPEG files are generally smaller than PNG files, making them suitable for sharing online or storing in limited storage space.
To adjust the quality and format, simply click on the “File” menu and select “Save”. You can then choose your desired format and quality settings.
Advanced Screenshot Techniques
You’ve learned the basics of capturing single-window screenshots on your Mac using Grab. Now, let’s explore some advanced techniques that give you even more control over your screenshots.
Capturing Specific Areas of the Screen, Pro Tip: How to take fancy, single-window screenshots on Mac
The “Selection” option in Grab allows you to capture only a specific portion of your screen. This is helpful when you want to isolate a particular element, like a specific section of a webpage or a specific dialog box. To capture a specific area of your screen, follow these steps:
- Open Grab and select “Selection” from the “Capture” menu.
- Your cursor will change to a crosshair.
- Click and drag your cursor to select the area you want to capture.
- Release the mouse button to capture the selected area.
Capturing Timed Screenshots
Sometimes you need to capture a specific event that happens on your screen, like an animation or a pop-up message. Grab’s “Timed Screen” option allows you to capture a screenshot after a set delay.To capture a timed screenshot, follow these steps:
- Open Grab and select “Timed Screen” from the “Capture” menu.
- Enter the desired delay in seconds using the number pad.
- Click “Start” to begin the countdown.
- Once the countdown reaches zero, Grab will capture the screen.
Using Delay for Precise Screenshots
The “Delay” option in Grab allows you to control the timing of your screenshots. This is particularly useful for capturing specific events or elements that appear after a short delay, such as a pop-up menu or an animated transition. To use the “Delay” option, follow these steps:
- Open Grab and select “Selection,” “Window,” or “Screen” from the “Capture” menu.
- Click on the “Delay” button.
- Enter the desired delay in seconds using the number pad.
- Click “Start” to begin the countdown.
- Grab will capture the selected area or screen after the specified delay.
Enhancing Your Screenshots
A picture is worth a thousand words, and a well-edited screenshot can elevate your communication to new heights. By taking the time to enhance your screenshots, you can ensure they are clear, visually appealing, and effectively convey your message.
You know how to take a screenshot on your Mac, but did you know you can capture just a single window? It’s super easy, just use Command + Shift + 4, then click the window you want to capture. Speaking of capturing things, did you know you can add your free digital vaccine certificate to your iPhone’s Wallet?
It’s totally painless, just follow the instructions on this helpful guide. And once you’ve got that snazzy screenshot, don’t forget to share it with your friends!
Recommended Image Editing Tools
A variety of powerful image editing tools are available for Mac users, each offering a unique set of features and capabilities. Here are a few popular options that are well-suited for enhancing screenshots:
- Preview: This built-in Mac application offers a surprisingly robust set of editing tools. Preview allows you to adjust brightness, contrast, and color balance, as well as crop, resize, and rotate your screenshots. It also provides basic annotation tools for adding text, shapes, and arrows.
- Pixelmator Pro: This professional-grade image editor offers a comprehensive suite of tools for advanced editing. Pixelmator Pro includes features for color correction, retouching, and compositing, making it ideal for creating high-quality screenshots. It also supports a wide range of file formats, ensuring compatibility with various applications.
- Affinity Photo: Another powerful alternative, Affinity Photo provides a user-friendly interface and a wide array of editing tools. It offers features for color adjustments, layers, masks, and filters, allowing you to precisely refine your screenshots. Affinity Photo is also known for its performance and speed, making it suitable for large image files.
Adjusting Brightness, Contrast, and Colors
Once you’ve chosen an image editing tool, you can start enhancing your screenshots by adjusting their brightness, contrast, and colors. These adjustments can significantly improve the visual appeal of your screenshots, making them easier to read and understand.
- Brightness: Adjusting the brightness level can make your screenshots appear lighter or darker. Increasing brightness can make dark areas more visible, while decreasing brightness can create a more subdued or dramatic effect.
- Contrast: Contrast refers to the difference between light and dark areas in your screenshot. Increasing contrast can make the image appear more vibrant and defined, while decreasing contrast can soften the image and reduce harshness.
- Colors: Adjusting the color balance of your screenshot can enhance its overall appearance. You can use tools to adjust individual color channels (red, green, blue) or to apply presets that alter the overall color scheme.
Using Screenshots for Different Purposes
Single-window screenshots are a powerful tool that can be used in various ways to enhance your workflow and communication. They allow you to capture specific information or visuals from a single application window, making it easier to share, document, or illustrate ideas.This section explores some of the most common applications of single-window screenshots, highlighting how they can be used to share information, create tutorials, and elevate social media content.
Sharing Specific Information with Colleagues or Clients
Single-window screenshots are incredibly useful for sharing specific information with colleagues or clients. They allow you to quickly capture and share relevant data, code snippets, error messages, or any other information that might be difficult to explain in words alone.
This can save time and effort by providing a clear and concise visual representation of the information you want to convey.For instance, imagine you’re working on a project with a team and need to share a specific spreadsheet containing sales figures.
Instead of emailing the entire spreadsheet, you can take a single-window screenshot of the relevant data and share it with your colleagues. This ensures they only see the information they need, reducing the risk of confusion or misinterpretation.
Creating Visual Guides for Tutorials or Presentations
Single-window screenshots can be used to create clear and concise visual guides for tutorials or presentations. They allow you to capture step-by-step instructions, highlight specific features or functionalities, and provide a visual context for your explanations.For example, you could use single-window screenshots to create a tutorial on how to use a specific software application.
Each screenshot would capture a different step in the process, providing a visual representation of the instructions. This makes it easier for viewers to follow along and understand the steps involved.
Enhancing Social Media Posts with Professional-Looking Visuals
Single-window screenshots can add a touch of professionalism to your social media posts. They can be used to share interesting data, code snippets, or other visually appealing information that might not be as engaging in text form alone.For example, you could use a single-window screenshot to share a graph showing the growth of your social media following.
This visual representation of your progress can be more engaging than simply stating the numbers in text form.
Tips for Professional Screenshots
You’ve mastered the art of taking single-window screenshots on your Mac, but what about making those screenshots look truly professional? A few simple tips can transform your average screenshot into a polished, high-quality image perfect for sharing or presentations.
So you’ve mastered the single-window screenshot on your Mac, but what about your iPhone? If you’re looking to level up your mobile photography, check out this article on How to shoot amazing black-and-white photos on your iPhone. It’s a super helpful guide, and once you’ve got the hang of it, you can even use your iPhone to take those fancy screenshots of your Mac’s single windows, which is always a cool party trick.
Best Practices for Professional Screenshots
Taking professional screenshots on a Mac goes beyond just capturing the screen. It’s about creating a visually appealing and clear image that effectively conveys your message.
- Ensure a Clean and Clutter-Free Desktop Environment:Before you capture your screenshot, take a moment to tidy up your desktop. Minimize unnecessary windows, close open apps you don’t need, and organize your icons. A clean desktop will make your screenshot look more professional and less distracting.
- Use a High-Resolution Display:Higher resolution displays produce sharper and more detailed screenshots. If you’re working on a lower-resolution display, consider scaling up the size of the window you’re capturing for better clarity.
- Consider Using a Screenshot Capture Tool with Advanced Features:While the built-in tools on your Mac are great for basic screenshots, specialized capture tools offer additional features that can elevate your screenshots. Some tools allow you to capture specific regions, add annotations, and even record video of your screen.
These features can be invaluable for creating professional-looking screenshots.
Beyond Single-Window Screenshots: Pro Tip: How To Take Fancy, Single-window Screenshots On Mac
While mastering single-window screenshots is a valuable skill, Mac offers a range of other screenshot techniques to capture different aspects of your screen. These methods provide flexibility for capturing various content, from specific areas to the entire screen. This section explores these techniques and introduces advanced tools for further customization.
Capturing the Entire Screen
To capture the entire screen, use the following keyboard shortcut:
Command + Shift + 3
This shortcut captures everything displayed on your screen, including menus and dock icons. The resulting screenshot is saved as a PNG file on your desktop. This method is ideal for capturing a full-screen application, a webpage, or a presentation slide.
Selecting a Specific Area
For capturing a specific area of your screen, use the following keyboard shortcut:
Command + Shift + 4
After pressing this shortcut, your cursor will transform into a crosshair. Drag the crosshair to select the area you want to capture. The selected area will be highlighted as you drag the crosshair. Release the mouse button to capture the selected area.
The screenshot will be saved as a PNG file on your desktop.
Using Third-Party Screenshot Tools
Beyond the built-in screenshot tools, numerous third-party applications offer advanced features for capturing and editing screenshots. These tools provide options for:
- Capturing scrolling windows, allowing you to capture content that extends beyond the screen’s visible area.
- Adding annotations and effects to screenshots, such as arrows, circles, text, and blur effects.
- Recording screen activity, creating video recordings of your screen interactions.
- Scheduling screenshots, automatically capturing your screen at specific intervals.
Exploring these third-party tools can enhance your screenshot capabilities and provide greater control over your captured images. Some popular options include Snagit, Lightshot, and Skitch.
Conclusion
So, there you have it! You now have the tools and knowledge to take professional-looking, single-window screenshots on your Mac. Mastering these techniques can significantly improve the quality and clarity of your visual content.Remember, practice makes perfect! Experiment with different screenshot tools, techniques, and editing options to find what works best for you and your specific needs.
With a little effort, you can create visually appealing screenshots that effectively communicate your message and leave a lasting impression.
Final Wrap-Up
So there you have it! You now have the power to take professional-looking single-window screenshots on your Mac. Whether you’re sharing information, creating a tutorial, or just want to make your social media posts pop, these tips will make your screenshots stand out.
Remember, practice makes perfect, so experiment with different techniques and tools to find what works best for you. And who knows, maybe you’ll even become a screenshot master!
Essential FAQs
Can I use Grab to capture a specific area of my screen?
Absolutely! Grab lets you select a specific area of your screen using the “Selection” option. Just click on the “Selection” button in the Grab window and drag a rectangle around the area you want to capture.
What are some good image editing tools for Mac besides Preview?
Besides Preview, you can also use powerful image editing tools like Pixelmator Pro, Affinity Photo, or Adobe Photoshop. These offer more advanced features for enhancing your screenshots.
Can I use Grab to take screenshots of specific events?
Yes, Grab lets you capture a timed screenshot. Just select the “Time” option in the Grab window, set a delay, and then trigger the screenshot. This is useful for capturing events that happen after a certain time interval.


