Ios Mail Filters Quickly Tame Overflowing Mailboxes
iOS Mail filters quickly tame overflowing mailboxes, transforming a chaotic inbox into a well-organized haven. Imagine a world where your email isn’t a source of stress, but a tool for productivity. Filters allow you to automatically sort incoming messages, creating order out of the chaos and giving you back control of your digital life.
Think of it this way: you wouldn’t just dump all your clothes on the floor, right? You sort them into drawers and closets. Email filters are like the organizers for your inbox, letting you categorize and prioritize messages so you can easily find what you need, when you need it.
The Problem
We’ve all been there. You open your email app, and a tidal wave of unread messages crashes over you. The sheer volume of emails can feel overwhelming, making it difficult to find what you need, respond to important messages, and even stay on top of your daily tasks.
It’s like trying to navigate a cluttered room – you know what you’re looking for, but it’s buried under a mountain of stuff.
The Impact of a Cluttered Inbox
A cluttered inbox can have a significant impact on your productivity and mental well-being. Imagine trying to focus on a critical project while hundreds of unread emails are demanding your attention. This constant barrage of notifications can lead to:
- Decreased Focus:It’s hard to concentrate when you’re constantly being bombarded with emails. This can lead to mistakes, missed deadlines, and a general feeling of being overwhelmed.
- Increased Stress:A chaotic inbox can create a sense of anxiety and overwhelm. You may feel constantly behind, leading to increased stress and even burnout.
- Lost Time:Searching for specific emails in a cluttered inbox can be a time-consuming task. This lost time could be spent on more productive activities.
iOS Mail Filters
You’ve got a handle on the problem of an overflowing inbox, and now you’re ready to conquer it with iOS Mail filters. These handy tools let you automatically sort and organize your emails, making your inbox a much more manageable place.
How iOS Mail Filters Work
iOS Mail filters act like smart assistants, automatically sorting your emails based on specific criteria you set. You can create rules that tell your Mail app what to do with incoming emails, such as:
- Move emails from a particular sender to a specific folder.
- Mark emails as read or unread.
- Flag emails for follow-up.
- Delete emails that meet certain conditions.
Benefits of Using Filters
Using iOS Mail filters offers a range of advantages, making email management a breeze:
- Reduced Stress:No more frantically searching for important emails. Filters keep your inbox organized and reduce the stress of managing a chaotic email flow.
- Improved Inbox Management:By automatically sorting emails into relevant folders, filters make it easier to find what you need, saving you time and frustration.
- Increased Efficiency:Filters streamline your workflow by automatically handling routine tasks, allowing you to focus on more important emails.
Types of iOS Mail Filters
You can create various types of filters to suit your needs. Here are some examples:
- Sender-Based Filters:These filters automatically categorize emails based on the sender’s address. For instance, you could create a filter to move all emails from your boss to a “Work” folder.
- Subject-Based Filters:These filters categorize emails based on s in the subject line. For example, you could create a filter to move all emails containing “invoice” to a “Finance” folder.
- Content-Based Filters:These filters use s in the email body to sort emails. You could create a filter to move all emails containing “urgent” to a “Urgent” folder.
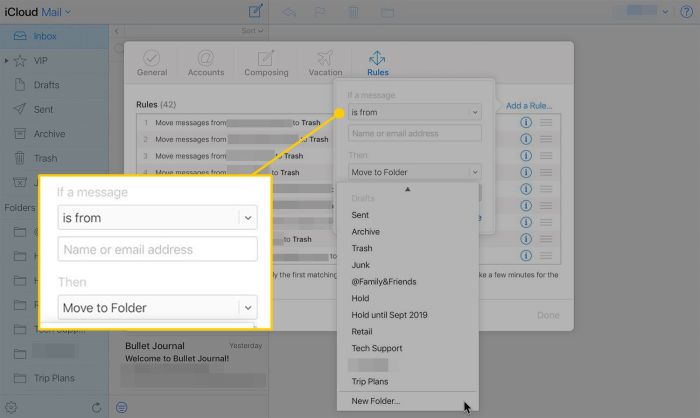
Setting Up Filters

Setting up filters in iOS Mail is a breeze. It’s a quick and easy process that can transform your inbox from a chaotic mess into an organized haven.
Creating Filters
To create a filter, follow these steps:
- Open the Mail app on your iPhone or iPad.
- Tap the “Mailboxes” tab at the bottom of the screen.
- Tap “Edit” in the upper right corner.
- Tap the “+” button to add a new filter.
- Give your filter a descriptive name, like “Work Emails” or “Newsletter Updates.”
- Choose the criteria you want to use to filter your emails. You can filter by:
- Sender: This is probably the most common filter, allowing you to isolate emails from specific individuals or companies.
- Subject: Filter emails based on specific s or phrases in the subject line.
- From: Filter emails based on the sender’s email address.
- To: Filter emails based on the recipient’s email address.
- CC: Filter emails based on the email addresses in the CC field.
- BCC: Filter emails based on the email addresses in the BCC field.
- Select the actions you want to apply to the filtered emails. This can include:
- Move to: Move filtered emails to a specific mailbox.
- Mark as read: Automatically mark filtered emails as read.
- Flag: Mark filtered emails with a flag for later attention.
- Delete: Automatically delete filtered emails.
- Tap “Save” to complete the filter setup.
Choosing Effective Filter Criteria
When choosing filter criteria, it’s important to consider what works best for your inbox. Here are some tips:
- Be specific:Avoid using broad criteria like “All emails from John” as this could catch emails you don’t want to filter. Instead, use more specific criteria like “Emails from John with the subject ‘Meeting'” or “Emails from John sent from [email protected].” This will ensure you only filter the emails you intend to.
- Use a combination of criteria:You can combine multiple criteria to create more precise filters. For example, you could create a filter that moves emails from your boss with the subject “Urgent” to a separate mailbox.
- Keep it simple:Don’t overcomplicate your filters. Start with a few basic filters and gradually add more as needed.
Filter Examples
Let’s see some practical examples of how you can set up filters to tame specific types of emails. These examples will help you understand how filters can be customized to suit your unique needs.
Filtering Newsletters
Newsletters are a common type of email that can quickly clutter your inbox. To manage these emails, you can create filters that move them to a dedicated folder.
- Filter Example:
- Subject Contains:“Newsletter”
- Move to Folder:“Newsletters”
Filtering Promotional Emails
Promotional emails are another common culprit for inbox overload. Filters can help you organize these emails by moving them to a separate folder.
- Filter Example:
- From Contains:“Deals” or “Promotions”
- Move to Folder:“Promotions”
Filtering Social Notifications
Social media notifications can be distracting. Filters can help you manage these notifications by moving them to a specific folder.
- Filter Example:
- From Contains:“Facebook” or “Twitter”
- Move to Folder:“Social Notifications”
Filtering Emails from Specific Senders
You can create filters to manage emails from specific senders. For example, you might want to move all emails from your boss to a “Work” folder or all emails from a particular online store to a “Shopping” folder.
- Filter Example:
- From Contains:“Boss’s Email Address”
- Move to Folder:“Work”
Filtering Emails with Specific s
You can create filters to manage emails that contain specific s. For example, you might want to move all emails that contain the word “urgent” to a “Urgent” folder.
- Filter Example:
- Subject Contains:“Urgent”
- Move to Folder:“Urgent”
Advanced Filter Techniques: IOS Mail Filters Quickly Tame Overflowing Mailboxes
Basic iOS Mail filters can be helpful for organizing your inbox, but they can be even more powerful when you use multiple criteria and actions. Advanced filters allow you to create complex rules that can automatically sort, categorize, and manage your emails, making your inbox more manageable and efficient.
Combining Criteria
Multiple criteria allow you to create more specific filters. For example, you could create a filter that only moves emails from a specific sender to a specific folder if they contain a certain . You can also combine multiple criteria using “AND” or “OR” operators.
- AND:All criteria must be met for the filter to apply. For example, a filter with “From: John Doe AND Subject: Meeting” will only apply to emails from John Doe with the subject “Meeting”.
- OR:At least one criterion must be met for the filter to apply. For example, a filter with “From: John Doe OR Subject: Meeting” will apply to emails from John Doe, emails with the subject “Meeting”, or emails that meet both criteria.
Filter Actions
Filter actions determine what happens to emails that match the filter criteria. The most common actions include:
- Move to Folder:This action moves matching emails to a specific folder. You can create folders for different purposes, such as “Work”, “Personal”, or “Promotions”, and use filters to automatically organize your emails into these folders.
- Mark as Read:This action marks matching emails as read. This can be useful for quickly clearing out your inbox, especially if you’re not interested in reading all of the emails in a particular category.
- Delete:This action deletes matching emails. Use this action with caution, as deleted emails cannot be recovered.
- Flag:This action flags matching emails, making them easier to find later. This can be useful for emails that require your attention or that you want to revisit later.
- Other Actions:Other actions include “Junk” (marking emails as spam), “Skip Inbox” (bypassing the inbox and moving emails directly to a specific folder), and “Notify” (sending a notification when a matching email arrives).
Advanced Filter Scenarios
- Prioritizing Important Emails:You can create a filter that flags emails from your boss or important clients, ensuring that you don’t miss their messages. This filter could use the criteria “From: [Boss’s Email] OR From: [Client’s Email]” and the action “Flag”.
- Automating Newsletter Management:You can create a filter that moves all newsletters to a specific folder. This filter could use the criteria “From: [Newsletter Sender] OR Subject: [Newsletter ]” and the action “Move to Folder: Newsletters”.
- Filtering Social Media Notifications:You can create a filter that moves social media notifications to a specific folder, allowing you to focus on other emails in your inbox. This filter could use the criteria “From: [Social Media Platform] AND Subject: [Notification ]” and the action “Move to Folder: Social Media”.
Filter Maintenance and Optimization
Filters are a powerful tool for managing your inbox, but they’re not a set-it-and-forget-it solution. Like any well-oiled machine, your filters need regular attention to ensure they’re working efficiently and effectively.Think of it this way: Your filters are like your personal inbox assistants.
They’re constantly sorting and organizing your emails, making sure the important stuff gets to the right place and the rest stays out of your way. But if you don’t keep an eye on them, they might start making mistakes, or worse, they might miss important emails altogether.
Regular Review and Updates
Regularly reviewing and updating your filters is crucial for maintaining their effectiveness. Over time, your email habits and preferences might change, and your filters may no longer be aligned with your current needs. For example, you might have set up a filter to send all emails from a particular company to a specific folder, but now you might want to receive those emails directly in your inbox.
Or maybe you’ve started subscribing to a new newsletter and want to add it to your “Read Later” folder.Here are some tips for keeping your filters in tip-top shape:
- Review your filters at least once a month.This will give you a chance to make sure they’re still working as intended and identify any potential issues.
- Check your filter logs.iOS Mail provides a log of all the emails that have been filtered, so you can see which emails are being caught and which are slipping through the cracks.
- Update your filters as needed.If you notice that your filters aren’t working as expected, or if your email habits have changed, take a few minutes to update them.
Optimizing Filter Settings, IOS Mail filters quickly tame overflowing mailboxes
Just like tuning a car engine, optimizing your filter settings can make a big difference in their performance. By tweaking your filter rules, you can ensure that they’re catching the right emails and leaving the rest alone.Here are some tips for optimizing your filter settings:
- Use specific s.Instead of using broad terms like “promotions” or “updates,” try using more specific s that are relevant to your needs. For example, instead of filtering emails with the “promotions,” you could filter emails that contain the phrase “promo code” or “discount code.”
- Be mindful of case sensitivity.Some email providers treat s differently depending on their case. For example, filtering emails with the “Amazon” might not catch emails that use the “amazon.” To avoid this, try using both lowercase and uppercase versions of your s in your filters.
- Use multiple filters for complex rules.If you have a complex filtering rule, you might want to create multiple filters to make it easier to manage. For example, you could create one filter to move emails from a specific sender to a specific folder, and another filter to mark those emails as read.
Troubleshooting Common Filter Issues
Even the best filters can sometimes encounter problems. If you’re having trouble with your filters, there are a few things you can try:
- Check your filter settings.Make sure that your filters are set up correctly and that they’re using the right s and conditions.
- Review your filter logs.Check the logs to see which emails are being filtered and which are not. This can help you identify any potential issues.
- Disable and re-enable your filters.Sometimes, simply disabling and re-enabling your filters can resolve minor issues.
The Impact of Filters
Imagine your inbox, once a chaotic jumble of emails, transformed into a well-organized system where important messages rise to the top and irrelevant ones are neatly tucked away. That’s the power of email filters. By automatically sorting and organizing your emails, filters streamline your workflow, freeing you to focus on what truly matters.Filters can dramatically improve your time management and productivity by minimizing distractions and allowing you to prioritize tasks.
With filters, you can quickly identify and address urgent messages while relegating less critical emails to a designated folder for later review. This targeted approach saves you time and mental energy, enabling you to work more efficiently and effectively.
Leveraging Filters for Specific Goals
Filters are incredibly versatile tools that can be tailored to suit your unique needs and goals. For instance, you can:
- Filter emails from specific senders:This is especially useful for keeping track of important communications from clients, colleagues, or family members. You can create filters that automatically move emails from these senders to designated folders, ensuring you never miss an important message.
- Filter emails based on s:This allows you to quickly identify emails containing specific terms, such as “invoice,” “urgent,” or “meeting.” You can then create filters to move these emails to folders for easy access and follow-up.
- Filter emails based on attachments:If you regularly receive emails with attachments, you can create filters to move these emails to a dedicated folder. This helps you stay organized and easily locate files when needed.
- Filter emails based on their importance:Many email providers offer features like “starring” or “flagging” emails. You can create filters to automatically move starred or flagged emails to a dedicated folder, making it easy to prioritize urgent tasks.
By implementing a strategic filter system, you can effectively manage your inbox, prioritize tasks, and achieve a more productive workflow.
Beyond Filters

While filters are powerful tools for organizing your inbox, they’re not the only way to tame the email beast. iOS Mail offers several additional features to help you manage your inbox more effectively. These techniques can complement your filters, creating a truly streamlined email experience.
iOS Mail filters are a lifesaver when it comes to managing a chaotic inbox. You can easily sort through the clutter and keep your important emails front and center. If you’re struggling with a Mac without a mouse, you can learn how to turn on Bluetooth using the keyboard by following these steps How to turn on Mac Bluetooth without a mouse.
Once you’ve got Bluetooth working, you can easily pair your phone and take advantage of the iOS Mail filters to get your inbox under control.
Folders
Folders are a fundamental tool for organizing your emails. They allow you to group related messages together, keeping your inbox clutter-free. You can create folders for specific projects, clients, or topics. This helps you quickly locate important emails and keeps your inbox focused on the most urgent messages.
Smart Mailboxes
Smart Mailboxes are like dynamic folders, automatically filtering emails based on specific criteria. They are essentially pre-configured filters that constantly update themselves. For example, you could create a Smart Mailbox for all emails marked as “Important” or for emails from a specific sender.
This helps you prioritize and quickly access crucial messages.
- You can create Smart Mailboxes based on a variety of criteria, including sender, subject, date, and more.
- Smart Mailboxes are particularly useful for tracking emails that require follow-up or attention.
- You can customize the appearance of your Smart Mailboxes to easily distinguish them from regular folders.
Other Inbox Management Techniques
Beyond folders and Smart Mailboxes, there are other strategies for managing your inbox effectively. These include:
- Unsubscribe from unwanted newsletters and promotional emails:Regularly review your subscriptions and unsubscribe from any emails that no longer serve you. This will significantly reduce the amount of clutter in your inbox.
- Use email snoozing features:If you need to address an email later, use the “Snooze” feature to temporarily remove it from your inbox. This allows you to focus on urgent messages without feeling overwhelmed.
- Set aside specific time for email management:Instead of constantly checking your inbox throughout the day, set aside specific blocks of time to manage your emails. This allows you to focus on your work without constant distractions.
- Use the “Mark as Read” feature strategically:Instead of simply deleting emails, consider marking them as read if they’re not urgent. This helps you keep track of your email history and avoids unnecessary clutter.
The Future of Email Management

The world of email is constantly evolving, with new technologies and trends emerging all the time. As we move forward, we can expect to see even more innovative solutions that will help us manage our inboxes more effectively. This will be driven by a combination of factors, including the increasing volume of email, the need for better organization, and the desire for more personalized experiences.
The Impact of AI and Machine Learning
Artificial intelligence (AI) and machine learning (ML) are poised to revolutionize email management. These technologies can analyze your email habits and preferences to provide more intelligent solutions for organizing your inbox. For example, AI-powered filters can automatically sort emails into different categories based on content, sender, or other criteria.
These technologies can also learn your communication patterns and identify important emails, ensuring that you don’t miss anything critical.
iOS Mail filters are a lifesaver for anyone with a mailbox that’s constantly overflowing. You can set up rules to automatically sort emails, move them to specific folders, or even delete them entirely. And if you’re recording audio from your iPhone, you might want to check out How to record digital audio from your iPhone to your Mac with iDAM for a super easy way to transfer those files to your Mac.
Once you’ve got your audio organized, you can get back to managing your inbox with the help of those awesome Mail filters.
Predictions for the Future of Email Filters and Other Inbox Management Tools
Email filters are already a powerful tool for managing your inbox, and they are only going to become more sophisticated in the future. Here are some predictions:
- Smart Filters:AI-powered filters will be able to learn your preferences and automatically adjust themselves to provide the best possible organization. For example, a filter could automatically learn that you always want to see emails from your boss at the top of your inbox, while emails from newsletters could be sent to a separate folder.
- Predictive Filters:Filters will be able to anticipate your needs and proactively filter emails based on your schedule, location, and other factors. For example, a filter could automatically move emails related to a conference you’re attending to a separate folder, making them easier to access when you need them.
- Personalized Inbox Experiences:Email providers will use AI and ML to create personalized inbox experiences tailored to your individual needs. For example, an inbox could prioritize emails from people you interact with frequently, while automatically filtering out spam and irrelevant messages.
Case Studies

Seeing iOS Mail filters in action can be incredibly inspiring. These real-world examples show how individuals and businesses have harnessed the power of filters to tame their overflowing inboxes and gain control of their email flow.
Case Study 1: The Busy Entrepreneur
This case study focuses on a busy entrepreneur who used iOS Mail filters to manage a high volume of emails. The entrepreneur, let’s call her Sarah, found herself drowning in emails, making it challenging to stay on top of important messages.
She needed a way to prioritize her inbox and ensure timely responses to critical emails.
- The Challenge:Sarah received a large volume of emails daily, making it difficult to identify and respond to urgent messages promptly. She also struggled to manage subscriptions and promotional emails, which cluttered her inbox.
- The Solution:Sarah implemented iOS Mail filters to categorize her emails based on sender, subject, and s. She created filters for important emails from clients, partners, and team members, ensuring these messages always appeared at the top of her inbox. She also set up filters to automatically move promotional emails and subscriptions to a separate folder, keeping her primary inbox focused on critical communication.
- The Results:Sarah’s email management improved significantly. She was able to respond to important emails quickly, boosting her productivity and client satisfaction. Her inbox was no longer cluttered with irrelevant messages, allowing her to focus on essential tasks.
Case Study 2: The Marketing Team
This case study explores how a marketing team used iOS Mail filters to streamline their email marketing campaigns. The team, responsible for managing multiple email lists and sending out regular newsletters, faced challenges in tracking campaign performance and managing email subscriptions.
Seriously, iOS Mail filters are a lifesaver for anyone drowning in emails. I mean, you can create rules to automatically sort messages by sender, subject, or even keywords – talk about a time-saver! And if you’re looking to really customize your iOS experience, you gotta check out How to install iOS 8’s most wicked widgets.
They’re like little mini-apps that can do everything from displaying the weather to controlling your music. Once you’ve got your widgets set up, you can get back to cleaning out your inbox with those killer Mail filters. It’s a win-win situation, trust me.
- The Challenge:The marketing team struggled to track the performance of their email campaigns effectively. They also faced difficulties in managing email subscriptions, leading to a high number of unsubscribes and bounced emails.
- The Solution:The team implemented iOS Mail filters to automate the process of tracking email campaign performance. They created filters that automatically moved emails from specific campaigns to dedicated folders, making it easier to analyze campaign metrics like open rates, click-through rates, and unsubscribes.
They also set up filters to automatically unsubscribe recipients who repeatedly bounced emails, reducing the number of invalid addresses on their lists.
- The Results:The marketing team’s email campaign management became more efficient and effective. They were able to track campaign performance with greater ease, leading to improved campaign optimization and higher engagement rates. By managing email subscriptions effectively, they reduced the number of bounced emails and unsubscribes, ensuring their email campaigns reached the right audience.
Last Word
With a little effort, you can create a system of filters that works for you, keeping your inbox clean and your workflow efficient. So ditch the overwhelm, embrace the power of filters, and reclaim your inbox from the email abyss.
You’ll be surprised at how much time and energy you can save, allowing you to focus on what really matters.
Frequently Asked Questions
How do I know which filters to create?
Start by identifying the types of emails you receive most often. Do you get a lot of newsletters, promotional emails, or social media notifications? Creating filters for these categories can help you quickly organize your inbox.
What if I accidentally delete an email that I needed?
Don’t worry! iOS Mail has a “Recently Deleted” folder where you can recover emails for up to 30 days. Just go to your inbox, tap “Edit,” and then “Recently Deleted.”
Can I use filters to automatically archive emails?
Absolutely! You can set up filters to automatically archive emails from specific senders or with specific s. This can help you keep your inbox clutter-free.
Are there any limitations to iOS Mail filters?
While iOS Mail filters are very powerful, they do have some limitations. For example, you can’t create filters based on the content of an email’s body. You can only use criteria like sender, subject, and s.