How To Use Icloud Drive To Free Up Storage On Your Mac
How to use iCloud Drive to free up storage on your Mac is a question many Mac users ask. It’s a simple solution to a common problem, and it’s a great way to make sure you have enough space for all your files and apps.
Plus, it’s easy to use and makes accessing your files from anywhere a breeze.
iCloud Drive acts like a virtual hard drive, giving you a place to store your files in the cloud. This means you can access them from any device with an internet connection. The best part? It helps free up space on your Mac by moving your files to the cloud.
Understanding iCloud Drive
iCloud Drive is Apple’s cloud storage service that seamlessly integrates with your Mac and other Apple devices. It allows you to store your files online and access them from anywhere, anytime. Think of it as a digital file cabinet that’s always with you.
How iCloud Drive Works
iCloud Drive works by storing your files on Apple’s servers. When you save a file to iCloud Drive, a copy is uploaded to the cloud. You can then access that file from any of your Apple devices, as well as from your Mac’s local storage.
This means that your files are always up-to-date and accessible, regardless of which device you’re using.
Benefits of Using iCloud Drive
- File Access from Anywhere:iCloud Drive lets you access your files from any Apple device, including your Mac, iPhone, iPad, and Apple Watch. This means that you can work on a document on your Mac and then continue working on it on your iPad, without having to worry about transferring files manually.
- Automatic File Syncing:iCloud Drive automatically syncs your files across all of your devices. This means that any changes you make to a file on one device are automatically reflected on all of your other devices. You’ll never have to worry about having different versions of the same file on different devices.
- Collaboration:iCloud Drive makes it easy to collaborate on files with others. You can share files with others and give them permission to edit or view them. This is a great way to work on projects with colleagues or friends.
- File Backup:iCloud Drive automatically backs up your files, so you never have to worry about losing them. If you accidentally delete a file or your Mac’s hard drive fails, you can easily restore your files from iCloud Drive.
iCloud Drive Storage Limitations
- Storage Capacity:iCloud Drive offers a limited amount of free storage space, which is 5GB. If you need more storage space, you can purchase additional storage for a monthly fee. Apple offers several different storage plans, ranging from 50GB to 2TB.
- Pricing Tiers:Apple’s pricing for iCloud storage is as follows:
- 50GB:$0.99/month
- 200GB:$2.99/month
- 2TB:$9.99/month
Identifying Files to Move to iCloud Drive: How To Use ICloud Drive To Free Up Storage On Your Mac

Now that you understand what iCloud Drive is and how it works, let’s identify the files on your Mac that are taking up the most space. By strategically moving these files to iCloud Drive, you can free up valuable storage on your Mac and keep your data accessible across all your devices.
Identifying Large Files
Finding files that are taking up a lot of space on your Mac is crucial to freeing up storage. Here’s how to locate those hefty files:
- Open Finderand go to the “Apple Menu” > “About This Mac”.
- Click on the “Storage”tab. You’ll see a breakdown of your Mac’s storage usage.
- Click on “Manage”to view more detailed storage information.
- In the “Storage”window, you’ll see a list of categories like “Applications,” “Documents,” “Photos,” “Music,” “Movies,”and “Other.”
- Click on any of these categories to see a more detailed breakdown of files within that category.
- If you find a category with a significant amount of storage used, you can click on it to see a list of files within that category.
Criteria for Selecting Files
Once you’ve identified files that are taking up a lot of space, you need to decide which ones are good candidates for moving to iCloud Drive. Consider these factors:
- File Size:Large files, like videos, photos, and documents, are prime candidates for iCloud Drive. Moving them to iCloud Drive can significantly free up space on your Mac.
- Access Frequency:Files that you don’t access frequently are good candidates for iCloud Drive. Since you can access these files from any device with an internet connection, it’s not essential to keep them on your Mac.
- Importance:If a file is critical to your work or personal life, consider backing it up to iCloud Drive, in addition to keeping it on your Mac. This ensures you have a backup copy in case something happens to your Mac.
Organizing Your Files
To make the decision process easier, consider creating a simple table to organize your files. This will help you quickly identify which files to move to iCloud Drive:
| File Type | Size | Access Frequency | Importance |
|---|---|---|---|
| Photos | 10GB | Occasionally | High |
| Videos | 5GB | Rarely | Medium |
| Documents | 2GB | Frequently | High |
| Music | 1GB | Occasionally | Low |
Moving Files to iCloud Drive
Now that you know what iCloud Drive is and have identified the files you want to move, let’s get those files into iCloud Drive! This will free up space on your Mac and make your files accessible from any of your Apple devices.
Using the Finder to Move Files
The Finder is the primary way to manage files on your Mac. To move files to iCloud Drive, simply drag and drop them into the iCloud Drive folder.
- Open the Finder and navigate to the iCloud Drive folder. You’ll find it in the sidebar under “Favorites” or by clicking “Go” in the menu bar and selecting “iCloud Drive.”
- Open the folder containing the files you want to move.
- Select the files you want to move by clicking them while holding down the “Command” key.
- Drag and drop the selected files into the iCloud Drive folder.
Saving New Files Directly to iCloud Drive
You can also save new files directly to iCloud Drive. This is a great way to ensure that your new files are automatically backed up and accessible on all your devices.
- When saving a new file, select “iCloud Drive” from the “Save As” dialog box.
- You can also choose a specific folder within iCloud Drive to save your file.
Managing the iCloud Drive Folder Structure
Organizing your iCloud Drive folder structure is essential for keeping your files organized and easily accessible.
- Create folders within iCloud Drive to categorize your files. This makes it easier to find specific files later.
- Use descriptive folder names. This helps you quickly identify the contents of each folder.
- Consider using a hierarchical folder structure for large amounts of files. For example, you might have a “Documents” folder with subfolders for different types of documents.
Managing iCloud Drive Storage
Now that you’ve moved some files to iCloud Drive, you’ll want to keep an eye on how much storage space you’re using. You can also take steps to optimize your iCloud Drive storage and make sure you’re not wasting any space.
Checking Available iCloud Drive Storage, How to use iCloud Drive to free up storage on your Mac
To check your available iCloud Drive storage, you can follow these steps:
- Open the Apple Menuin the top-left corner of your screen.
- Select System Settings.
- Click on your Apple IDat the top of the window.
- Select iCloud.
- You’ll see a summary of your iCloud Drive storage usage, including the amount of storage you’ve used and how much is still available.
Optimizing iCloud Drive Storage
Here are some tips for optimizing your iCloud Drive storage:
- Delete unnecessary files:Regularly review your iCloud Drive and delete any files you no longer need. You can use the “Recently Added”and “Recently Deleted”folders to easily find files to remove.
- Reduce file sizes:If you have large files, consider reducing their size using compression tools like “ZIP”or “RAR”. This can significantly reduce the amount of storage space they occupy.
- Use compression tools:Compress large files using tools like “ZIP”or “RAR”to reduce their size and free up storage space. This is especially useful for files like images and videos, which can often be compressed without noticeable quality loss.
- Store files locally:If you don’t need to access a file frequently, consider storing it locally on your Mac instead of in iCloud Drive. This can help free up space in your iCloud Drive.
iCloud Drive Storage Plans
Apple offers various iCloud Drive storage plans to accommodate different needs. Here’s a comparison of the plans and their costs:
| Plan | Storage Space | Monthly Cost | Yearly Cost |
|---|---|---|---|
| 50 GB | 50 GB | $0.99 | $11.88 |
| 200 GB | 200 GB | $2.99 | $35.88 |
| 2 TB | 2 TB | $9.99 | $119.88 |
Accessing Files from iCloud Drive
You’ve moved your files to iCloud Drive, and now it’s time to access them from your various devices. iCloud Drive allows you to seamlessly access your files from anywhere, ensuring you always have the most up-to-date versions.
Accessing Files from Different Devices
Accessing your files stored in iCloud Drive from different devices is a straightforward process.
- Mac:Open the Finder, and you’ll see “iCloud Drive” in the sidebar. Click on it to access your files.
- iPhone/iPad:Open the Files app, and you’ll find “iCloud Drive” as a location to browse your files.
- Windows PC:Download the iCloud for Windows app, and it will sync your iCloud Drive files to your computer.
You can then access them through the iCloud Drive folder on your computer.
- Web Browser:Visit iCloud.com and sign in with your Apple ID. You can then access your iCloud Drive files from any web browser.
Syncing Files Across Devices
iCloud Drive automatically syncs your files across all your devices. This means that any changes you make to a file on one device will be reflected on all your other devices.
So, you’re trying to free up some space on your Mac? Using iCloud Drive is a great way to do that, especially if you’re a big fan of Apple’s ecosystem. But if you’re looking for a more robust cloud storage solution with native Apple silicon support, you might want to check out the Dropbox beta.
How to get the Dropbox beta with full Apple silicon support Once you’ve got your Dropbox setup, you can start moving files over to the cloud, freeing up valuable space on your Mac. It’s a win-win situation!
- Automatic Sync:iCloud Drive handles the syncing process in the background, so you don’t have to worry about manually transferring files.
- Real-Time Updates:Changes you make to a file are typically reflected on other devices within seconds.
- Conflict Resolution:If you make changes to a file on multiple devices simultaneously, iCloud Drive will attempt to merge the changes and resolve any conflicts.
Accessing Files Directly from iCloud Drive vs. Downloading Locally
Accessing files directly from iCloud Drive has its advantages and disadvantages compared to downloading them locally.
- Advantages of Accessing Directly:
- Saves Storage Space:You don’t need to download the entire file to your device, saving valuable storage space.
- Always Up-to-Date:You’re always working with the latest version of the file.
- Accessible from Any Device:You can access your files from any device with an internet connection.
- Disadvantages of Accessing Directly:
- Requires Internet Connection:You need a stable internet connection to access files directly from iCloud Drive.
- May Be Slower:Opening files directly from iCloud Drive can be slower than opening files stored locally.
- Limited Offline Access:You can’t access files offline unless you’ve downloaded them locally.
Troubleshooting iCloud Drive Issues
While iCloud Drive is generally a reliable way to store and access your files, you may occasionally encounter issues. This section will cover some common problems and their solutions, helping you keep your files synchronized and accessible.
Common iCloud Drive Issues and Solutions
Here’s a table summarizing common iCloud Drive issues and their solutions:
| Issue | Solution | Additional Information |
|---|---|---|
| Files not syncing properly |
1. Check your internet connection Ensure you have a stable and active internet connection. If you’re running out of space on your Mac, iCloud Drive is a lifesaver. It lets you store files in the cloud, freeing up valuable space on your hard drive. Once you’ve cleared some space, you can check out How to install the iOS 17 Developer Beta to try out the latest features. Then, you can easily access those files from your iPhone, iPad, or even your Mac using iCloud Drive. 2. Restart your devices Restart your Mac and any other devices using iCloud Drive. 3. Sign out and sign back in Sign out of iCloud on all devices and then sign back in. 4. Check iCloud Drive settings Verify that iCloud Drive is enabled and configured correctly on all devices. 5. Disable and re-enable iCloud Drive Temporarily disable iCloud Drive on your Mac, then re-enable it. 6. Check for updates Update macOS and any other relevant apps to the latest versions. 7. Contact Apple Support If the issue persists, contact Apple Support for further assistance. |
If files are not syncing properly, it could be due to network issues, device conflicts, or iCloud Drive settings. Restarting devices and signing out and back in can often resolve these issues. If the issue persists, it may be necessary to disable and re-enable iCloud Drive or contact Apple Support. |
| Running out of iCloud storage |
1. Upgrade your iCloud storage plan You can purchase additional iCloud storage space if you need more room for your files. 2. Manage your iCloud storage Delete unnecessary files, videos, and other data to free up space. 3. Use alternative storage solutions Consider using external hard drives, cloud storage services, or other methods to store your files if you’re running out of iCloud space. |
You can manage your iCloud storage by accessing the “Storage” section in your Apple ID settings. Apple offers various storage plans, starting with 50 GB for a small fee. If you have a large amount of data, consider using alternative storage solutions. |
| Unable to access files from iCloud Drive |
1. Check your internet connection Ensure you have a stable and active internet connection. 2. Restart your Mac Restart your Mac to refresh the connection to iCloud Drive. 3. Sign out and sign back in Sign out of iCloud on your Mac and then sign back in. 4. Check iCloud Drive settings Verify that iCloud Drive is enabled and configured correctly on your Mac. 5. Check for updates Update macOS and any other relevant apps to the latest versions. 6. Contact Apple Support If the issue persists, contact Apple Support for further assistance. |
If you’re unable to access files from iCloud Drive, it could be due to network issues, device conflicts, or iCloud Drive settings. Restarting your Mac and signing out and back in can often resolve these issues. If the issue persists, it may be necessary to check your iCloud Drive settings or contact Apple Support. |
Alternatives to iCloud Drive
While iCloud Drive is a great option for Apple users, it’s not the only cloud storage service available. If you’re looking for alternatives, there are plenty of other services to choose from, each with its own set of advantages and disadvantages.
Comparison of Cloud Storage Services
When choosing a cloud storage service, it’s important to consider your needs and preferences. Here’s a comparison of iCloud Drive, Google Drive, and Dropbox:
| Feature | iCloud Drive | Google Drive | Dropbox |
|---|---|---|---|
| Storage Capacity | 5GB free, up to 2TB with paid plans | 15GB free, up to 100TB with paid plans | 2GB free, up to 2TB with paid plans |
| Pricing | $0.99/month for 50GB, $2.99/month for 200GB, $9.99/month for 2TB | $1.99/month for 100GB, $9.99/month for 2TB, $19.99/month for 10TB | $11.99/month for 2TB, $19.99/month for 3TB, $29.99/month for 5TB |
| Features | Seamless integration with Apple devices, collaboration features, time machine backups | Extensive collaboration features, Google Workspace integration, powerful search functionality | File syncing across devices, version history, collaboration features |
| Integration with Other Platforms | Strong integration with Apple devices, limited integration with other platforms | Strong integration with Google products, good integration with other platforms | Good integration with other platforms, including Windows and Linux |
Advantages and Disadvantages of Each Service
iCloud Drive
- Advantages:Seamless integration with Apple devices, user-friendly interface, time machine backups, good collaboration features.
- Disadvantages:Limited storage capacity with free plan, limited integration with non-Apple devices, can be expensive for large storage needs.
Google Drive
- Advantages:Generous free storage, powerful search functionality, extensive collaboration features, strong integration with Google Workspace.
- Disadvantages:Can be overwhelming for new users, not as tightly integrated with Apple devices as iCloud Drive.
Dropbox
- Advantages:Good file syncing across devices, version history, strong collaboration features, good integration with other platforms, including Windows and Linux.
- Disadvantages:Limited free storage, can be expensive for large storage needs, not as integrated with Apple devices as iCloud Drive.
Optimizing Mac Storage Beyond iCloud Drive
While iCloud Drive is a great tool for freeing up storage on your Mac, it’s not the only solution. There are several other ways to optimize your Mac’s storage space and keep it running smoothly.
Removing Unnecessary Applications
Uninstalled applications often leave behind residual files that take up space on your hard drive. Regularly removing these unnecessary applications can help reclaim significant storage.
- Identify and Uninstall Unused Applications:Go to your Applications folder and identify any applications you no longer use. You can also use the “Applications” section of the “About This Mac” window to see which apps take up the most space.
- Use the Uninstaller Feature:Most applications have an uninstaller feature that removes all associated files. You can access this feature from the application’s folder or by right-clicking on the application icon in the Applications folder and selecting “Move to Trash.”
- Empty the Trash:After uninstalling an application, be sure to empty the Trash to permanently remove the files.
Emptying the Trash
The Trash is a temporary holding place for deleted files. It’s essential to empty the Trash regularly to reclaim the storage space occupied by these files.
- Access the Trash:You can find the Trash icon in the Dock. Click on it to view the contents.
- Empty the Trash:Right-click on the Trash icon and select “Empty Trash.” Alternatively, you can select “Empty Trash” from the “Finder” menu.
Optimizing System Files
Over time, your Mac’s system files can become fragmented and inefficient, leading to slower performance and reduced storage space. Optimizing these files can improve your Mac’s performance and free up storage.
- Run Disk Utility:Disk Utility is a built-in tool that can help you optimize your Mac’s hard drive. You can access Disk Utility by opening the “Applications” folder, then the “Utilities” folder, and then clicking on “Disk Utility.”
- Run First Aid:Select your Mac’s hard drive in the sidebar, then click on the “First Aid” tab. This will scan your hard drive for errors and attempt to repair them.
- Optimize Storage:Disk Utility can also help you optimize your Mac’s storage by identifying and removing unnecessary files. Click on the “Optimize” tab to run this feature.
Disk Cleanup Tools and Utilities
Several third-party disk cleanup tools and utilities can help you identify and remove large or duplicate files that are taking up valuable storage space. These tools often offer advanced features like file analysis, duplicate detection, and automatic cleanup.
- Choose a Reputable Tool:When selecting a disk cleanup tool, ensure it’s from a reputable developer and has positive reviews. Avoid free tools that may contain malware or unwanted software.
- Run a Scan:Most disk cleanup tools offer a scan feature that analyzes your hard drive and identifies files that can be safely deleted. Review the results carefully before proceeding with the cleanup.
- Use with Caution:Be cautious when using disk cleanup tools, as they can sometimes delete important files. Always back up your Mac before using these tools.
Step-by-Step Guide to Using Disk Cleanup Tools
- Install a Disk Cleanup Tool:Download and install a reputable disk cleanup tool from a trusted source.
- Run a Scan:Launch the tool and run a scan of your hard drive. This will identify files that can be safely deleted.
- Review the Results:Carefully review the results of the scan. Ensure you understand which files will be deleted before proceeding.
- Select Files for Cleanup:Select the files you want to delete. You can typically filter the results by file type, size, and other criteria.
- Confirm the Cleanup:Confirm the cleanup operation before proceeding. The tool will then delete the selected files from your hard drive.
Security Considerations for iCloud Drive
Storing your data in the cloud is convenient, but it’s important to understand the security measures in place to protect your information. Apple has implemented robust security features to safeguard your data stored in iCloud Drive, but it’s still essential to take proactive steps to protect your account and data.
Importance of Two-Factor Authentication
Two-factor authentication (2FA) is a crucial security measure that adds an extra layer of protection to your iCloud account. When you enable 2FA, you’ll be required to enter a unique code, typically sent to your phone, in addition to your password when you log in to your iCloud account from a new device or browser.
Need to free up space on your Mac? iCloud Drive is a lifesaver! Move your documents, photos, and other files to the cloud to clear up your hard drive. If you’re also having trouble scheduling Dark Mode or Night Shift on your iPhone or iPad, check out this helpful article Can’t schedule Dark Mode or Night Shift on iPhone and iPad?
Here’s a fix for a quick fix. Once you’ve got your devices running smoothly, you can focus on maximizing your iCloud Drive storage for all your files!
- This extra step significantly reduces the risk of unauthorized access to your iCloud Drive, even if someone has your password.
- Enabling 2FA is highly recommended for all iCloud users, especially those who store sensitive data in iCloud Drive.
Future of iCloud Drive
iCloud Drive has evolved significantly since its inception, and its future looks promising, with Apple continuously innovating and expanding its capabilities. The future of iCloud Drive holds exciting possibilities, driven by Apple’s ongoing commitment to enhance cloud storage solutions.
Potential Enhancements and Innovations
The future of iCloud Drive is likely to be marked by a series of advancements aimed at improving user experience and expanding its capabilities.
- Increased Storage Capacity:Apple is likely to continue increasing the storage capacity offered with iCloud Drive subscriptions. This is crucial as users increasingly rely on cloud storage for their data, including photos, videos, documents, and more. For example, Apple recently increased the maximum storage capacity to 2TB, demonstrating their commitment to meeting the growing storage demands of users.
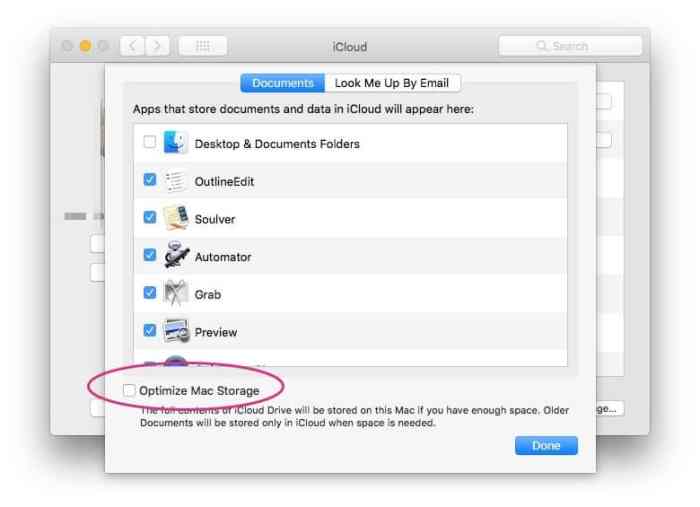
- Improved Performance:Apple is constantly working on optimizing the performance of iCloud Drive, aiming to ensure faster syncing and access to files across devices. This includes leveraging advancements in network technologies and server infrastructure to minimize latency and enhance responsiveness. For instance, the introduction of iCloud Drive’s “Optimized Storage” feature allows users to store their files locally but access them from iCloud Drive, optimizing storage space and enhancing performance.
- New Features:Apple is expected to introduce new features to iCloud Drive, expanding its functionality and making it more versatile. This could include features such as advanced collaboration tools, enhanced file organization and search capabilities, and integration with other Apple services. For example, the introduction of iCloud Drive’s “Shared with You” feature allows users to easily share files and collaborate with others, highlighting Apple’s commitment to improving collaboration features.
Impact on Cloud Storage and File Management
These developments will have a significant impact on the future of cloud storage and its role in managing digital files.
- Increased Adoption:As iCloud Drive becomes more feature-rich and offers greater storage capacity, it is likely to see increased adoption by users. This trend is already evident, with Apple reporting a significant increase in iCloud Drive usage in recent years.
- Shift to Cloud-Based Workflows:With the growing accessibility and reliability of cloud storage, more users are likely to adopt cloud-based workflows for their work and personal tasks. This means relying on iCloud Drive for file storage, collaboration, and data access across devices.
- Integration with Other Services:As iCloud Drive integrates more seamlessly with other Apple services, it will become a central hub for managing digital content. This will simplify workflows and make it easier for users to access and manage their files across different platforms.
Timeline of iCloud Drive Evolution
iCloud Drive has undergone a series of significant milestones and innovations since its introduction in 2011.
- 2011:iCloud Drive is introduced as a feature of iCloud, offering basic file storage and syncing capabilities.
- 2014:iCloud Drive is redesigned with a new interface and features, including folder organization and the ability to access files offline.
- 2016:iCloud Drive introduces “Optimized Storage,” a feature that allows users to store files locally but access them from iCloud Drive, optimizing storage space.
- 2017:iCloud Drive introduces “Shared with You,” a feature that allows users to easily share files and collaborate with others.
- 2020:Apple increases the maximum iCloud Drive storage capacity to 2TB, demonstrating their commitment to meeting the growing storage demands of users.
Example Scenarios for Using iCloud Drive

iCloud Drive offers a convenient way to free up storage on your Mac by moving files to the cloud. Let’s explore some real-world scenarios where using iCloud Drive can be beneficial.
Using iCloud Drive for Large Files and Projects
Moving large files and projects to iCloud Drive is a great way to free up space on your Mac. For example, if you’re a graphic designer working on a high-resolution image project, storing the files in iCloud Drive can save valuable storage space on your Mac’s hard drive.
This approach also ensures you can access the project files from any of your Apple devices, including your iPhone, iPad, or another Mac.
Final Summary

Using iCloud Drive to free up storage on your Mac is a smart move. Not only will you have more space for your files and apps, but you’ll also be able to access your files from anywhere. And, if you’re worried about security, Apple has you covered with their robust security measures.
So, what are you waiting for? Give it a try and see how easy it is to manage your files and free up space on your Mac!
Key Questions Answered
How much iCloud Drive storage do I get for free?
Apple gives you 5GB of free iCloud Drive storage. You can upgrade to a larger plan if you need more space.
What happens if I run out of iCloud Drive storage?
You won’t be able to upload new files to iCloud Drive until you free up some space or upgrade your storage plan.
Is my data secure in iCloud Drive?
Apple uses end-to-end encryption to protect your data stored in iCloud Drive. This means that only you have the keys to access your data.
Can I use iCloud Drive with a Windows PC?
Yes, you can use iCloud Drive on a Windows PC by downloading the iCloud for Windows app.