How to Test Your Webcam and Microphone Before a Meeting (Windows): Ensuring Smooth Virtual Interactions
How to Test Your Webcam and Microphone Before a Meeting (Windows): Ensuring Smooth Virtual Interactions. In the era of virtual meetings, ensuring your webcam and microphone are functioning flawlessly is crucial. This guide will take you through a comprehensive process to test and optimize your setup, empowering you to confidently participate in online gatherings.
Follow these simple steps to eliminate technical glitches and enhance your virtual meeting experience. Whether you’re a seasoned pro or a newcomer to the world of video conferencing, this article will equip you with the knowledge and tools to make a lasting impression.
Testing Your Webcam
Before a meeting, it’s crucial to ensure your webcam is working correctly. Here’s a step-by-step guide to test your webcam on Windows:
To access your webcam settings, go to the Start menu, search for “Camera,” and click on the Camera app. Alternatively, you can press the Windows key + S to open the search bar and type “Camera.”
Camera Settings
- Brightness and Contrast:Adjust these settings to improve the lighting and visibility of your image.
- Resolution:Choose a higher resolution for a sharper image, but keep in mind that this may increase the file size and bandwidth requirements.
- Frame Rate:Set a higher frame rate for smoother video, but be aware that it may also increase the system resources required.
Testing Your Microphone

Ensuring your microphone is working correctly before a meeting is crucial. Here’s a step-by-step guide to test it:
Accessing Microphone Settings:
Before your meeting, testing your webcam and microphone on Windows ensures a seamless experience. However, if you encounter the “Liquid Detected in USB-C Connector” alert on your iPhone, check out this guide: How to Fix the “Liquid Detected in USB-C Connector” Alert on Your iPhone . Once your iPhone is fixed, return to testing your webcam and microphone on Windows to ensure you’re ready for your meeting.
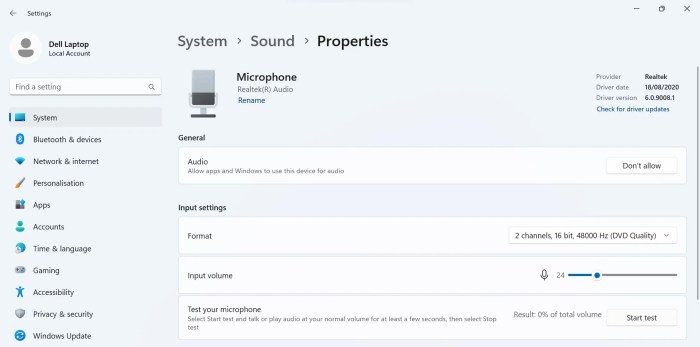
- Go to “Settings” on your Windows computer.
- Click on “System” and then select “Sound” from the left menu.
- Under the “Input” tab, you’ll find a list of microphones connected to your system.
Microphone Performance Optimization:
- Input Volume:Adjust the slider under “Input volume” to increase or decrease the microphone’s sensitivity.
- Noise Suppression:Enable “Noise suppression” to reduce background noise and improve audio quality.
- Echo Cancellation:Activate “Echo cancellation” to prevent audio feedback if using speakers or headphones.
- Microphone Enhancements:Enable “Microphone enhancements” to apply additional processing, such as bass boost or clarity improvement.
Once you’ve adjusted the settings, click on “Test your microphone” to check if it’s working properly. You should be able to hear your voice clearly through the speakers or headphones.
Troubleshooting Webcam Issues
Experiencing difficulties with your webcam? Don’t fret! Here’s a comprehensive guide to identify and resolve common webcam issues.
Webcam issues can arise due to various factors, such as outdated drivers, software conflicts, or hardware problems. Let’s delve into the troubleshooting process to get your webcam up and running again.
Updating Webcam Drivers
Outdated webcam drivers can hinder its proper functioning. Here’s how to update your webcam drivers:
- Search for “Device Manager” in the Windows search bar and open it.
- Expand the “Imaging devices” category.
- Right-click on your webcam and select “Update driver.”
- Follow the on-screen instructions to complete the update process.
Troubleshooting Microphone Issues: How To Test Your Webcam And Microphone Before A Meeting (Windows)
Microphones are essential for clear communication during online meetings. However, they can sometimes malfunction due to various reasons. Here’s a guide to identify common microphone issues and provide troubleshooting tips to resolve them:
Identifying Common Microphone Issues
Common microphone issues include:
- No audio input
- Distorted or muffled audio
- Background noise or interference
- Microphone not detected by the computer
Troubleshooting Tips
Check Hardware Connections
Ensure that the microphone is properly plugged into the correct audio port on your computer. Inspect the cable for any damage or loose connections. Try plugging the microphone into a different port to eliminate any issues with the port itself.
Adjust Microphone Settings
Open the sound settings on your computer and check the microphone’s volume and input level. Make sure the microphone is enabled and not muted. You can also try adjusting the microphone’s gain or sensitivity to improve audio quality.
Test the Microphone
Use a microphone testing tool or record a short audio clip to test the microphone’s functionality. This will help you determine if the issue is with the microphone itself or with the computer’s audio settings.
Update Microphone Drivers
Outdated microphone drivers can cause compatibility issues. Visit the manufacturer’s website to download and install the latest drivers for your microphone. This can often resolve issues related to audio quality or microphone detection.
If you’re worried about your webcam or microphone not working properly before an important meeting, you can easily test them using Windows’ built-in tools. To do this, go to Settings > System > Sound and select your webcam and microphone from the drop-down menus.
Then, click on the “Test” button to see if they’re working correctly. If you’re having trouble with your webcam or microphone, you can try troubleshooting them by following the steps in this guide: How to Back Up WhatsApp Chats on an iPhone (With or Without iCloud) . Once you’ve fixed the issue, you can go back to Settings > System > Sound to test your webcam and microphone again.
Restart the Computer
Sometimes, a simple restart of your computer can resolve microphone issues. This will clear any temporary glitches or conflicts that may be affecting the microphone’s functionality.
Check for Background Noise
Identify and eliminate any sources of background noise, such as fans, air conditioners, or other people talking. Use a noise-canceling microphone or position the microphone away from noise sources to improve audio quality.
Disable Other Audio Devices
If you have multiple audio devices connected to your computer, disable any that are not being used. This can prevent audio interference or conflicts that may affect the microphone’s performance.
Contact Support
If the troubleshooting tips above do not resolve the microphone issue, contact the microphone manufacturer or your computer’s technical support team for further assistance. They can provide additional troubleshooting steps or arrange for repairs if necessary.
Tips for Optimizing Webcam and Microphone Performance

Optimizing your webcam and microphone performance is crucial for seamless video conferencing. Here are some tips to enhance your video and audio quality:
Improving Webcam Image Quality
Ensure your webcam lens is clean and free of smudges or dust. Proper lighting is key; avoid backlighting or overhead lighting that can create shadows or glare. Choose a well-lit area with natural light or use a ring light for optimal illumination.
Before your important meeting, make sure your webcam and microphone are working properly with this simple Windows guide. If you’re experiencing issues with YouTube audio on your Smart TV, don’t miss our troubleshooting tips in How to Fix YouTube Audio Not Playing or Syncing on Your Smart TV . Remember, before your meeting, always test your webcam and microphone to avoid any last-minute technical difficulties.
Adjust the webcam’s settings to optimize brightness, contrast, and saturation for a clear and vibrant image.
Enhancing Microphone Audio Quality
Position your microphone close to your mouth to minimize background noise and improve voice clarity. Use a noise-canceling microphone or headphones to further reduce unwanted sounds. Test your microphone in a quiet environment to ensure it captures your voice accurately and without distortion.
Adjust the microphone’s settings to optimize volume and sensitivity for optimal audio levels.
Importance of Proper Lighting and Background
Adequate lighting enhances not only your webcam image but also your overall appearance. Avoid harsh lighting that can create unflattering shadows. Choose a well-lit area or use artificial lighting to illuminate your face evenly. Pay attention to your background; ensure it’s tidy and professional, or use a virtual background to create a more polished look.
Using Third-Party Tools for Testing
Third-party tools offer advanced features and customization options that can help you diagnose and resolve webcam and microphone issues more effectively.
Some recommended third-party testing tools include:
- Webcam Test: A comprehensive tool that tests your webcam’s resolution, frame rate, and color accuracy.
- Microphone Test: A dedicated tool for testing your microphone’s input level, noise cancellation, and frequency response.
- SoundCheck: A versatile tool that can test both your webcam and microphone, providing detailed analysis and troubleshooting suggestions.
To use these tools, simply visit their websites, launch the test, and follow the on-screen instructions. They will guide you through a series of tests to identify any potential issues and provide recommendations for resolving them.
Best Practices for Virtual Meetings
Participating in virtual meetings effectively requires preparation and adherence to specific guidelines. These guidelines ensure a productive and professional experience for all participants.
Here are some best practices to follow when using your webcam and microphone during virtual meetings:
Effective Communication
- Speak clearly and concisely:Ensure your speech is well-articulated and at a moderate pace, allowing others to comprehend your message easily.
- Be mindful of your tone:Your tone of voice conveys emotions and intentions. Maintain a professional and respectful tone throughout the meeting.
- Avoid interrupting others:Allow others to finish speaking before you interject. Use the “raise hand” feature or other designated methods to indicate your desire to speak.
- Use active listening:Demonstrate attentiveness by nodding, maintaining eye contact (looking at the camera), and asking clarifying questions when necessary.
Etiquette and Professionalism
- Dress appropriately:Choose attire that is appropriate for a professional setting, even if you are working from home.
- Maintain a professional background:Ensure your surroundings are tidy and free from distractions. Use a virtual background if necessary.
- Be punctual:Join the meeting on time and avoid disrupting the flow by entering late.
- Mute your microphone when not speaking:This minimizes background noise and interruptions for other participants.
Collaboration and Engagement
- Use the chat feature:Utilize the chat function to share links, ask questions, or provide additional information without interrupting the speaker.
- Participate actively:Share your insights, ask questions, and engage with other participants to foster a collaborative environment.
- Respect diverse perspectives:Value the opinions and contributions of all participants, even if you do not agree with them.
Troubleshooting Common Virtual Meeting Issues
Virtual meetings have become a norm in the modern workplace. However, technical difficulties can arise during these meetings, affecting the quality of communication and collaboration. Understanding and troubleshooting common virtual meeting issues related to webcam and microphone performance is crucial to ensure seamless and productive meetings.
Common issues include poor video quality, audio distortion, connection problems, and audio/video glitches. By identifying the root cause of these issues and implementing effective troubleshooting tips, users can resolve them promptly and minimize disruptions during virtual meetings.
Connection Problems, How to Test Your Webcam and Microphone Before a Meeting (Windows)
- Check your internet connection. Ensure you have a stable and reliable internet connection to support video and audio transmission.
- Restart your router and modem. Sometimes, a simple restart can resolve connectivity issues.
- Check your firewall settings. Make sure your firewall is not blocking the video conferencing application.
Audio/Video Glitches
- Update your webcam and microphone drivers. Outdated drivers can cause compatibility issues and performance problems.
- Adjust your webcam and microphone settings. Ensure the settings are optimized for your environment and meeting requirements.
- Check for background noise and interference. Minimize background noise and eliminate any potential sources of interference that may affect audio quality.
Additional Resources
Beyond the methods described in this guide, there are several additional resources available to assist you in testing and troubleshooting your webcam and microphone.
Online Forums and Support Communities
- Reddit: Subreddits like /r/webcams and /r/microphones offer a wealth of information and support from fellow users.
- Tom’s Hardware: The Tom’s Hardware forums have dedicated sections for webcam and microphone discussions.
- AVS Forum: This online community provides a comprehensive forum for all aspects of audio and video technology, including webcams and microphones.
Professional Technical Support
If you encounter persistent issues with your webcam or microphone, you may consider seeking professional technical support. Many computer manufacturers and webcam/microphone vendors offer paid support services to assist with troubleshooting and repairs.
Conclusion
Before a virtual meeting, testing your webcam and microphone is crucial to ensure a seamless experience. By following the tips and advice Artikeld in this article, you can minimize technical difficulties and present yourself professionally during your video calls.
Remember to:
- Test your webcam and microphone before every meeting.
- Troubleshoot any issues promptly.
- Optimize your webcam and microphone performance for the best quality.
- Consider using third-party tools for advanced testing and optimization.
- Follow best practices for virtual meetings to enhance your communication and collaboration.
Closing Summary

By following the tips and advice Artikeld in this guide, you can ensure that your webcam and microphone are ready for action. Remember, testing your setup beforehand can save you from embarrassing technical difficulties and allow you to fully engage in your virtual meetings.
So, take a few minutes to test your equipment and ensure a seamless and productive virtual meeting experience.
Clarifying Questions
What if my webcam is not detected?
Check if your webcam is properly connected and that the drivers are up to date. If the issue persists, try restarting your computer or using a different USB port.
How can I improve the quality of my microphone audio?
Use a high-quality microphone, position it close to your mouth, and adjust the settings to reduce background noise and enhance clarity.
What should I do if I’m experiencing audio or video glitches during a meeting?
Check your internet connection, close any unnecessary programs, and ensure that your webcam and microphone are set as the default devices.