How To Rock Out With A Garageband Jam Session
How to rock out with a GarageBand Jam Session? It’s easier than you think! GarageBand is a powerful, user-friendly music creation tool that allows anyone to unleash their inner rockstar. Whether you’re a seasoned musician or a complete newbie, GarageBand offers a wealth of features to help you build, record, and share your musical ideas.
This guide will walk you through the entire process, from setting up your first project to mastering your final track. We’ll cover everything from choosing instruments to adding effects, and even offer tips on how to get your music out there for the world to hear.
So, grab your headphones, crank up the volume, and let’s get jamming!
Getting Started with GarageBand
GarageBand is a user-friendly digital audio workstation (DAW) that’s perfect for musicians of all skill levels. Whether you’re a seasoned pro or just starting out, GarageBand offers a wide range of tools to help you create, record, and produce your music.
This section will guide you through the basics of using GarageBand, including how to create a new project and import audio files.
The GarageBand Interface
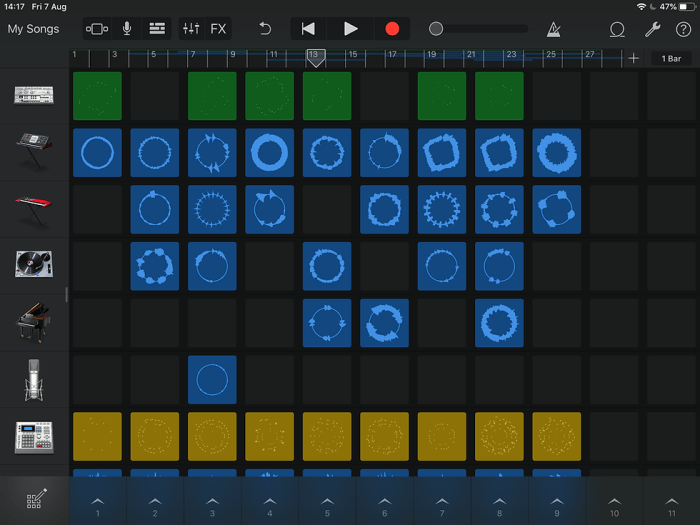
The GarageBand interface is designed to be intuitive and easy to navigate. The main window is divided into several key areas:
- Track List:This area displays all the tracks in your project. Each track represents a different instrument, audio recording, or MIDI region.
- Piano Roll:This view allows you to edit MIDI data, which is used to control the notes played by virtual instruments.
- Timeline:The timeline displays the arrangement of your project, showing the different sections of music and their duration.
- Control Bar:This bar contains various controls for playback, recording, and editing.
Creating a New Project
Starting a new project in GarageBand is simple:
- Open GarageBand:Launch GarageBand on your Mac or iOS device.
- Select a Project Type:Choose the type of project you want to create. Options include:
- Empty Project:A blank canvas to start from scratch.
- Song:A template with a basic drum track and a few instruments to get you started.
- Podcast:A project designed for recording and editing podcasts.
- Choose a Template:If you’ve selected “Song” or “Podcast”, you’ll be presented with a variety of templates to choose from. Select one that best suits your needs.
- Name Your Project:Give your project a descriptive name.
- Start Creating:Your new project is ready to go!
Importing and Organizing Audio Files
GarageBand makes it easy to import and organize your audio files:
- Drag and Drop:You can simply drag and drop audio files from your computer’s file system into the GarageBand window.
- File Menu:You can also import audio files using the “File” menu. Select “Import” and then choose the desired audio file.
- Audio Library:GarageBand comes with a library of built-in sounds and loops that you can use in your projects. You can browse the library by genre, instrument, or mood.
- Organize Tracks:Once you’ve imported your audio files, you can organize them into different tracks. This makes it easier to manage your project and edit individual parts of your music.
Building Your Band
GarageBand gives you the tools to create a whole band, even if you’re just one person. You can choose from a wide variety of instruments, create different parts for each instrument, and even add effects to make your music sound amazing.
Available Instruments
GarageBand has a wide range of instruments to choose from, so you can create any kind of music you want. You can use real instruments, like the piano, guitar, bass, and drums, or you can use virtual instruments, like synthesizers, samplers, and loops.
You can even use GarageBand’s built-in instruments, like the Smart Instruments, which are designed to help you play better and sound more professional.
- Real Instruments:GarageBand has a wide selection of real instruments, including the piano, guitar, bass, drums, and vocals. You can use these instruments to create realistic-sounding music.
- Virtual Instruments:GarageBand also offers a variety of virtual instruments, such as synthesizers, samplers, and loops. These instruments can be used to create unique and experimental sounds.
- Smart Instruments:GarageBand’s Smart Instruments are designed to help you play better and sound more professional. They provide features like automatic chord detection, real-time feedback, and customizable settings.
Designing a Band Lineup
When designing a band lineup, consider the style of music you want to create. For example, a rock band might include a lead guitar, rhythm guitar, bass, drums, and vocals. A jazz band might include a piano, saxophone, bass, drums, and vocals.
A good band lineup will have a balance of instruments that complement each other and create a cohesive sound.
Here’s an example of a band lineup:
- Lead Guitar:This instrument provides the melody and solo parts of the song.
- Bass:This instrument provides the low end and rhythmic foundation of the song.
- Drums:This instrument provides the beat and rhythm of the song.
- Vocals:This instrument provides the melody and lyrics of the song.
Adjusting Instrument Sounds and Effects
Once you’ve chosen your instruments, you can adjust their sounds and add effects to make them sound even better.
- Instrument Sounds:You can adjust the sound of your instruments by using the various controls in GarageBand. For example, you can adjust the volume, tone, and pitch of your instruments. You can also use GarageBand’s built-in effects to create unique sounds.
- Effects:GarageBand has a wide variety of effects that you can use to enhance your music. Some common effects include reverb, delay, chorus, and distortion. You can add effects to individual instruments or to the entire song.
Laying Down the Foundation: How To Rock Out With A GarageBand Jam Session
Okay, so you’ve got your instruments ready, and you’re stoked to start jamming. But before you dive into the epic solos and mind-blowing riffs, it’s time to lay down a solid foundation for your song. This is where GarageBand’s tracks come in.Think of tracks like individual lanes on a highway, each dedicated to a specific instrument or sound.
This keeps everything organized and allows you to layer your music without things getting messy.
Creating a Basic Drum Track
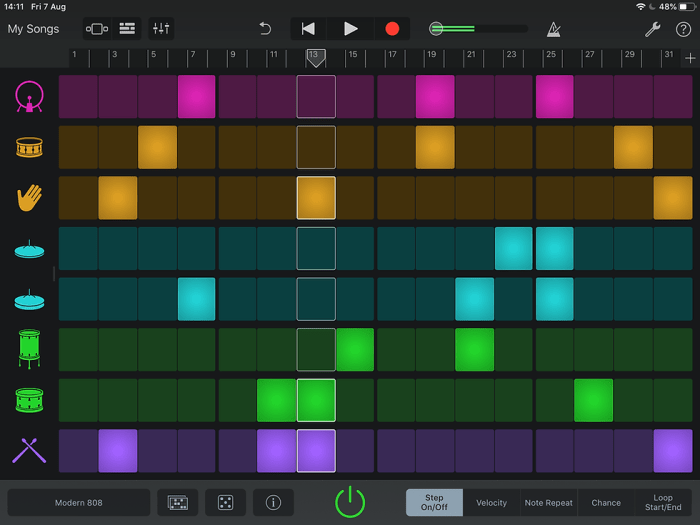
GarageBand makes creating a drum track super easy. You can use the built-in drum loops, which are pre-recorded drum patterns. To create a basic drum track:
- Open GarageBand and select a new project.
- Click on the “Track” button in the top-left corner and choose “Drummer.”
- Browse through the different drum loops and choose one that you like. You can even adjust the tempo and style of the loop to fit your song.
- Drag and drop the drum loop into the track area. You can adjust the length of the loop by dragging the edges.
Organizing a Simple Bass Line
Now that you’ve got your drums locked in, it’s time to add some bass. GarageBand has a virtual bass instrument that you can use to create a simple bass line. To do this:
- Click on the “Track” button again and choose “Bass.”
- You’ll see a virtual bass guitar with different strings. Click on the strings to play notes. You can also use the keyboard to play notes.
- Experiment with different notes and rhythms to create a bass line that complements the drum track.
Adding Melody and Harmony
Okay, so you’ve got your drums and bass laying down a solid groove, and maybe even a cool guitar riff. Now it’s time to add some melody and harmony to give your jam session some real life. This is where things get fun and you can really express your creativity.
Creating Catchy Melodies
The virtual keyboard in GarageBand is your best friend for creating melodies. You can use it to play notes one by one, or you can use the “Smart Instruments” feature to create melodies automatically. If you’re feeling adventurous, you can even use the “Drummer” feature to create a melody based on the rhythm of your drums.
When creating a melody, try to keep these tips in mind:
- Think about the mood you want to create. A happy song might have a bouncy, upbeat melody, while a sad song might have a more somber melody.
- Use a variety of notes. Don’t be afraid to experiment with different intervals and rhythms. You can even use the “Quantize” feature to make your melody sound more polished.
- Keep it simple. A catchy melody is often a simple one. Start with a basic melody and then add embellishments later.
Layering Instruments for a Richer Sound
Layering instruments is a great way to add depth and complexity to your jam session. For example, you could layer a piano track on top of your guitar track, or you could add a synth track to give your song a more electronic feel.
When layering instruments, try to keep these tips in mind:
- Use instruments that complement each other. For example, a piano and a guitar can sound great together, but a piano and a drum machine might not be the best combination.
- Use different panning and volume levels. This will help to create a more spacious and dynamic sound.
- Experiment with different effects. Adding effects like reverb or delay can make your layered instruments sound even more interesting.
Using Chords and Progressions
Chords are groups of notes played together, and they’re the foundation of harmony. A chord progression is a series of chords played in a specific order.
Chords and progressions are the backbone of harmony, giving your music a sense of structure and depth.
- Learn some basic chord progressions. There are many common chord progressions that you can use as a starting point. You can find examples of chord progressions online or in music theory books.
- Experiment with different chords. Don’t be afraid to try out different chords and progressions to see what sounds good to you. You can use the “Chord Track” feature in GarageBand to create chords easily.
- Use the “Smart Chords” feature. This feature allows you to play a chord progression by simply playing the root notes of the chords.
Mastering the Art of Recording
Capturing your music in GarageBand is like capturing a moment in time. A good recording makes all the difference in showcasing your creativity and passion. Let’s dive into the world of recording vocals and live instruments, and discover how to achieve professional-quality audio.
Recording Vocals and Live Instruments
GarageBand provides a straightforward approach to recording vocals and live instruments.
- Choose the Right Microphone:The type of microphone you use depends on what you’re recording. For vocals, a condenser microphone is ideal for capturing a clear and detailed sound. For instruments like guitars or drums, a dynamic microphone is more suitable due to its ability to handle louder volumes.
- Set Up Your Recording Environment:Minimize background noise by finding a quiet space to record. Use acoustic panels or blankets to absorb sound reflections and create a more controlled recording environment.
- Connect Your Microphone:Connect your microphone to your computer’s audio interface or directly to the microphone input on your computer. Ensure the microphone is properly connected and the audio levels are set appropriately.
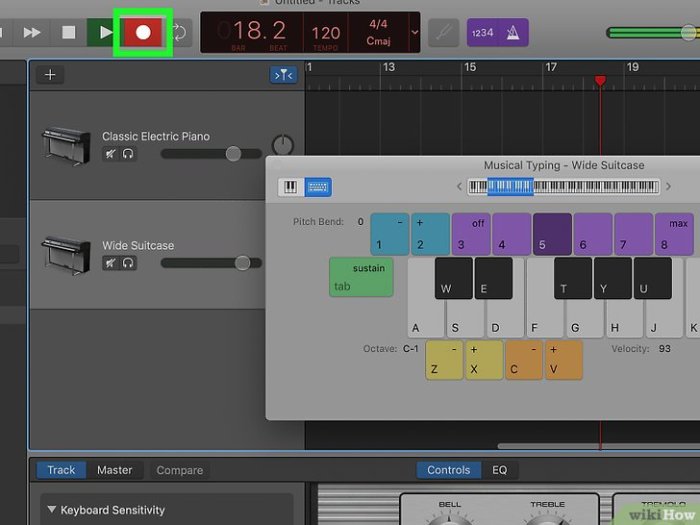
- Record Your Track:Once you’ve set up your microphone and audio interface, you can start recording. GarageBand allows you to record multiple tracks, so you can layer different instruments or vocals.
- Monitor Your Recording:Use headphones to monitor your recording while you’re recording. This allows you to ensure that your audio is clear and free of unwanted noise.
Achieving Clear and Professional Audio
Clear and professional audio is essential for creating a polished and impressive recording.
GarageBand is super chill for jamming out with friends, but if you’re worried about your internet connection getting bogged down, you might wanna check out How to enable and disable iCloud Private Relay in iOS 15 and macOS Monterey.
It’ll help keep your online activity private and secure, so you can focus on rocking out without any lag.
- Proper Microphone Placement:The placement of your microphone can significantly impact the sound of your recording. Experiment with different microphone positions to find the sweet spot that captures the best sound for your instrument or vocals.
- Use Pop Filters:Pop filters are essential for minimizing plosives (those harsh sounds created by pronouncing “b,” “p,” or “t”). They prevent these sounds from being picked up by the microphone, resulting in a cleaner recording.
- Monitor Your Audio Levels:Maintaining proper audio levels is crucial. Avoid clipping, which occurs when the audio signal is too loud and distorts. Use the gain control on your microphone and audio interface to adjust the input level.
- Optimize Room Acoustics:The acoustics of your recording environment can significantly impact the sound of your recording. Use acoustic treatment like foam panels or blankets to absorb unwanted reflections and create a more controlled sound.
Editing and Enhancing Recorded Audio
Editing and enhancing your recordings can transform your raw audio into a polished masterpiece.
- Remove Unwanted Noise:GarageBand offers a variety of tools to remove unwanted noise from your recordings. These tools can help eliminate background noise, clicks, pops, and other imperfections.
- Adjust Volume and Panning:You can adjust the volume and panning of your tracks to create a balanced and immersive sound. This allows you to emphasize certain instruments or vocals and create a more dynamic mix.
- Apply Effects:GarageBand provides a wide range of effects that you can use to enhance your recordings. These effects include reverb, delay, chorus, and more. Experiment with different effects to create a unique sound for your music.
- Use EQ to Shape Your Sound:An equalizer (EQ) allows you to adjust the frequency content of your audio. This can help you remove unwanted frequencies, boost specific frequencies, and create a more balanced and pleasing sound.
- Compress Your Audio:Compression is a powerful tool that can help even out the dynamic range of your audio. It can make your tracks louder and more consistent, while also adding a sense of punch and presence.
Bringing Your Jam Session to Life
You’ve got your instruments, your groove, and your melodies all set. Now it’s time to add that extra touch to make your GarageBand jam session truly shine. Think of this stage as the finishing touches that transform a raw sketch into a vibrant masterpiece.
We’ll explore how to add effects and transitions, use automation to create dynamic changes, and finally, learn the importance of mixing and mastering for a polished sound.
Adding Effects and Transitions
Effects and transitions are your secret weapons for adding depth, dimension, and excitement to your music. Effects like reverb, delay, and chorus can create a sense of space, atmosphere, and movement, while transitions like crossfades and fades can smoothly connect different sections of your song.
- Reverb:Adds a sense of space and depth by simulating reflections of sound waves in a room or hall. It’s like placing your band in a cathedral or a small, intimate club. You can adjust the size and character of the reverb to create different sonic environments.
- Delay:Creates echoes or repetitions of the original sound, adding a sense of movement and texture. It’s like having your band playing in a long hallway with sound bouncing off the walls. You can adjust the delay time and feedback to create different effects, from subtle echoes to shimmering trails.
- Chorus:Creates a thicker, richer sound by adding multiple copies of the original sound with slight variations in pitch and timing. It’s like having multiple singers harmonizing together. You can adjust the depth and width of the chorus to create different levels of richness and fullness.
- Crossfades:A seamless transition between two audio clips where the volume of the first clip gradually decreases while the volume of the second clip gradually increases. This creates a smooth flow between sections of your song.
- Fades:A gradual increase or decrease in volume at the beginning or end of an audio clip. Fades can be used to create a smooth intro or outro, or to emphasize certain sections of your song.
Using Automation to Create Dynamic Changes
Automation allows you to control the parameters of your instruments, effects, and other elements over time. Think of it like a mini-movie director for your music, adding drama and movement to your track. You can automate volume, panning, effects, and more.
“Automation is like having a robotic sound engineer adjusting your track in real time.”
- Volume Automation:Allows you to gradually increase or decrease the volume of your instruments or effects over time, creating a sense of build-up or release. This can be used to create dynamic changes in your song, such as a gradual crescendo leading to a powerful chorus or a fade-out at the end of a track.
- Pan Automation:Allows you to move instruments or effects left and right in the stereo field over time. This can create a sense of space and movement in your track, and can be used to emphasize certain instruments or effects.
- Effect Automation:Allows you to control the parameters of your effects over time, such as the amount of reverb, delay, or chorus. This can be used to create dynamic changes in your sound, such as adding a gradual reverb effect to a vocal track as the song progresses.
GarageBand is awesome for jamming out with your friends, but sometimes you need to communicate without interrupting the flow of the music. That’s where the Apple Watch comes in handy! Check out How to use the Walkie-Talkie app on Apple Watch to learn how to send quick messages without having to pull out your phone.
Then you can get back to rocking out with GarageBand and impress everyone with your sick beats.
Mixing and Mastering for a Polished Sound
Mixing and mastering are the final steps in bringing your jam session to life. Mixing is the process of balancing the levels of each instrument and effect in your track, while mastering is the process of optimizing the overall sound of your track for a polished and professional sound.
- Mixing:This is where you fine-tune the individual elements of your song, ensuring that each instrument and effect is clear and present in the mix. This involves adjusting the levels, panning, and EQ of each track to create a balanced and cohesive sound.
- Mastering:The final step in the audio production process, where you optimize the overall sound of your track for a professional and polished sound. This involves adjusting the overall volume, EQ, dynamics, and stereo imaging to create a track that is loud, clear, and ready for distribution.
Sharing Your Music
You’ve poured your heart and soul into your GarageBand jam session, and now it’s time to share your creation with the world. There are a few ways to export your project as a finished song, making it ready for sharing with friends or uploading online.Once you’ve got your final mix sounding just right, you can export your GarageBand project as an audio file.
This will create a standalone file that you can share with others without them needing to have GarageBand.
Exporting Your Music
To export your GarageBand project, go to the Filemenu and select Share. From there, you can choose the format you want to export your song in, like MP3, WAV, or AIFF. You can also choose the quality of the exported file, which will affect the file size.
Sharing Your Music Online
There are several platforms where you can share your music online.
GarageBand is awesome for jamming out, but sometimes those pesky phone calls interrupt your flow. If you’re on your iPad or Mac, you can learn how to keep those annoying phone calls off your iPad or Mac so you can stay focused on your music.
Once you’ve got that sorted, you can get back to laying down some sick tracks in GarageBand!
- SoundCloud: A popular platform for musicians of all levels, SoundCloud offers a variety of features for sharing and promoting your music. You can upload your songs, create playlists, and even embed your tracks on other websites.
- YouTube: While primarily known for video content, YouTube also allows you to upload audio files. You can create a channel specifically for your music and share your GarageBand creations with a wider audience.
- Bandcamp: A platform designed specifically for musicians, Bandcamp offers a unique way to share your music and sell it directly to fans. You can create a profile, upload your music, and set your own prices.
Sharing Your Music with Friends
If you just want to share your music with friends, you can send them the exported audio file via email, text message, or a file-sharing service like Dropbox or Google Drive.
Choosing a Platform, How to rock out with a GarageBand Jam Session
When deciding which platform to use, consider your goals. If you’re looking to reach a wider audience, SoundCloud or YouTube are good options. If you’re looking to sell your music, Bandcamp is a great choice. If you just want to share your music with friends, you can use any of the methods mentioned above.
Inspiration and Creativity
GarageBand is a fantastic tool for unleashing your musical creativity, but sometimes, inspiration can be a fickle friend. Whether you’re facing a blank slate or feeling stuck in a creative rut, there are plenty of strategies to spark your musical imagination and keep your GarageBand sessions flowing.
Examples of Successful GarageBand Projects
There are countless musicians who have used GarageBand to create incredible music, demonstrating the power of this tool to produce professional-quality results. Here are a few examples:
- The Chainsmokers, known for their hit song “Closer,” initially started out making music with GarageBand. Their early tracks, crafted using the software, gained them a following and propelled them into the music industry.
- Lorde, the Grammy-winning singer-songwriter, famously used GarageBand to create her debut album “Pure Heroine.” The album’s unique sound and raw emotion resonated with listeners worldwide, solidifying Lorde’s place in the music scene.
- Billie Eilish, another Grammy-winning artist, began her musical journey by recording her first songs on GarageBand. Her innovative approach to music production, heavily influenced by GarageBand’s intuitive interface, has made her a global sensation.
Strategies for Finding Inspiration
Inspiration can strike at any moment, but sometimes, you need to actively seek it out. Here are some strategies to get those creative juices flowing:
- Listen to a wide range of music.Explore different genres, artists, and eras to broaden your musical horizons and discover new sounds that inspire you.
- Engage with other musicians.Collaborate with friends, join online communities, or attend live performances to gain fresh perspectives and fuel your creativity.
- Experiment with different instruments and sounds.GarageBand offers a wide array of virtual instruments and sound effects. Don’t be afraid to try something new and see where it takes you.
- Draw inspiration from your surroundings.Pay attention to the sounds, sights, and emotions around you. Let these experiences inform your musical ideas and create a unique sonic landscape.
Overcoming Creative Blocks
Everyone experiences creative blocks from time to time. The key is to have strategies to overcome them and keep the creative flow going.
- Take a break.Sometimes, stepping away from your project for a while can help you return with a fresh perspective.
- Try a different approach.If you’re stuck in a rut, experiment with a new instrument, sound, or style. This can spark new ideas and break you out of your creative box.
- Don’t be afraid to experiment.GarageBand is a sandbox for musical exploration. Try out different sounds, effects, and techniques. You might surprise yourself with what you create.
Advanced Techniques
GarageBand offers a range of advanced features that can elevate your jam sessions to a professional level. These features empower you to craft intricate arrangements, experiment with unique sounds, and collaborate with others, unlocking a world of creative possibilities.
MIDI Editing
MIDI (Musical Instrument Digital Interface) is a powerful tool that allows you to control and manipulate musical notes digitally. GarageBand provides a comprehensive MIDI editor that gives you granular control over every aspect of your music. You can use MIDI editing to:
- Edit individual notes: Change the duration, pitch, velocity, and other parameters of individual notes. This allows you to fine-tune your melodies and rhythms.
- Create complex rhythms: Use the MIDI editor to create intricate rhythms and drum patterns that would be difficult to play manually.
- Automate effects: Control the intensity of effects like reverb, delay, and chorus over time, creating dynamic and evolving soundscapes.
Creating Complex Arrangements and Orchestrations
GarageBand provides tools to create complex arrangements and orchestrations. You can use these features to build layered soundscapes, explore different musical styles, and bring your musical vision to life.
- Track Management: GarageBand allows you to create multiple tracks, each dedicated to a specific instrument or sound. This enables you to build up a layered arrangement, adding different instruments and effects to create depth and complexity.
- Using Loops and Samples: GarageBand provides a vast library of loops and samples that can be used to create backing tracks, add percussion, or enhance your arrangements. These pre-recorded elements can help you build a foundation for your music quickly and easily.
- Virtual Instruments: GarageBand features a collection of virtual instruments, including pianos, guitars, drums, and orchestral instruments. You can use these instruments to create realistic and expressive sounds, expanding your musical palette and creating intricate arrangements.
Collaborating on GarageBand Projects
GarageBand allows you to collaborate with others on your projects, enabling you to share your musical ideas and work together to create something truly unique.
- Sharing Projects: You can easily share your GarageBand projects with others through iCloud, allowing them to access and edit your work. This enables you to collaborate on songs, exchange ideas, and build upon each other’s contributions.
- Real-time Collaboration: GarageBand allows for real-time collaboration, enabling you to work on a project simultaneously with others. This allows for a more fluid and interactive creative process, as you can hear each other’s contributions in real time and build upon them.
Conclusive Thoughts
With a little practice and experimentation, you’ll be amazed at the music you can create with GarageBand. Don’t be afraid to explore, get creative, and have fun! Remember, the most important thing is to enjoy the process and let your musical personality shine through.
So, what are you waiting for? Start jamming today!
Quick FAQs
Do I need any special equipment to use GarageBand?
GarageBand is free on Mac and iOS devices, so you don’t need any special equipment to get started. You can use a built-in microphone or a USB microphone for recording.
Can I use GarageBand to make professional-sounding music?
Absolutely! GarageBand has all the tools you need to create high-quality music. With practice and a little experimentation, you can achieve professional-sounding results.
What if I don’t know how to play any instruments?
No problem! GarageBand includes a wide variety of virtual instruments, so you can create music without ever touching a real instrument. You can even use loops and samples to build your tracks.
Is GarageBand easy to learn?
GarageBand is designed to be user-friendly, even for beginners. There are plenty of tutorials and resources available online to help you learn the basics.

