How To Resize Images Using Apple’S Preview Tool In Macos
How to resize images using Apple’s Preview tool in macOS is a simple and efficient way to adjust the size of your pictures. Whether you’re preparing images for social media, email, or printing, Preview’s intuitive interface and versatile resizing options make the process a breeze.
With a few clicks, you can scale images down to fit specific dimensions, maintain aspect ratios, and even fine-tune image quality.
Preview, the built-in image viewer on macOS, offers a surprisingly robust set of tools, including image resizing capabilities that go beyond just shrinking or enlarging pictures. You can adjust width, height, and resolution, ensuring your images are optimized for their intended purpose.
Let’s explore the steps involved in resizing images using Preview, making your digital life a little easier.
Resizing Images with Preview
Preview is a built-in image viewer and editor in macOS. It’s a handy tool for basic image editing tasks, including resizing. Preview’s user-friendly interface and accessibility make it a great choice for resizing images without needing to install additional software.
You can quickly resize images for various purposes like sharing online, printing, or emailing.
Resizing Images in Preview
To resize an image in Preview, you’ll follow these steps:
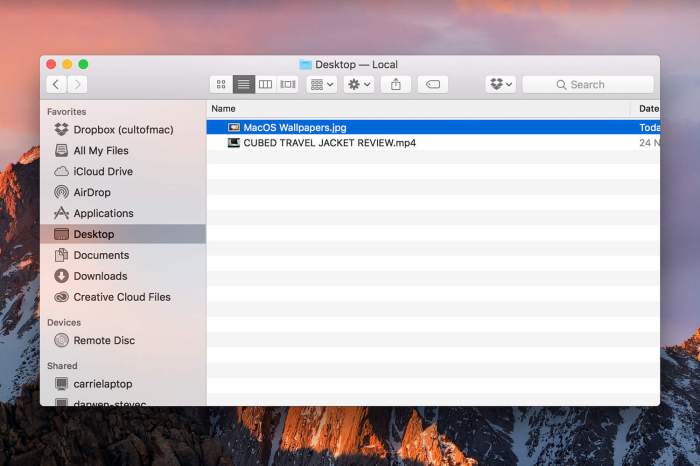
- Open the image in Preview.
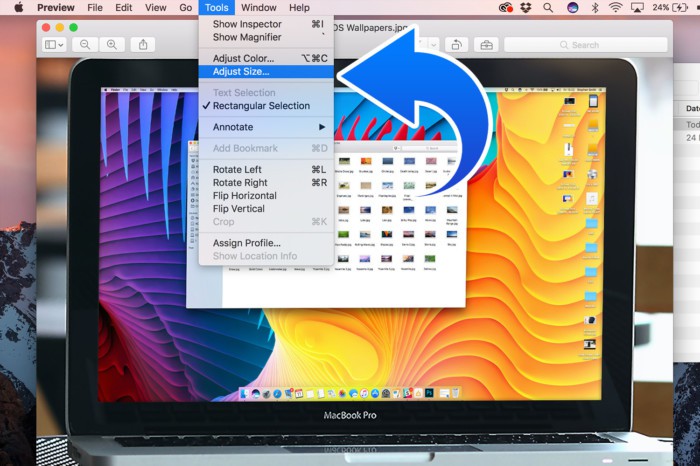
- Select the “Tools” menu.
- Choose “Adjust Size” from the dropdown menu.
- In the “Adjust Size” window, you can specify the new dimensions of the image. You can enter specific values for width and height, or you can choose a preset size from the “Scale to” dropdown menu.
- Select “Scale proportionally” to maintain the image’s aspect ratio. This ensures the image is resized without distortion.
- Click “OK” to apply the changes.
Opening an Image in Preview
Preview is Apple’s default image viewer, and it’s incredibly versatile. You can open images directly from your Finder, web browser, or email, making it a seamless part of your workflow.
Opening Images from Finder
You can open images from Finder in a few ways.
- Double-Click:The most common way is to simply double-click the image file in Finder. This will open it directly in Preview.
- Right-Click and Select “Open With”:If you want to choose Preview specifically, right-click on the image file and select “Open With.” Then, select “Preview” from the list of applications.
- Drag and Drop:You can drag and drop the image file from Finder onto the Preview icon in your Dock or the application window. This will open the image in Preview.
Opening Images from Web Browser
Opening an image from your web browser is a straightforward process.
- Right-Click and Select “Open Image in New Tab”:Right-click on the image in your browser and select “Open Image in New Tab.” This will open the image in a new tab, which you can then easily save or open in Preview.
- Drag and Drop:You can also drag and drop the image from your browser window onto the Preview icon in your Dock or the application window.
Opening Images from Email
Opening an image from an email is similar to opening one from a web browser.
- Right-Click and Select “Save Image As”:Right-click on the image in your email and select “Save Image As.” This will save the image to your computer, which you can then open in Preview.
- Drag and Drop:You can drag and drop the image from your email window onto the Preview icon in your Dock or the application window.
Accessing the Resize Tool
The Resize tool in Preview is your go-to for adjusting the dimensions of your images. It’s easy to find and use, making it a breeze to make your pictures fit perfectly for any purpose. To access the Resize tool, you have a few options:
Using the Menu Bar
The most straightforward way to find the Resize tool is through the menu bar. Here’s how:
1. Open the “Tools” menu
Click on the “Tools” menu at the top of the Preview window.
2. Select “Adjust Size”
In the dropdown menu, you’ll see the option “Adjust Size.” Select it. This will open the Resize window, where you can fine-tune the size of your image.
Resizing Options
Preview offers various options for resizing images, giving you granular control over the final dimensions and resolution of your image. These options allow you to tailor the image to your specific needs, whether it’s for web use, printing, or sharing on social media.
Scale to and Fit to
The “Scale to” and “Fit to” options provide different methods for resizing images.
- The “Scale to” option allows you to specify the exact dimensions of the resized image, either in pixels or percentages. For example, you can resize an image to be 1000 pixels wide and 500 pixels high.
- The “Fit to” option resizes the image to fit within the specified dimensions while maintaining the aspect ratio. This means that one dimension will be adjusted to fit the specified value, while the other dimension will be adjusted proportionally. For example, if you fit an image to a 1000-pixel width, the height will be adjusted automatically to maintain the aspect ratio.
Width and Height
The “Width” and “Height” fields are used to specify the desired dimensions of the resized image. You can enter values in pixels, inches, or centimeters, depending on your preference. The units used for the dimensions are displayed next to the fields.
The “Width” and “Height” fields work in conjunction with the “Scale to” and “Fit to” options. For example, if you select “Scale to” and enter a value in the “Width” field, the height will be adjusted proportionally to maintain the aspect ratio.
Resolution
The “Resolution” option determines the number of pixels per inch (PPI) or pixels per centimeter (PPC) in the resized image. A higher resolution image will have more pixels per unit of area, resulting in a sharper and more detailed image.
- For web use, a resolution of 72 PPI is generally sufficient. This is because web images are viewed at a smaller size and a lower resolution is acceptable.
- For print, a resolution of 300 PPI is typically recommended. This ensures that the image will print with sufficient detail and clarity.
Maintaining Aspect Ratio
Maintaining the aspect ratio of an image is super important when resizing. It keeps the image looking natural and avoids distortion. Imagine trying to fit a square picture into a rectangular frameyou’d either have to cut off parts of the picture or stretch it out, making it look weird.
Aspect ratio is basically the ratio of the image’s width to its height, and maintaining it ensures that the image is resized proportionally.
Resizing images in macOS is super easy using the Preview app, which is already built-in. You can quickly adjust the dimensions for sharing on social media or just to save some space. And while you’re at it, don’t forget to wash your hands! It’s super important for staying healthy, and Apple Watch has a great Handwashing app to help you out.
Check out this guide How to get the most out of Apple Watch’s Handwashing app for some tips on making the most of it. Anyway, back to Preview – once you’ve resized your image, you can easily save it or share it with friends.
Just make sure you’ve got those clean hands!
Resizing Images with and Without Maintaining Aspect Ratio
When resizing an image, you have the option to either maintain or ignore the aspect ratio. Here’s the deal:
- Maintaining Aspect Ratio: This is the best option for most situations. It keeps the image looking natural and prevents distortion. When you resize an image while maintaining its aspect ratio, both the width and height are adjusted proportionally. This means that if you increase the width by 20%, the height will also increase by 20%.
This ensures that the image retains its original proportions.
- Ignoring Aspect Ratio: This option is useful in specific cases, like if you need to fit an image into a specific space with a different aspect ratio. However, it can lead to distortion, making the image look stretched or squished. When you resize an image without maintaining its aspect ratio, you can adjust the width and height independently.
This means that you can increase the width without changing the height, or vice versa. This can be useful if you need to fit an image into a specific space with a different aspect ratio. However, it can also lead to distortion, making the image look stretched or squished.
Applying the Resize
Once you’ve chosen your resizing options, you’re ready to apply the changes to your image. Preview makes it easy to resize and save your image with a few clicks.You can apply the resize by clicking the Resizebutton in the bottom right corner of the Preview window.
Saving the Resized Image
After you resize your image, you can save it with the new dimensions. Here’s how:
To save your image, click Filein the menu bar and select Save As….
You can choose to save your image as a new file, keeping the original untouched, or overwrite the original file.
Saving Options
Preview offers various saving options for your resized image:
Save As…
This option lets you save the resized image as a new file with a different name and location. You can also choose the image format you want to save it as, such as JPEG, PNG, or TIFF.
Save
This option overwrites the original image file with the resized version.
Export
This option lets you save your image in a different format, such as PDF or GIF.
Copy
This option copies the resized image to your clipboard, allowing you to paste it into other applications.
Additional Resizing Techniques
Preview offers a few more techniques to manipulate your images beyond simple resizing. These techniques can be used in combination with resizing to achieve more refined results.
Using Crop and Rotate Tools, How to resize images using Apple’s Preview tool in macOS
The Crop and Rotate tools can be used to adjust the dimensions of your image. The Crop tool allows you to remove unwanted portions of the image, effectively resizing it to a smaller area. The Rotate tool can be used to change the orientation of the image, which can affect its overall dimensions depending on the degree of rotation.
For example, rotating an image 90 degrees can change its width and height.
Adjusting Image Quality and Compression Settings
Preview allows you to control the quality and compression of your resized image. This can be helpful when balancing file size and image quality. High-quality images generally have larger file sizes, while low-quality images have smaller file sizes.
You can adjust the compression settings to reduce the file size without sacrificing too much image quality.
Troubleshooting Common Issues
Resizing images in Preview is usually straightforward, but you might encounter some hiccups along the way. Don’t worry; these issues are often easy to fix. Let’s explore some common problems and how to solve them.
Resizing images in Preview is a breeze, especially if you’re used to the intuitive interface of macOS. Just open the image, go to “Tools,” and select “Adjust Size.” If you accidentally deleted the original image before resizing, don’t fret! You can check out this handy guide on how to undelete files in Mac OS X to recover it.
Once you have your image back, you can easily resize it to your desired dimensions using Preview’s built-in tools.
Distorted Images
Distorted images can occur when the aspect ratio is not maintained during resizing. This means the image is stretched or squashed, resulting in an unappealing look. To prevent this, ensure the “Scale proportionally” checkbox is selected in the Resize window.
This option maintains the original proportions of the image, preventing distortion. If you’ve already resized the image without this option checked, you can undo the changes and try again with “Scale proportionally” selected.
Best Practices for Image Resizing
Resizing images in Preview is a simple process, but following some best practices can help you achieve the best results and ensure that your images maintain their quality. By understanding the implications of resizing, you can make informed decisions about how to adjust your images for different purposes.
Choosing the Appropriate Resolution and File Format
The resolution of an image refers to the number of pixels it contains, and the file format determines how those pixels are stored. When resizing images, it’s crucial to select the right resolution and file format to maintain image quality and file size.
- Resolution: Higher resolution images contain more pixels and offer greater detail. When resizing an image, consider the intended use. For example, if you’re sharing an image online, a lower resolution (e.g., 72 pixels per inch (ppi)) is sufficient, while a higher resolution (e.g., 300 ppi) might be necessary for printing.
- File Format: Different file formats offer varying levels of compression and quality. JPEG is a popular choice for web images because it offers a good balance between quality and file size. However, if you need to preserve the highest level of detail, consider using a lossless format like PNG or TIFF.
Resizing images in macOS is a breeze using the Preview app. Just open your image, head to Tools > Adjust Size, and you’re good to go. While you’re tweaking things, you might also want to check out Force Apple Music to play all songs at the same volume with Sound Check so your tunes are always at a consistent level.
Once you’ve got your image sized just right, save it and you’re all set.
For images with large areas of solid color, using a format like GIF can help reduce file size without sacrificing quality.
Impact of Resizing on Image Quality and File Size
Resizing images can affect both their quality and file size.
- Image Quality: When you resize an image larger, you’re essentially adding pixels that are interpolated from the original pixels. This can lead to a loss of sharpness and detail. Conversely, resizing an image smaller can result in a loss of information, as pixels are discarded.
The extent of quality loss depends on the original image size, the resizing factor, and the interpolation method used.
- File Size: Resizing an image can affect its file size. When you resize an image smaller, the file size will generally decrease.
However, resizing an image larger can increase the file size, especially if you’re using a lossless format.
Conclusion
Resizing images is a common task, and Apple’s Preview tool makes it incredibly easy. Whether you need to shrink a photo for social media or enlarge it for printing, Preview provides the necessary tools and options to achieve your desired results.
You can easily adjust the dimensions, maintain the aspect ratio, and even use advanced techniques like cropping and rotating to fine-tune your image.
Last Word
Resizing images with Apple’s Preview is a skill that can be incredibly useful for any Mac user. From fine-tuning images for online sharing to preparing them for printing, Preview gives you the control you need. Whether you’re a seasoned Mac user or just starting out, you’ll find Preview’s simple interface and versatile resizing tools to be a valuable asset in your digital toolbox.
So, go ahead, experiment with different resizing options and see how Preview can help you make your images look their best!
Expert Answers: How To Resize Images Using Apple’s Preview Tool In MacOS
Can I resize multiple images at once using Preview?
No, Preview doesn’t have a built-in batch resizing feature. However, you can use third-party apps like ImageMagick or Automator to resize multiple images at once.
What are the best file formats to use for resized images?
For web use, JPEG is a common choice due to its good compression. For images with sharp edges or text, PNG might be better to preserve detail. TIFF is a good choice for high-quality images that will be printed.
How do I undo a resize in Preview?
Unfortunately, Preview doesn’t have an undo function for resizing. If you’re unhappy with the results, you’ll need to start with the original image again.

