How To Record Your Mac’S Screen For Free With Quicktime Player
How to Record Your Mac’s Screen For Free With QuickTime Player, a built-in app on your Mac, is a lifesaver for students, educators, and anyone who needs to create quick screen recordings. It’s super easy to use and doesn’t require any extra downloads.
You can record your entire screen, just a specific window, or even just a selected area. Plus, you can add audio from your microphone or your computer’s speakers, making it perfect for tutorials, presentations, and more.
In this guide, we’ll walk you through the process of using QuickTime Player to record your screen. We’ll cover everything from launching the app to editing and sharing your recordings.
Accessing QuickTime Player: How To Record Your Mac’s Screen For Free With QuickTime Player

QuickTime Player is a built-in application on macOS that can be used to record your Mac’s screen. It’s a user-friendly tool that doesn’t require any additional downloads or installations.
Recording your Mac’s screen with QuickTime Player is super easy, and you can even capture audio! It’s a great way to document a presentation or tutorial, but if you need to store your screen recordings, you might want to check out How to get the Microsoft OneDrive preview that runs natively on M1 Macs.
OneDrive is a solid cloud storage option that integrates seamlessly with macOS. Once you’ve got your recording saved, you can edit it in iMovie or Final Cut Pro for a more polished look.
Locating QuickTime Player
Finding QuickTime Player is pretty straightforward. It’s usually located in the Applications folder, which you can access through the Finder. Here’s how to do it:
- Open the Finder by clicking its icon in the Dock. You can also use the keyboard shortcut Command + Spacebar to open Spotlight and then type “Finder” to find it.
- Navigate to the Applications folder. You can do this by clicking the Applications folder in the Finder’s sidebar or by using the menu bar: Go > Applications.
- Scroll down the list of applications until you find QuickTime Player. It’s usually located towards the top of the list.
Launching QuickTime Player
Once you’ve found QuickTime Player in the Applications folder, you can launch it in a few ways:
- Double-click the QuickTime Player icon to open the application.
- Right-click the icon and select “Open” from the context menu.
- Use Spotlight Search: Press Command + Spacebar, type “QuickTime Player,” and press Enter.
Starting a Screen Recording
Once you’ve got QuickTime Player open, you’re ready to start recording your Mac’s screen. Let’s dive into the process and explore the options you have to customize your recording.
Recording your Mac’s screen with QuickTime Player is super easy, but you might want to check out How to mix up activities for a more effective Apple Watch workout if you’re looking to boost your fitness routine. Once you’ve got your workout plan dialed in, you can record yourself and see how you’re progressing.
You’ll be a pro at screen recording in no time!
Initiating a Screen Recording
To start recording, follow these steps:
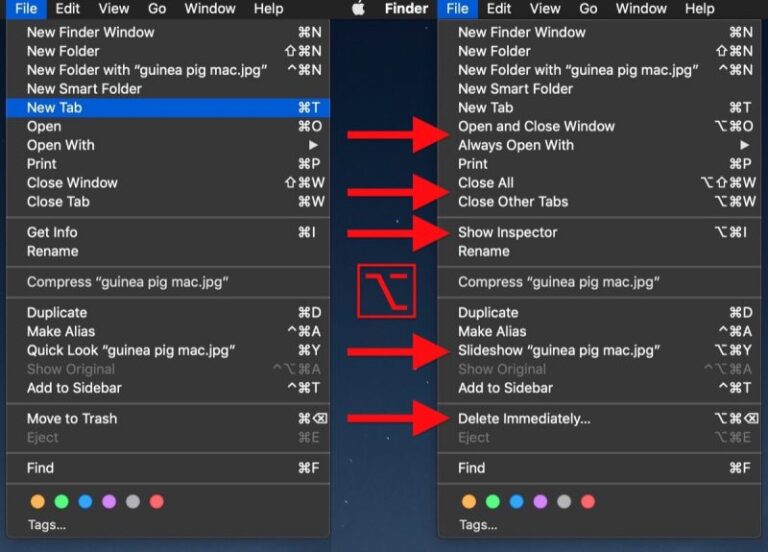
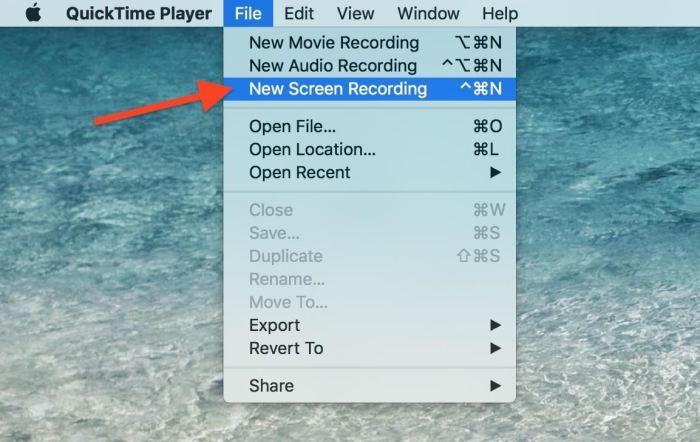
- From the QuickTime Player menu bar, select “File” and then “New Screen Recording.”
- A new window will pop up, displaying a red recording button, a dropdown menu for selecting the recording area, and a microphone icon.
- Click the red button to start recording.
Recording Options
You have two main options for recording:
- Full Screen Recording:This captures everything on your screen, including the menu bar and dock. It’s great for capturing presentations, tutorials, or any content that spans your entire screen.
- Selected Area Recording:This allows you to choose a specific portion of your screen to record. This is helpful for focusing on a specific application window or a particular area of your screen. To select an area, click and drag the cursor over the desired region.
Customizing Recording Settings
Before you hit the record button, you can customize your recording settings:
- Audio Input:Click the microphone icon to select your audio input source. You can choose from your built-in microphone, an external microphone, or even record system audio (the sound playing from your Mac). If you’re recording a tutorial, you’ll likely want to use your microphone to narrate.
But if you’re capturing a gameplay session, you might want to record system audio to capture the game’s sound effects.
- Video Quality:To adjust the video quality, go to “QuickTime Player” in the menu bar, then “Preferences.” Under the “Recording” tab, you can change the video quality by selecting a different resolution. For better video quality, choose a higher resolution, but this will also result in a larger file size.
You can also select a different frame rate, which determines how many frames per second your video will have. A higher frame rate results in smoother motion, but again, it will increase the file size.
Recording Audio

You can choose to include audio in your screen recordings. This means that you can capture your voice, system sounds, or both.
Selecting an Audio Source
You can choose to record audio from your microphone, system audio, or both. This is a valuable feature, as it allows you to create more engaging and informative screen recordings.
- To record audio from your microphone, select “Microphone” from the “Audio” dropdown menu.
- To record audio from your system, select “System Audio” from the “Audio” dropdown menu.
- To record both your microphone and system audio, select both “Microphone” and “System Audio” from the “Audio” dropdown menu.
Editing Recordings

Okay, so you’ve got your screen recording. Now, let’s talk about how to make it perfect! QuickTime Player has some basic editing tools built right in, so you can make your recording look professional without needing any fancy software.QuickTime Player’s editing features let you trim, cut, and paste parts of your recording, and even add annotations or callouts to highlight important points.
Trimming, Cutting, and Pasting
Let’s say you’ve got a recording of a presentation, and you want to cut out the intro and outro. This is where trimming comes in handy.You can select a portion of your recording by dragging your mouse over the timeline at the bottom of the QuickTime Player window.
Once you’ve selected the part you want to trim, you can right-click on the selection and choose “Trim”. You can also use the “Edit” menu at the top of the screen.To cut and paste, you can select the portion of the recording you want to move, then use the “Edit” menu to copy and paste it to a different location within the recording.
Adding Annotations and Callouts
Sometimes you might want to add annotations or callouts to your recording to highlight important points. QuickTime Player makes this easy.Just click on the “Edit” menu, and then select “Annotations”. You’ll see a toolbar appear at the bottom of the screen.
From there, you can choose from different annotation tools, including:
- Text:Add text boxes to your recording.
- Arrow:Draw arrows to point out specific areas.
- Highlight:Highlight important sections of your screen recording.
- Rectangle:Draw rectangles to highlight areas.
- Circle:Draw circles to highlight areas.
You can customize the color, size, and opacity of your annotations to make them stand out.
Saving and Sharing Recordings
You’ve successfully recorded your Mac’s screen. Now, it’s time to save your recording and share it with others. QuickTime Player offers various options for saving and sharing your recordings, making it easy to document your work, share tutorials, or create presentations.
Saving Recordings
You can save your recordings in different file formats, each offering specific advantages.
QuickTime Player automatically saves your recordings as .mov files, which are the default format for QuickTime Player.
- .mov: This is the standard format for QuickTime Player and is compatible with most devices and platforms. It offers a balance between quality and file size.
- .mp4: A widely supported video format, .mp4 is often preferred for its smaller file size compared to .mov, making it suitable for sharing online.
- .m4v: A format specifically designed for video playback, .m4v is often used for distributing videos online.
To save your recording, follow these steps:
- Click the Stopbutton in the QuickTime Player window to end the recording.
- From the menu bar, select File> Save.
- Choose a location to save your recording.
- Enter a name for your recording file.
- Select the desired file format from the Formatdropdown menu.
- Click Save.
Advanced Features
QuickTime Player offers several advanced features that enhance your screen recording capabilities beyond the basics. These features allow you to customize your recordings and capture more detailed information.
QuickTime Player is a super easy way to record your Mac’s screen for free, but it’s definitely not as fancy as some of the other options out there. If you’re trying to decide between the iPhone XS and XR, Know the differences between iPhone XS and iPhone XR , you might want to check out some of the more advanced screen recording apps for your Mac.
QuickTime Player is great for basic recordings, but it lacks some of the features that might be helpful for more advanced projects.
Recording Cursor Movement, How to Record Your Mac’s Screen For Free With QuickTime Player
The ability to record your cursor movement during screen recordings can be incredibly helpful for tutorials, presentations, or any time you want to emphasize specific actions. To enable this feature, you’ll need to adjust the recording settings. When you start a new screen recording, you’ll notice a small icon in the top-right corner of the screen that resembles a microphone.
This icon represents the recording settings. Clicking on this icon will bring up a menu with several options, including the ability to toggle the cursor recording on or off.
Capturing Video From External Sources
QuickTime Player isn’t limited to just recording your screen. You can also use it to capture video from external sources like a webcam or an iPhone connected to your Mac. This can be useful for creating video content or recording live events.
To capture video from an external source, simply select “New Movie Recording” from the QuickTime Player menu. Then, choose the external source you want to record from in the dropdown menu within the recording window. You can then start and stop recording as usual.
Additional Features
QuickTime Player offers several other features that can be helpful for screen recording:
- Timecode Overlay:QuickTime Player allows you to add a timecode overlay to your recordings. This can be useful for keeping track of time during long recordings or for aligning recordings with other media.
- Audio Input Selection:You can choose which audio source to record from, such as your internal microphone or an external microphone. This allows you to capture high-quality audio for your recordings.
- Recording Quality:You can adjust the recording quality, balancing resolution and file size. Higher quality recordings will produce larger files, while lower quality recordings will be smaller.
Troubleshooting
It’s awesome that you’re recording your Mac’s screen with QuickTime Player, but sometimes things don’t go as smoothly as we’d like. This section covers some common issues you might encounter and how to fix them.
Audio Recording Issues
If you’re trying to record audio with your screen recording but it’s not working, there are a few things to check. First, make sure your microphone is selected as the input device in QuickTime Player. You can do this by going to the “Edit” menu and choosing “Audio & Video Settings.” Next, check to make sure that your microphone is working properly.
You can do this by opening the “Sound” preferences in System Preferences and testing your microphone. If you’re still having trouble, try restarting your Mac.
Recording Not Starting or Stopping
Sometimes, QuickTime Player might not start or stop recording when you expect it to. This could be due to a few things. First, make sure you’re clicking the “Record” button in the QuickTime Player window. If you’re using a keyboard shortcut, make sure it’s set up correctly.
You can check your keyboard shortcuts in System Preferences under “Keyboard.” If you’re still having trouble, try restarting QuickTime Player or your Mac.
Video Quality Issues
If your screen recording is blurry or pixelated, there are a few things you can try. First, make sure that your Mac is meeting the minimum system requirements for QuickTime Player. You can find these requirements on Apple’s website.
Next, try changing the video quality settings in QuickTime Player. You can do this by going to the “Edit” menu and choosing “Audio & Video Settings.” Finally, if you’re still having trouble, try restarting your Mac.
Alternatives

While QuickTime Player is a great free option for recording your Mac’s screen, there are other alternatives available that offer additional features and functionalities. These alternatives can be useful for more advanced screen recordings or if you require specific features that QuickTime Player doesn’t provide.
Alternative Screen Recording Applications
Here are some popular screen recording applications available for Mac:
- OBS Studio: OBS Studio is a free and open-source software widely used for live streaming and screen recording. It offers a wide range of features, including multi-track audio recording, scene transitions, and customizable overlays. OBS Studio is known for its flexibility and ability to handle complex recording setups.
- Camtasia: Camtasia is a paid screen recording and video editing software known for its user-friendly interface and powerful editing tools. It provides features like video editing, audio mixing, and screen annotations, making it suitable for creating professional-looking screen recordings.
- ScreenFlow: ScreenFlow is another paid screen recording and video editing software specifically designed for Mac users. It offers advanced features like motion graphics, transitions, and interactive elements, making it ideal for creating engaging and professional screen recordings.
- Kap: Kap is a free and open-source screen recording application known for its simplicity and ease of use. It provides basic screen recording functionalities with features like audio recording and cursor highlighting. Kap is a good choice for quick and straightforward screen recordings.
Comparison of Features
The table below compares the features and functionalities of these alternative screen recording applications to QuickTime Player:
| Feature | QuickTime Player | OBS Studio | Camtasia | ScreenFlow | Kap |
|---|---|---|---|---|---|
| Price | Free | Free | Paid | Paid | Free |
| Audio Recording | Yes | Yes | Yes | Yes | Yes |
| Video Editing | Limited | No | Yes | Yes | No |
| Screen Annotations | No | Yes | Yes | Yes | No |
| Motion Graphics | No | No | Yes | Yes | No |
| Live Streaming | No | Yes | No | No | No |
| Customizable Overlays | No | Yes | Yes | Yes | No |
Last Point
So, there you have it – a comprehensive guide to screen recording on your Mac using QuickTime Player. It’s free, it’s easy, and it’s incredibly versatile. Whether you’re a tech guru or just getting started with screen recordings, QuickTime Player is the perfect tool for the job.
Go ahead, give it a try, and see what you can create!
FAQ Summary
Can I record audio from my computer’s speakers?
Yes! You can choose to record audio from your microphone, your computer’s speakers, or both. This is perfect for creating tutorials or demos where you want to capture the sound of your computer along with the visuals.
How do I adjust the video quality of my recording?
You can adjust the video quality of your recording within QuickTime Player’s settings. You can choose from different resolutions and frame rates to find the perfect balance between file size and visual clarity.
What file formats can I save my recordings in?
QuickTime Player can save your recordings in various formats, including MOV, MP4, and more. You can choose the format that best suits your needs and sharing preferences.
Are there any other screen recording apps for Mac?
Yes, there are other screen recording apps available for Mac, such as OBS Studio, Loom, and ScreenFlow. These apps offer more advanced features, but QuickTime Player is a great option for basic screen recording needs.