How To Record Your Iphone Screen With Screenrecorder
How to Record Your iPhone Screen with ScreenRecorder? It’s easier than you think! Whether you’re a tech-savvy pro or just starting out, screen recording on your iPhone is a powerful tool for capturing tutorials, showcasing apps, or even recording gameplay.
This guide will walk you through the steps, from using the built-in recorder to exploring third-party apps and mastering advanced techniques. Get ready to unlock the potential of screen recording and express yourself in a whole new way!
From documenting app glitches to sharing gameplay highlights, screen recording offers a range of possibilities. But before diving into the nitty-gritty, let’s break down the basics of how to record your iPhone screen. We’ll cover the built-in Screen Recorder, delve into third-party options, and explore ways to enhance your recordings with audio and editing.
Introduction to iPhone Screen Recording
In today’s digital world, capturing what’s happening on your iPhone screen is more important than ever. Whether you’re showcasing your latest app, demonstrating a new feature, or creating a tutorial, iPhone screen recording lets you capture everything in high quality.
Screen recording on iPhone offers a convenient way to document and share your digital experiences. It allows you to record everything happening on your screen, including audio, making it a versatile tool for various purposes.
Examples of Screen Recording Use Cases
Screen recording is a valuable tool for various reasons. Here are some common examples of how you can use it:
- Tutorials and How-to Videos: Create instructional videos to teach others how to use an app, website, or specific feature on their iPhone. Screen recording lets you demonstrate the steps clearly and concisely.
- Gaming Highlights: Capture your epic gaming moments, showcasing your skills and strategies. Share your gameplay with friends or upload it to platforms like YouTube.
- Bug Reporting: If you encounter an issue with an app or website, record your screen to show developers the exact steps that lead to the problem. This helps them identify and fix bugs quickly.
- Product Demonstrations: Showcase your app or website’s features and functionality to potential users. Screen recording provides a clear and engaging way to present your product.
- Online Meetings and Presentations: Record online meetings or presentations to refer back to important information or share with colleagues who couldn’t attend live.
Using the Built-in Screen Recorder
Apple’s built-in screen recorder offers a simple way to capture your iPhone screen. It’s a convenient tool for creating tutorials, demos, or simply recording your gameplay.
Accessing the Screen Recorder
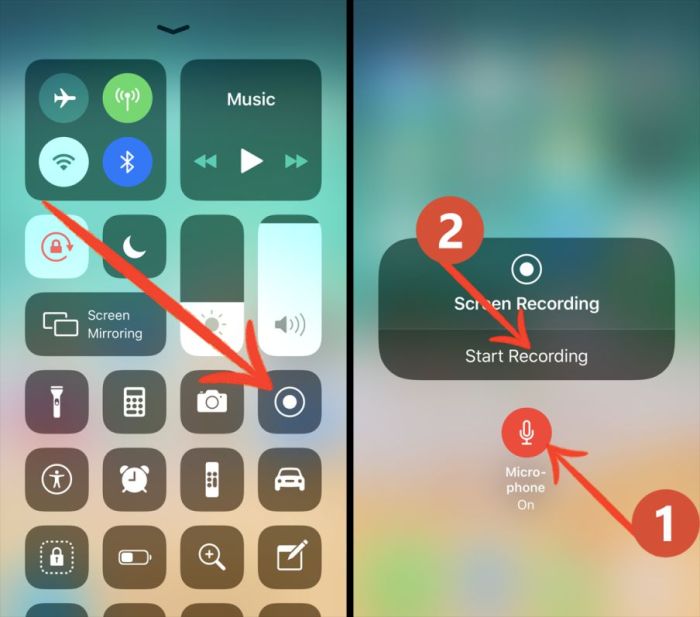
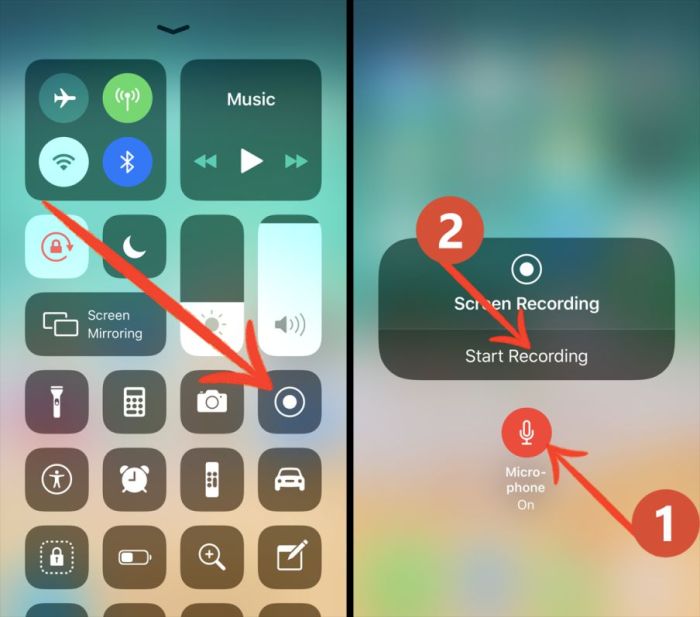
The screen recorder is easily accessible through your iPhone’s Control Center. You can customize your Control Center to include the screen recorder by following these steps:
1. Open Settings
Go to the Settings app on your iPhone.
2. Control Center
Navigate to the Control Center section.
3. Customize Controls
Tap on “Customize Controls”.
4. Add Screen Recording
Locate the screen recording icon and tap the green plus sign to add it to your Control Center. Once you’ve added the screen recorder to your Control Center, you can easily access it by swiping up from the bottom of the screen (on iPhones with a Home button) or swiping down from the top-right corner (on iPhones without a Home button).
Initiating and Stopping a Screen Recording
To start a screen recording, follow these steps:
1. Open Control Center
Swipe up or down to access your Control Center.
2. Tap the Record Button
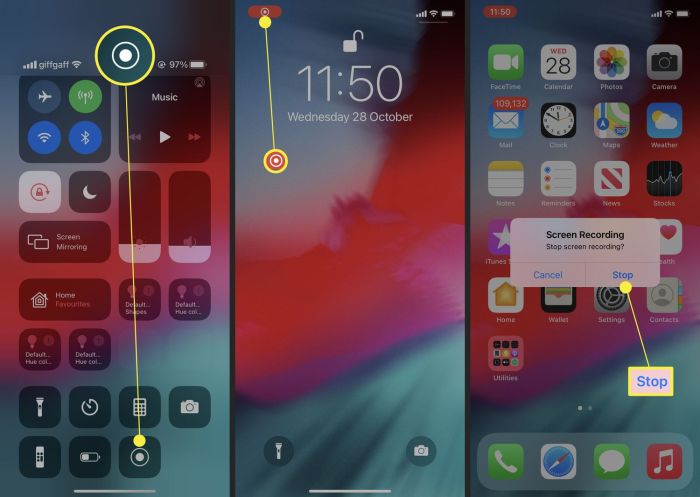
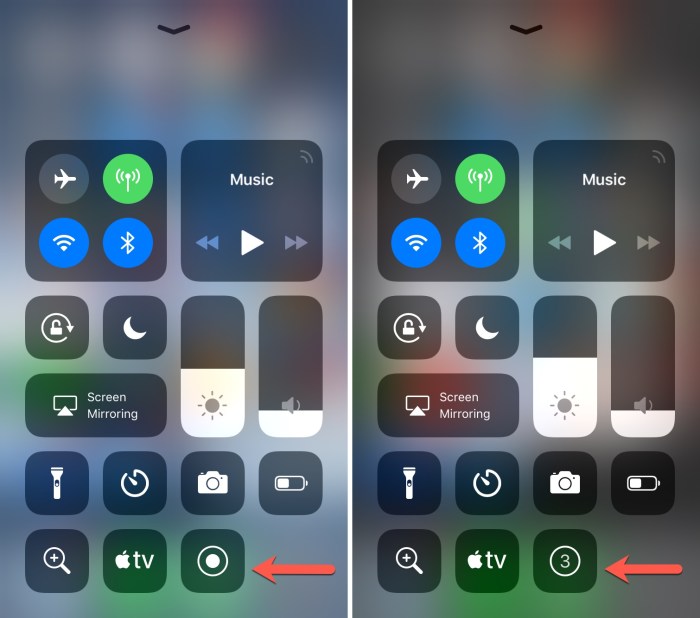
Locate the screen recording icon (a circle with a white dot inside) and tap it.
3. Confirm Recording
A three-second countdown will appear on your screen. Once the countdown ends, your recording will begin.
4. Stop Recording
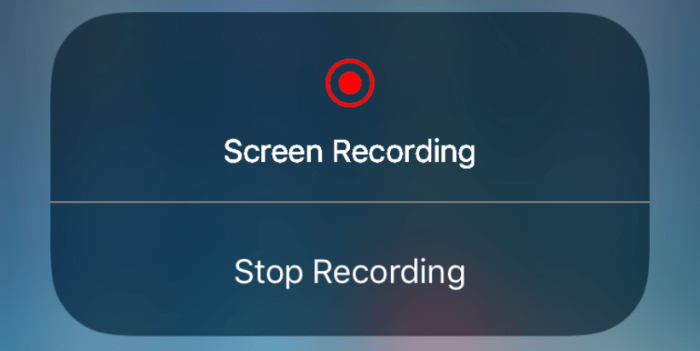
To stop the recording, tap the red bar at the top of your screen and then tap “Stop”.
Limitations of the Built-in Screen Recorder
While the built-in screen recorder is convenient, it has some limitations:
- No Audio Recording: The built-in screen recorder doesn’t record audio from your iPhone’s microphone. If you need to capture audio, you’ll need to use a third-party app.
- No Editing Features: The screen recorder doesn’t offer any editing features. You’ll need to use a separate editing app to trim, add effects, or make other changes to your recordings.
- Limited Recording Time: The built-in screen recorder may have limitations on recording length. For longer recordings, you may need to consider a third-party app.
Third-Party Screen Recording Apps
Sometimes, you might need more advanced features than what the built-in screen recorder offers. This is where third-party screen recording apps come in handy. These apps provide a wider range of options, including additional editing tools, audio recording capabilities, and more.
Comparison of Popular Third-Party Screen Recording Apps
Let’s take a look at some popular third-party screen recording apps and compare their features, pros, cons, and pricing.
| App Name | Features | Pros | Cons | Price |
|---|---|---|---|---|
| RecordIt | Screen recording, audio recording, editing, video compression | User-friendly interface, intuitive editing tools, affordable | Limited customization options, no advanced features like annotations | Free with in-app purchases |
| X-Mirage | Screen recording, mirroring, audio recording, live streaming | High-quality recording, advanced features like annotations and webcam overlays, reliable performance | More expensive than other options, may require some technical knowledge | Paid subscription |
| AirShou | Screen recording, audio recording, video editing, no watermark | Free to use, no ads, supports external audio sources | May not be available in all regions, limited editing features | Free |
| Apowersoft Screen Recorder | Screen recording, audio recording, webcam recording, editing | Versatile features, user-friendly interface, supports multiple output formats | Can be resource-intensive, some features require a paid subscription | Free with paid upgrades |
| DU Recorder | Screen recording, audio recording, video editing, live streaming | Easy to use, supports various recording formats, free with no ads | Limited editing features, may require permission to access files | Free with in-app purchases |
Advantages and Disadvantages of Third-Party Screen Recording Apps
There are both advantages and disadvantages to using third-party screen recording apps.
Advantages:
- More features:Third-party apps offer a wider range of features, such as advanced editing tools, audio recording capabilities, webcam overlays, and more. This gives you greater control over your recordings and allows you to create more professional-looking videos.
- Customization options:Many third-party apps offer customization options, allowing you to adjust settings like video quality, frame rate, and audio settings to meet your specific needs.
- Additional tools:Some third-party apps come with additional tools, such as video editors, screen capturers, and annotation tools, that can be helpful for creating and editing your recordings.
Disadvantages:
- Cost:While some third-party apps are free, many offer paid subscriptions or in-app purchases for access to advanced features. This can be a drawback if you’re on a tight budget.
- Permissions:Third-party apps may require access to your personal data, such as your contacts or location. This can be a privacy concern for some users.
- Performance:Some third-party apps can be resource-intensive and may slow down your device, especially if you’re using older or less powerful iPhones.
Specific Features Offered by Third-Party Apps
Third-party screen recording apps offer a wide range of features beyond what the built-in screen recorder provides. Here are some examples:
Advanced Editing Tools:
- Trim and cut:Some apps allow you to trim and cut your recordings to remove unwanted sections.
- Add transitions:Some apps let you add transitions between different clips to create a more polished look.
- Adjust audio:Many apps offer audio editing features, such as volume control, noise reduction, and equalization.
- Add annotations:Some apps allow you to add annotations, such as text, shapes, and arrows, to your recordings to highlight important points.
Audio Recording:
- Internal audio:Some apps can record the audio that is played through your iPhone’s speakers.
- External audio:Some apps allow you to record audio from an external microphone, such as a headset or a lapel mic.
- Mix audio:Some apps allow you to mix internal and external audio to create a more professional-sounding recording.
Other Features:
- Webcam overlays:Some apps allow you to add a webcam overlay to your recordings, so you can show your face or reactions while you’re recording your screen.
- Live streaming:Some apps allow you to live stream your screen recordings to platforms like Twitch, YouTube, and Facebook.
- Video compression:Some apps offer video compression features, which can reduce the file size of your recordings without sacrificing quality.
Recording Audio During Screen Recording
Capturing audio alongside your screen recording is crucial for creating engaging and informative videos. Whether you’re recording a tutorial, a gameplay session, or a presentation, having audio adds another layer of depth and context to your content. You have two main options for capturing audio during your iPhone screen recording: using the built-in microphone or recording system audio.
Recording Audio from the Microphone
This is the most straightforward way to capture audio during a screen recording. When you start a screen recording, your iPhone’s built-in microphone will automatically record any sounds picked up from your surroundings. This is ideal for scenarios where you want to provide commentary during the recording, like a tutorial or gameplay walkthrough.
Your voice will be clearly captured and synchronized with the screen recording.
Recording System Audio
This feature allows you to record audio playing through your iPhone’s speakers alongside your screen recording. This is particularly useful for capturing audio from videos, music, or games. Unfortunately, iOS doesn’t directly offer a built-in way to record system audio alongside screen recordings.
However, there are workarounds and third-party apps that can help you achieve this.
Using Third-Party Apps for System Audio Recording
There are numerous third-party screen recording apps available on the App Store that offer system audio recording capabilities. These apps typically have a dedicated option to enable system audio recording, allowing you to capture the audio playing through your iPhone’s speakers alongside your screen recording.
It’s important to note that the quality of system audio recording can vary depending on the app and your iPhone’s capabilities.
Screen recording your iPhone is super easy with ScreenRecorder. You can capture anything from gameplay to tutorials, and even share it with your friends. If you need to print something while you’re at it, you can use AirPrint to print directly from your iPhone.
Check out How to print from your iPhone using AirPrint for a quick guide. Once you’re done, you can hop back to ScreenRecorder and continue capturing your screen.
Tips for Achieving High-Quality Audio Recordings
Here are some tips to help you capture clear and professional-sounding audio during your screen recordings:* Use a Quiet Environment:Record in a quiet room with minimal background noise to ensure your voice or system audio is clear and free from distractions.
Position the Microphone Correctly
If you’re using the built-in microphone, make sure it’s positioned close to your mouth for optimal sound quality.
Use Headphones
Wearing headphones can help you monitor the audio during recording and ensure you’re capturing a good sound level.
Avoid Recording in Windy Conditions
Wind can create a lot of noise, so try to record indoors or in a sheltered area if you’re recording outside.
Adjust the Audio Levels
Before you start recording, check the audio levels on your iPhone or in the screen recording app to ensure your voice or system audio is not too loud or too soft.
Editing Screen Recordings
You’ve captured your iPhone screen, but now you want to make it even better! Editing your screen recording allows you to refine the content, highlight important moments, and add a personal touch. Luckily, you don’t need to be a professional video editor to get started.
Editing Features in the Photos App
The Photos app on your iPhone comes equipped with basic editing tools that can help you clean up your screen recording. You can trim, crop, and even add text to your videos. Here’s a breakdown of how these features work:* Trimming:Trimming lets you remove unwanted portions of your screen recording.
This is especially helpful for cutting out unnecessary intro or outro sections or removing any accidental moments. To trim your screen recording, open the Photos app and select the video. Tap “Edit” in the top right corner. Then, drag the yellow handles on either end of the timeline to adjust the start and end points of your video.
Cropping
Cropping removes portions of the video frame, allowing you to focus on specific areas of the screen. This can be useful for removing distractions or highlighting a particular section of your screen. To crop your screen recording, tap the “Crop” button in the editing menu.
Then, drag the corners of the cropping frame to adjust the size and position of the cropped area.
Adding Text
You can add text overlays to your screen recordings to provide additional context, emphasize important points, or simply add a title to your video. To add text, tap the “Text” button in the editing menu. Select a font style and color, and then type your text.
You can resize, reposition, and rotate the text box to fit your video.
Using External Video Editing Software
While the Photos app offers some basic editing features, external video editing software provides more advanced options for refining your screen recordings. Here are some benefits of using external video editing software:* More Advanced Editing Tools:External video editing software offers a wider range of editing features, including the ability to add transitions, effects, and audio tracks.
You can also fine-tune the video’s colors, brightness, and contrast for a more polished look.
Recording your iPhone screen with ScreenRecorder is a breeze, especially if you’re trying to show off a new app or game. But, did you know you can also use your Apple Watch to track your handwashing habits? Check out How to get the most out of Apple Watch’s Handwashing app for some tips.
Once you’ve mastered handwashing, you can even record a quick tutorial on your iPhone and share it with your friends!
Greater Control Over Your Video
External video editing software gives you more control over every aspect of your video, allowing you to create a more professional and personalized final product. You can fine-tune the pacing, add animations, and create a unique visual style.
Flexibility and Customization
External video editing software offers more flexibility in terms of format support and customization options. You can export your video in different resolutions and formats, and you have access to a wider range of effects, transitions, and templates.
Sharing Screen Recordings
You’ve captured your iPhone screen, and now it’s time to share your creation with the world. Sharing your screen recordings is a great way to show others what you’re doing on your iPhone, whether it’s a tutorial, a gameplay walkthrough, or a funny moment you want to share.
Let’s explore the different ways you can share your screen recordings.
Sharing Screen Recordings Directly from the Photos App
Sharing your screen recording is simple, thanks to the Photos app. The Photos app offers a streamlined way to share your screen recording with friends, family, or even on social media. Here’s how to share a screen recording from the Photos app:
- Open the Photos appon your iPhone.
- Locate the screen recordingyou want to share.
- Tap on the screen recordingto view it.
- Tap the Share icon(a square with an arrow pointing upward) in the bottom left corner of the screen.
- Choose your sharing methodfrom the options that appear, such as:
AirDrop
Share with nearby Apple devices.
Messages
Share with individuals or groups via iMessage.
Share with anyone with an email address.
Other Apps
Share with various social media platforms and messaging apps.
Sharing Screen Recordings on Social Media Platforms
Social media platforms are great for sharing screen recordings with a wider audience. You can share your screen recordings on platforms like Facebook, Instagram, Twitter, and YouTube.Here are some tips for sharing your screen recordings on social media:
Choose the right platform
Consider your audience and the type of content you’re sharing when deciding where to share your screen recording.
Optimize your video
Trim, edit, and add captions or music to make your screen recording more engaging.
Use relevant hashtags
Help people find your screen recording by using relevant hashtags.
Promote your video
So you wanna record your iPhone screen with ScreenRecorder? It’s pretty easy, but if you’re using a Mac and your mouse is acting up, you might need to turn on Bluetooth first. You can actually do that without a mouse by following the instructions on this website: How to turn on Mac Bluetooth without a mouse.
Once you’ve got Bluetooth running, you’re good to go with ScreenRecorder!
Share your screen recording on other social media platforms and encourage people to like, comment, and share it.
Sharing Screen Recordings with Specific Individuals
Sometimes you might want to share your screen recording with a specific individual or group of people. Here are some ways to do this:
Send your screen recording as an attachment to an email.
Messaging Apps
Share your screen recording via messaging apps like WhatsApp, Telegram, or Messenger.
Cloud Storage
Upload your screen recording to a cloud storage service like Google Drive or Dropbox and share the link with the recipient.
Troubleshooting Common Screen Recording Issues
Okay, so you’ve gotten the hang of screen recording on your iPhone, but sometimes things don’t go as planned. Let’s talk about some common issues and how to fix them.
Screen Recording Not Starting
This is one of the most frustrating problems. It can happen for a few reasons. Here’s a rundown of common culprits and how to tackle them:
- Insufficient Storage:Screen recordings take up space, so make sure you have enough free storage on your iPhone. Check your storage settings and delete any unnecessary files to free up some space. You can also try recording in a lower resolution or duration to save space.
- Background App Activity:If other apps are running in the background, they can interfere with screen recording. Close any apps you aren’t actively using. You can also try enabling “Low Power Mode” to limit background activity.
- Software Glitches:Sometimes, a simple software glitch can be the culprit. Try restarting your iPhone. If that doesn’t work, check for any available software updates for your iOS. Updating your software can often fix bugs and improve performance.
- Permissions Issues:Make sure you’ve granted the Screen Recorder app permission to access your screen. You can check this in your iPhone’s Settings app under “Privacy” and then “Screen Recording”.
Screen Recording Stops Abruptly
It’s super annoying when your recording suddenly stops. Here are some things to try:
- Overheating:If your iPhone gets too hot, it might automatically stop recording to prevent damage. Let your phone cool down before trying to record again.
- Low Battery:A low battery can also cause your recording to stop. Plug in your iPhone to charge it.
- Background App Activity:As mentioned earlier, other apps running in the background can interfere with screen recording. Close any unnecessary apps.
- Software Glitches:Just like with recording not starting, a software glitch could be the culprit. Try restarting your iPhone or checking for software updates.
Audio Issues During Screen Recording
Sometimes, the audio on your screen recording isn’t as clear as you’d like. Here are some tips:
- Microphone Selection:Make sure you’re using the correct microphone for your recording. If you’re recording a game, you might want to use the built-in microphone on your iPhone. If you’re recording a video call, you might want to use a headset microphone.
- Background Noise:Try to record in a quiet environment to minimize background noise. If you can’t avoid noise, you can try using a noise-canceling microphone or editing out the noise later.
- Volume Levels:Make sure the volume levels for your microphone and your iPhone are set appropriately. You can adjust these settings in your iPhone’s Settings app under “Sounds & Haptics”.
Screen Recording Lag or Stuttering
If your screen recording is lagging or stuttering, it can be frustrating. Here are some potential solutions:
- Reduce Screen Resolution:Try recording at a lower resolution to reduce the amount of data being processed. You can adjust the screen resolution in the Screen Recorder settings.
- Close Other Apps:Close any apps you aren’t actively using to free up resources for the screen recorder. You can also try enabling “Low Power Mode” to limit background activity.
- Restart Your iPhone:Sometimes a simple restart can fix performance issues.
Advanced Screen Recording Techniques
So far, we’ve covered the basics of screen recording on your iPhone. But what about taking your screen recordings to the next level? This section explores some advanced techniques to help you capture more engaging and informative videos.
Using Screen Recording with Specific Apps
Screen recording isn’t limited to just capturing your iPhone’s display. You can use it in conjunction with specific apps to create more dynamic content. Here’s a look at some common scenarios:
- Gaming:When recording gameplay, you can use the screen recording feature to capture your screen and simultaneously record audio from your microphone. This allows you to add commentary or sound effects to your videos.
- Tutorials:While creating tutorials, screen recording can be used to demonstrate how to use an app or website. You can use the built-in microphone to narrate the steps or record audio from a different source, such as music or sound effects.
- Live Streaming:Some apps allow you to stream live video to platforms like YouTube or Twitch. By enabling screen recording, you can capture your live stream for later editing or sharing.
Capturing Specific Content or Actions
Sometimes, you might need to record specific content or actions on your screen. These techniques can help you capture the exact moments you need:
- Recording a Specific Time Interval:The built-in screen recording feature on iPhones allows you to set a timer to stop recording after a specific duration. This is useful for capturing short videos or demos without manually stopping the recording.
- Capturing a Specific Section of the Screen:You can use third-party screen recording apps to record a specific portion of your screen, like a particular app window or a specific area of a webpage. This is helpful when you only need to capture a specific element or action.
- Capturing a Specific Action:Some screen recording apps allow you to set triggers that start recording when a specific action occurs, such as a touch event or a notification. This is useful for capturing quick moments or events that might be difficult to manually record.
Creative Screen Recording Approaches
Beyond the standard screen recording, there are creative ways to enhance your videos and make them more engaging:
- Adding Visual Effects:Many third-party screen recording apps offer visual effects, such as overlays, animations, and transitions, to enhance your videos. This can add a professional touch or create a more engaging visual experience.
- Using Split-Screen Recordings:Some screen recording apps allow you to record two or more screens simultaneously. This can be useful for comparing different apps, showing multiple perspectives, or creating unique visual effects.
- Adding Voiceovers:While recording your screen, you can add a voiceover to narrate the actions or provide commentary. This is particularly useful for tutorials, demos, or gaming videos.
Security and Privacy Considerations: How To Record Your IPhone Screen With ScreenRecorder
Recording your iPhone screen can be a handy tool for various purposes, from creating tutorials to capturing gameplay. However, it’s crucial to be aware of the security and privacy implications associated with screen recording. This section will delve into the importance of privacy settings, potential risks of sharing screen recordings, and best practices to safeguard sensitive information.
Privacy Settings, How to Record Your iPhone Screen with ScreenRecorder
Privacy settings on your iPhone play a vital role in controlling what information is accessible during screen recordings. It’s essential to review and adjust these settings to ensure that only the intended content is captured.
- Notification Permissions:Ensure that you only allow apps you trust to access your notifications during screen recording. This prevents sensitive information like messages or emails from being inadvertently captured.
- Microphone Access:If you’re recording audio, make sure you grant microphone access only to apps you trust. This helps prevent unauthorized recording of conversations or other private audio.
- Location Services:Be mindful of the apps that have access to your location data. While screen recording might not directly capture your location, apps with location access could potentially reveal your whereabouts indirectly.
Risks of Sharing Screen Recordings
Sharing screen recordings can pose privacy risks if not done cautiously. Consider the potential consequences before sharing a recording.
- Sensitive Data Exposure:Screen recordings can inadvertently capture sensitive information like passwords, financial details, or personal messages. Sharing such recordings could expose you to identity theft or other security threats.
- Privacy Violations:Sharing screen recordings without the consent of individuals featured in them could violate their privacy. This is particularly relevant when recording meetings, conversations, or other situations involving multiple people.
- Reputation Damage:Sharing screen recordings containing sensitive or embarrassing information could damage your reputation or lead to professional consequences.
Protecting Sensitive Information
Protecting sensitive information during screen recording requires a proactive approach. Here are some best practices:
- Review and Edit Recordings:Before sharing a screen recording, carefully review it to identify and remove any sensitive information. This includes blurring or obscuring sensitive data like passwords or financial details.
- Use Privacy-Focused Apps:Consider using screen recording apps that prioritize privacy by offering features like data encryption or limited access to sensitive information.
- Be Mindful of Content:Be cautious about the content you capture during screen recording. Avoid recording sensitive information like financial transactions, personal conversations, or confidential data.
- Seek Consent:If your screen recording involves others, obtain their consent before recording and sharing. This helps avoid potential privacy violations and builds trust.
Future Trends in Screen Recording
Screen recording technology is constantly evolving, with new features and capabilities emerging regularly. This ongoing development is driven by the increasing demand for screen recording in various applications, including education, gaming, software demonstrations, and more.
Advanced AI-Powered Features
The integration of artificial intelligence (AI) into screen recording software is a major trend that will shape the future of this technology. AI can enhance screen recordings in several ways, including:* Automatic Editing:AI can automatically detect and edit out unnecessary or repetitive segments, creating a more concise and engaging recording.
Intelligent Transcription
AI-powered transcription services can automatically generate accurate transcripts of audio in screen recordings, making it easier to search and share information.
Content Analysis and Summarization
AI can analyze the content of screen recordings to identify key topics and generate summaries, making it easier to understand and digest complex information.
Immersive and Interactive Screen Recording
The future of screen recording may involve more immersive and interactive experiences. This could include:* 360-Degree Screen Recording:Capturing the entire screen from all angles, providing a more comprehensive view of the content.
Interactive Elements
Incorporating interactive elements, such as clickable links or hotspots, to enhance user engagement.
Augmented Reality (AR) and Virtual Reality (VR) Integration
Combining screen recording with AR and VR technologies to create more immersive and engaging experiences.
Enhanced Security and Privacy
As screen recording becomes more widely used, there is a growing need for enhanced security and privacy features. This could include:* End-to-End Encryption:Ensuring that screen recordings are protected from unauthorized access and data breaches.
Privacy-Preserving Techniques
Using techniques to blur or anonymize sensitive information in screen recordings.
Watermarking and Digital Rights Management (DRM)
Protecting intellectual property by adding watermarks or using DRM to control access and distribution.
Cross-Platform Compatibility
Future screen recording solutions will likely offer greater cross-platform compatibility, enabling users to record screens across multiple devices and operating systems. This could include:* Cloud-Based Screen Recording:Storing and accessing screen recordings from any device with an internet connection.
Universal Screen Recording Apps
Developing screen recording apps that work seamlessly across different platforms, such as Windows, macOS, iOS, and Android.
Increased Accessibility and User-Friendliness
Screen recording tools will continue to evolve to become more accessible and user-friendly. This could include:* Simplified User Interfaces:Making screen recording tools easier to use for all users, regardless of technical expertise.
Automated Workflow Integration
Seamlessly integrating screen recording into other workflows, such as video editing or content management systems.
Voice-Controlled Screen Recording
Enabling users to start and stop screen recordings using voice commands.
Final Wrap-Up
Now that you’ve got the basics down, you’re ready to explore the world of iPhone screen recording! Whether you’re showcasing your skills, creating engaging tutorials, or simply capturing those epic moments, you’ve got the tools and knowledge to make it happen.
So go ahead, experiment, and discover the endless possibilities of recording your iPhone screen!
Common Queries
Can I record my screen with audio?
Absolutely! You can record both your microphone and system audio during screen recordings. Just make sure to enable the appropriate settings in the Control Center.
What are some good third-party screen recording apps?
Some popular options include: Screen Recorder, DU Recorder, and Record it! Each app offers unique features, so explore them to find the best fit for your needs.
How do I edit my screen recordings?
The built-in Photos app offers basic editing features like trimming and cropping. For more advanced editing, consider using external video editing software like iMovie or Adobe Premiere Rush.

