How To Record Your Iphone Screen In Ios 11
How to record your iPhone screen in iOS 11? It’s easier than you might think! This handy feature lets you capture anything happening on your phone, from gameplay to tutorials. You can even include audio in your recordings, making it perfect for sharing with friends or documenting your work.
Screen recording is super useful for a bunch of things. You can create tutorials, share gameplay, document bugs, or even make funny videos with your friends. And the best part is, it’s built right into iOS 11, so you don’t need to download any extra apps.
Screen Recording in iOS 11

In the world of iOS 11, screen recording has become a valuable tool for capturing and sharing what happens on your iPhone screen. This feature allows you to record your screen activity, which can be helpful for a variety of reasons, from creating tutorials to showcasing your apps to documenting bugs or glitches.Screen recording in iOS 11 is a native feature, meaning it’s built directly into the operating system.
This eliminates the need for third-party apps, providing a seamless and efficient way to capture your screen.
Benefits of Using Native Screen Recording in iOS 11
The native screen recording feature in iOS 11 offers several benefits:
- Easy Access:It’s easily accessible through the Control Center, allowing you to quickly start and stop recording.
- Simplicity:The interface is straightforward and user-friendly, making it easy to use even for those who are new to screen recording.
- High-Quality Recordings:The feature produces high-quality videos, capturing everything on your screen in detail.
- Audio Recording:You can choose to include audio from your microphone or the device’s internal audio, adding another layer of context to your recordings.
- Seamless Integration:The feature seamlessly integrates with other iOS apps, allowing you to easily share your recordings on social media platforms or with friends and colleagues.
Enabling Screen Recording
Before you can capture those epic gaming moments or record a tutorial on your iPhone, you need to enable the screen recording feature. This feature allows you to capture everything happening on your screen, from apps to games to video calls.
Here’s how to get it up and running.
Accessing the Control Center, How to record your iPhone screen in iOS 11
The Control Center is your go-to spot for quick access to essential features like Wi-Fi, Bluetooth, and brightness controls. You’ll need to add the screen recording button to your Control Center to easily start and stop recordings.
- Go to Settingson your iPhone.
- Tap on Control Center.
- Scroll down to the Customize Controlssection.
- Tap the +button next to Screen Recordingto add it to your Control Center.
Customizing the Screen Recording Button
Once you’ve added the screen recording button, you can customize its appearance. This can be helpful if you want to quickly identify the button in your Control Center.
- Go to Settingson your iPhone.
- Tap on Control Center.
- Tap on Screen Recording.
- Choose Show Controlsto display the microphone and timer options when you press the screen recording button. This lets you choose whether to include audio in your recording and set a timer for how long you want to record.
- You can also tap on the Soundoption to select a specific sound to play when you start and stop recording. This can be helpful for confirming that your recording has started or stopped.
Recording Your Screen
Okay, so you’ve got your screen recording setup ready to go. Now, let’s dive into actually capturing your screen.
Starting and Stopping a Recording
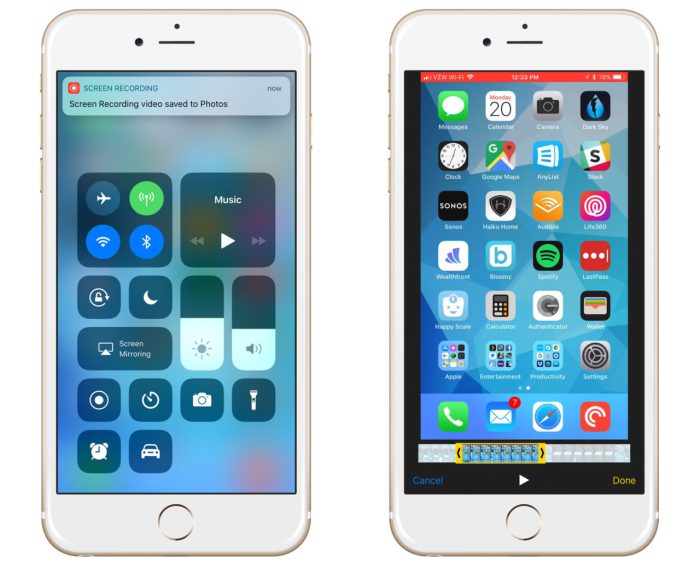
Starting and stopping a screen recording is super simple. You’ll find the screen recording button in your Control Center. To start recording, simply tap the red button. A three-second countdown will appear before the recording begins. To stop the recording, tap the red button again.
Including Audio in the Recording
You can also include audio in your screen recording. To do this, simply tap the microphone icon in the Control Center before you start recording. The microphone icon will turn red to indicate that audio will be included in the recording.
Recording Specific Elements
You can use screen recording to capture a variety of things, like videos or games. Here are some tips for recording specific elements:
Videos
When recording videos, it’s important to make sure the video is playing in full screen. This will ensure that the entire video is captured in the recording.
Games
If you’re recording a game, you may want to consider using a third-party app that allows you to customize the recording settings. This will allow you to adjust things like the frame rate and resolution of the recording.
Editing Your Recording
Now that you’ve captured your screen, you might want to make a few tweaks before sharing your masterpiece with the world. Editing your screen recording is a breeze in iOS 11, and we’ll walk you through the process.
Accessing and Managing Recorded Videos
Your screen recordings are stored in the Photos app, right alongside your other pictures and videos. To find them, open the Photos app and tap on the Albums tab. You’ll see an album called “Screen Recordings” where all your recordings are neatly organized.
Editing Options in iOS 11
iOS 11 offers a range of editing options for your screen recordings, allowing you to trim unwanted sections, add effects, and more.
Trimming Your Recording
To trim your screen recording, open the Photos app and select the recording you want to edit. Tap the Edit button in the top right corner. You’ll see a timeline of your video with handles at either end. Drag the handles to adjust the start and end points of your video.
Once you’re happy with the selection, tap the Done button to save your changes.
Adding Effects
While iOS 11 doesn’t offer a wide array of effects specifically for screen recordings, you can still add basic effects like filters, rotation, and cropping using the Photos app’s editing tools.
Sharing Your Recording
Once you’re satisfied with your edits, you can share your screen recording with friends, family, or colleagues. Tap the Share button in the bottom left corner of the screen. You can choose from a variety of options, including:
- Messaging: Share your recording via text message or iMessage.
- Email: Send your recording as an email attachment.
- Social Media: Post your recording to platforms like Facebook, Twitter, or Instagram.
- AirDrop: Share your recording wirelessly with nearby Apple devices.
Troubleshooting Common Issues
Okay, so you’ve tried recording your screen, but something’s not working as expected. Don’t worry, it happens! Let’s troubleshoot some common problems and get you back on track.
Audio Recording Issues
Sometimes, you might find that the audio isn’t being recorded properly. This could be due to a few things:
Microphone Access
Make sure you’ve granted the Screen Recording app access to your microphone. You can check this in your iPhone’s Settings app under “Privacy” > “Microphone.”
Background Noise
If you’re recording in a noisy environment, the audio might be distorted or difficult to hear. Try recording in a quieter space or using headphones with a built-in microphone.
App Compatibility
Some apps might not support audio recording. If you’re having trouble with a specific app, try recording a different one to see if the issue persists.
Hardware Issues
If you’re still having problems, it’s possible that there’s an issue with your microphone hardware. Try using a different microphone or checking your iPhone’s microphone settings.
Unexpected Screen Recording Behavior
If your screen recording isn’t behaving as you expect, there are a few things you can try:
Restart Your iPhone
Recording your iPhone screen in iOS 11 is super easy, but you might want to disinfect your devices before you start. Keeping your tech clean is key, especially if you’re sharing it with others. Check out How to disinfect your Mac, iPhone, mouse, trackpad, keyboard and cases to learn how to keep things germ-free.
Once you’re all sanitized, you’ll be ready to start recording your iPhone screen with the Control Center!
Sometimes, a simple restart can resolve unexpected behavior.
Update iOS
So you’ve mastered recording your iPhone screen in iOS 11, but now you wanna capture all the magic of Messi’s latest goals? You can check out his action on Apple TV+ by subscribing to the service, and then you can even record those highlights on your phone! If you want to know more about how to watch Messi on Apple TV+, you can find a helpful guide here: How to watch soccer legend Lionel Messi on Apple TV+.
Once you’ve got those Messi moments recorded, you can share them with your friends or just relive them whenever you want!
Make sure you’re running the latest version of iOS. Updates often include bug fixes that can improve screen recording functionality.
Check App Permissions
Double-check that the app you’re using to record your screen has the necessary permissions.
Try a Different App
If you’re having trouble with a specific screen recording app, try using a different one. There are many options available in the App Store.
Alternative Methods for Screen Recording
If you’re still having problems, you can try these alternative methods for recording your iPhone screen:
QuickTime Player
If you have a Mac, you can use QuickTime Player to record your iPhone screen. Connect your iPhone to your Mac using a USB cable and open QuickTime Player. Then, click “File” > “New Movie Recording.” Select your iPhone as the camera and start recording.
Third-Party Apps
There are many third-party apps available in the App Store that offer screen recording features. Some of these apps may offer additional features, such as editing capabilities or the ability to record audio from your iPhone’s microphone.
Advanced Techniques: How To Record Your IPhone Screen In IOS 11
Okay, so you’ve mastered the basics of screen recording on iOS 11. But what if you want to take your screen recordings to the next level? Let’s explore some advanced techniques that will help you capture more detailed and creative screen recordings.
Third-Party Screen Recording Apps
There are tons of third-party screen recording apps available on the App Store. These apps can offer additional features that aren’t built into iOS 11’s native screen recording tool.
- Some apps let you record audio from your microphone, which is perfect for creating tutorials or gameplay videos.
- Others offer editing features, allowing you to trim, add music, and even add text overlays to your recordings.
- And some apps even have advanced features like screen mirroring, which lets you project your iPhone’s screen to a larger display.
If you need more control over your screen recordings or want to add unique features, third-party apps are a great option.
Use Cases for Screen Recording

Screen recording on your iPhone isn’t just for capturing gameplay or funny moments with friends. It’s a versatile tool that can be used for a wide range of purposes, from creating tutorials to troubleshooting technical issues.
Tutorials
Screen recording is an excellent way to create tutorials for various topics. You can record yourself demonstrating how to use a specific app, navigating a website, or performing a task on your iPhone. This allows you to share your knowledge and expertise with others in a clear and concise way.
Recording your iPhone screen in iOS 11 is super easy! Just open the Control Center and tap the screen recording button. It’s a handy feature, especially for tutorials or capturing gameplay. If you’re still rocking an older Mac, you can check out Bypass the Mac App Store to update Mountain Lion software to get the latest updates.
Once you’ve got your recording, you can edit it in iMovie or another video editing app, making it even more awesome!
- Software walkthroughs:Imagine you’re a graphic designer showcasing the features of a new photo editing app. Recording your screen as you edit a photo, highlighting each tool and effect, would be a great way to teach others how to use the app.
- How-to guides:You could record a tutorial on how to set up a new email account, use a specific iPhone feature, or even explain how to solve a common problem.
Presentations
Screen recording can be used to create professional presentations for work, school, or even personal projects. You can record yourself presenting a slideshow, a document, or even a web page, adding audio commentary to explain your points.
- Project proposals:If you’re pitching a new project idea, you can record yourself presenting your slides and explaining the details.
- Online lectures:Teachers can use screen recording to create online lectures for their students.
Gameplay Capture
Screen recording is a popular way to capture gameplay on your iPhone. You can record yourself playing a game, adding commentary to your gameplay, and sharing it with friends or online.
- Sharing gaming highlights:You can capture epic moments, funny fails, or impressive strategies while playing.
- Creating gaming tutorials:Record yourself demonstrating advanced techniques or strategies in a game, helping others improve their skills.
Troubleshooting
Screen recording can be used to capture and share technical issues you’re experiencing on your iPhone. This can be helpful for troubleshooting problems with apps, websites, or the device itself.
- Reporting bugs to app developers:If you encounter a bug in an app, recording the issue can provide valuable information to the developer.
- Getting help from tech support:Sharing a screen recording of the problem you’re facing can help tech support diagnose and resolve the issue more efficiently.
Feedback
Screen recording can be used to provide feedback on websites, apps, or even presentations. You can record yourself navigating a website, using an app, or viewing a presentation, adding audio commentary to provide your thoughts and suggestions.
- User testing:Record yourself testing a new website or app, providing feedback on its usability and design.
- Providing constructive criticism:You can use screen recording to provide detailed feedback on a presentation, highlighting strengths and areas for improvement.
Best Practices for Screen Recording
Creating high-quality screen recordings on your iPhone is all about getting the details right. Whether you’re sharing a tutorial, showcasing an app, or capturing a gameplay session, following these best practices will ensure your recordings are clear, engaging, and effective.
Optimize Recording Quality
Optimizing recording quality is crucial for creating professional-looking screen recordings. Here’s how you can achieve it:
- Resolution:Select the highest resolution possible for your needs. This will result in a sharper, more detailed recording. Consider recording in 1080p (Full HD) for most scenarios, especially if you plan to share your recordings online.
- Frame Rate:Choose a frame rate that matches the content you’re recording. For smooth, fluid movement, like gameplay, a higher frame rate (60fps) is ideal. However, if you’re recording a static presentation, 30fps might be sufficient.
- Lighting:Good lighting is essential for clear visibility. Record in a well-lit environment to minimize shadows and ensure your screen content is easily visible.
- Clean Screen:Before recording, ensure your iPhone screen is clean and free of smudges or fingerprints. This will enhance the visual clarity of your recording.
Importance of Clear Audio and Video
Audio and video quality are equally important in screen recordings. Clear audio enhances the viewing experience and helps viewers understand the content.
- Audio Quality:Use a microphone that provides good sound quality. External microphones can significantly improve audio clarity, especially if you’re narrating your recording.
- Background Noise:Minimize background noise during recording. Find a quiet environment to reduce distractions and ensure your audio is clear.
- Video Clarity:Ensure your video is sharp and focused. Use a stable surface or tripod to prevent shaky footage.
Creating Engaging and Informative Screen Recordings
Engaging and informative screen recordings capture the audience’s attention and convey information effectively. Here’s how to achieve this:
- Keep it Concise:Avoid unnecessary information or tangents. Stick to the main topic and present the information in a clear and concise manner.
- Use Visual Cues:Utilize visual cues like arrows, highlights, or text overlays to emphasize key points or guide the viewer’s attention.
- Add Voiceover:Narrating your recording provides context and explanation, making it more engaging and informative.
- Edit for Clarity:Use editing software to remove unnecessary sections, add transitions, and enhance the overall flow of your recording.
Conclusion
So there you have it! You’ve learned the ins and outs of screen recording on your iPhone using iOS 11. From enabling the feature to editing your recordings and troubleshooting common issues, you’re now equipped to capture and share your screen activity with ease.
Don’t be afraid to experiment with the different settings and features. You can use screen recording to create tutorials, demos, gameplay videos, and even record your own reaction videos. The possibilities are endless!
Additional Resources
If you’re looking for even more information on screen recording in iOS 11, check out these resources:
- Apple’s official documentation on screen recording: https://support.apple.com/en-us/HT207989
- A detailed guide on screen recording in iOS 11 from a third-party website: https://www.iphonelife.com/content/how-record-your-iphone-screen-ios-11
- A YouTube video tutorial on screen recording in iOS 11: https://www.youtube.com/watch?v=dQw4w9WgXcQ
Final Summary

So there you have it, recording your iPhone screen in iOS 11 is a breeze! You can capture all sorts of things, from quick demos to epic gaming sessions. Just remember to practice, experiment with the settings, and you’ll be a screen recording pro in no time.
Happy recording!
Questions Often Asked
Can I record my screen with audio?
Yes, you can include audio in your screen recordings. Just make sure to enable the microphone option in the Control Center before you start recording.
How do I edit my screen recordings?
You can edit your recordings using the Photos app on your iPhone. You can trim the video, add effects, and even share them with friends.
What if I can’t find the screen recording button in Control Center?
If you can’t find the screen recording button, you’ll need to add it to your Control Center. Go to Settings > Control Center > Customize Controls and add the Screen Recording button.