How To Plug Your Guitar Into Your Iphone And Rock Out
How to plug your guitar into your iPhone and rock out? It sounds like something straight out of a futuristic rock concert, right? Well, it’s actually a totally doable thing thanks to the amazing world of digital audio interfaces. These little gadgets are like magic bridges that let your guitar talk to your phone, opening up a whole new world of recording, jamming, and even performing.
Think about it: you can now capture your killer riffs, experiment with cool effects, and even share your music with the world, all from your pocket. It’s like having a portable studio at your fingertips. This guide will walk you through everything you need to know, from choosing the right interface to finding the perfect app for your musical journey.
Understanding the Connection
To rock out with your guitar on your iPhone, you’ll need an audio interface, a device that translates your guitar’s analog signal into a digital signal that your iPhone can understand. There are a few different types of interfaces available, each with its own set of pros and cons.
Types of Interfaces
Audio interfaces for connecting guitars to iPhones come in two main types:
- Lightning Interfaces: These interfaces connect directly to your iPhone’s Lightning port, offering a simple and convenient connection.
- USB-C Interfaces: These interfaces connect to your iPhone via a USB-C adapter, providing a more versatile connection that can be used with other devices as well.
Interface Features and Specifications
Here’s a table comparing the features and specifications of some popular guitar interfaces for iPhone:
| Interface | Connection Type | Inputs | Outputs | Features | Price |
|---|---|---|---|---|---|
| IK Multimedia iRig 2 | Lightning | 1/4″ Instrument Input | Headphone Output | Built-in tuner, low-latency, compact design | $39.99 |
| IK Multimedia iRig HD 2 | Lightning | 1/4″ Instrument Input | 1/4″ Output, Headphone Output | High-quality preamp, low-latency, professional-grade audio | $99.99 |
| Focusrite iTrack Solo | Lightning | 1/4″ Instrument Input, XLR Mic Input | 1/4″ Output, Headphone Output | High-quality preamp, low-latency, phantom power for microphones | $149.99 |
| Apogee Jam+ | Lightning | 1/4″ Instrument Input | Headphone Output | Compact design, high-quality audio, built-in tuner | $79.99 |
Choosing the Right Interface: How To Plug Your Guitar Into Your IPhone And Rock Out
Connecting your guitar to your iPhone requires a guitar interface, a device that converts the analog signal from your guitar into a digital signal that your iPhone can understand. Choosing the right interface depends on your budget, experience level, and desired features.
Guitar Interfaces for Beginners, How to plug your guitar into your iPhone and rock out
Beginners often benefit from simple and affordable interfaces with basic features.
- IK Multimedia iRig 2:This compact and affordable interface is a popular choice for beginners. It features a 1/4″ input jack for your guitar and a headphone jack for monitoring. It’s compatible with iOS and Android devices and comes with a free version of IK Multimedia’s AmpliTube app, which provides a wide range of virtual amps and effects.
- Fender Mustang Micro:This interface is also budget-friendly and offers a variety of built-in amp and effects models. It includes a USB-C connection for your iPhone and a headphone jack. It’s compatible with Fender’s Mustang app, which offers a more user-friendly interface and more customization options than AmpliTube.
These interfaces are ideal for beginners who are just starting out and don’t need a lot of advanced features.
Guitar Interfaces for Experienced Guitarists
Experienced guitarists may require more advanced features, such as high-quality audio conversion, low latency, and multiple inputs.
- Focusrite Scarlett Solo 3rd Gen:This interface offers excellent audio quality and low latency, making it suitable for recording and live performance. It features a single XLR/TRS combo input, which can be used for both microphones and guitars, and a headphone jack. It’s also compatible with Focusrite’s Scarlett MixControl software, which allows you to control your audio levels and routing.
- Universal Audio Volt 2:This interface is designed for both recording and live performance and offers a variety of features, including a built-in preamp, a headphone jack, and a balanced output. It also includes a free version of Universal Audio’s UAD software, which provides access to a wide range of plugins, including emulations of classic studio gear.
These interfaces are ideal for experienced guitarists who want the best possible audio quality and flexibility.
Setting Up the Interface

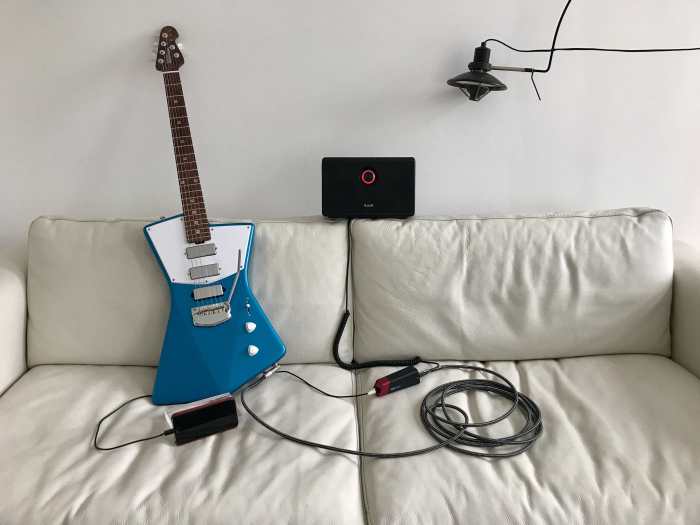
Now that you have your guitar interface and iPhone, it’s time to connect them and get ready to jam! The setup process is straightforward and involves connecting the interface to your iPhone and installing the necessary software.
Connecting the Interface
The first step is to connect your guitar interface to your iPhone. Most interfaces use a Lightning connector, similar to the one used for charging your iPhone. Simply plug the interface’s Lightning connector into your iPhone’s Lightning port.
Make sure that the interface is powered on before connecting it to your iPhone. Some interfaces have a power switch, while others may draw power directly from the iPhone.
If your interface uses a USB-C connector, you’ll need a Lightning to USB-C adapter. These adapters are widely available and can be purchased from Apple or other electronics retailers.
Installing the Software
Once your interface is connected, you’ll need to install the accompanying software or app. Most guitar interfaces come with their own dedicated software, which can be downloaded from the App Store.
The software provides essential features like audio input and output settings, as well as additional effects and tools.
Here’s a step-by-step guide for installing the software:
- Open the App Store on your iPhone.
- Search for the name of the interface’s software or app. For example, if you have a “IK Multimedia iRig 2” interface, search for “iRig Recorder.”
- Download and install the app. You may need to grant the app permission to access your microphone and other audio settings.
- Launch the app and follow the on-screen instructions to configure the interface.
Configuring the Interface
After installing the software, you’ll need to configure the interface to ensure it’s working correctly. This typically involves selecting the input and output sources, adjusting audio levels, and choosing the desired effects.
The specific configuration options will vary depending on the interface and software.
Here’s a general overview of the configuration process:
- Open the software app and navigate to the settings or configuration menu.
- Select the correct input source. This should be the interface’s input, which is typically labeled as “Guitar” or “Instrument.”
- Adjust the input gain level. This determines how loud the signal from your guitar is captured by the interface. The optimal level should be high enough to avoid clipping (distortion) but not so high that it causes feedback or noise.
- Select the output source. This should be the iPhone’s speaker or headphones. You can also choose to output the audio to an external speaker or audio device.
- Adjust the output volume level.
- Explore any additional features or effects provided by the software. These may include built-in amplifiers, effects pedals, and other tools for shaping your sound.
Choosing the Right App
Now that you have your iPhone and guitar interface set up, it’s time to choose the right app to capture your musical genius. There are a ton of options out there, each with its own unique features and strengths.
We’ll explore some popular choices and help you decide which one is perfect for your needs.
Free vs. Paid Apps
Deciding between free and paid apps can be a tough one, but it really comes down to your priorities. Free apps offer a great starting point, but they may have limitations on features like recording time, effects, or editing tools.
Paid apps, on the other hand, typically provide more advanced features and often offer a more professional recording experience.
- Free apps are a great way to experiment and get a feel for the process without committing any money. They often include basic recording and editing tools, but may have limitations on recording time or the number of effects available.
For example, GarageBandis a free app that comes pre-installed on iPhones and offers a surprising amount of features, including a virtual drum machine, sampler, and basic editing tools.
- Paid apps, like AmpliTube CS, provide a more comprehensive experience. They typically offer higher quality recording, a wider range of effects, and more advanced editing tools. While you’ll need to spend some money upfront, these apps can be a great investment for serious musicians.
For example, AmpliTube CSoffers a vast library of amps, effects, and even a virtual drummer, all designed to create a realistic studio experience.
Popular Guitar Recording Apps
There are many great guitar recording apps available, each with its own unique features and benefits. Here’s a breakdown of some popular choices:
| App Name | Features | Pros | Cons |
|---|---|---|---|
| GarageBand | – Basic recording and editing tools
|
– Free
|
– Limited features compared to paid apps
|
| AmpliTube CS | – Realistic amp and effects modeling
|
– High-quality recording
|
– Paid app
|
| AmpliTube 4 | – Advanced amp and effects modeling
|
– Extremely powerful and versatile
|
– Expensive
|
| BIAS FX 2 | – Realistic amp and effects modeling
|
– High-quality sound
|
– Paid app
|
Recording and Editing
Now that you’ve got your guitar plugged in and your iPhone ready to rock, it’s time to capture those sweet sounds. Recording with an iPhone interface is a breeze, and you can achieve professional-sounding results with a little bit of know-how.
So you want to plug your guitar into your iPhone and rock out? That’s awesome! But before you start shredding, you might want to check out Update your Brydge keyboard for multitouch support on iPad. It’ll make your iPad experience even smoother, and you’ll be able to control your music apps with ease.
Once you’re all set up, crank up your favorite amp app and let the good times roll!
Recording Techniques
Recording your guitar is all about capturing the best possible sound. There are a few key things to keep in mind:* Microphone Placement:The way you position your microphone in relation to your guitar speaker will significantly impact the tone of your recording.
Experiment with different placements to find what sounds best. For a warmer, fuller sound, place the microphone directly in front of the speaker. For a brighter, more focused sound, position the microphone slightly off-axis.
Signal Levels
Make sure your signal isn’t too hot or too weak. A good rule of thumb is to aim for a signal level that peaks around
- 18dB to
- 12dB. If the signal is too hot, it will distort. If it’s too weak, you’ll have a lot of noise.
Room Acoustics
The room you record in will also affect the sound of your recording. If your room is too reverberant, it will make your recording sound muddy. Try recording in a space with minimal echoes.
Editing Techniques
Once you’ve recorded your guitar track, you can use your chosen app to clean up the audio and add some polish.* Trimming:Use the trimming tool to remove unwanted sections of your recording, such as dead space or mistakes.
Adjusting Volume
You can use the volume slider to adjust the overall volume of your track or to create fades in and out.
Applying Effects
Many apps offer a variety of effects that you can use to shape the sound of your guitar. These can include things like reverb, delay, chorus, and distortion.
Playing and Performing

Okay, so you’ve got your iPhone, your guitar, and your interface all set up. Now it’s time to rock out! This setup isn’t just for recording in your bedroom; it opens up a whole new world of live performance possibilities.
Live Performance Possibilities
Think of your iPhone as a portable stage rig. It’s a powerful tool for live performance, especially when you factor in the effects and looping capabilities available in apps.
Want to jam out with your guitar through your iPhone? You’ll need a good audio connection for that sweet, sweet rock and roll. Make sure your AirPods Pro are set up properly by checking out How to use AirPods Pro Ear Tip Fit Test to make them sound their best.
Once you’ve got the right fit, you’ll be ready to crank up the tunes and shred!
- You can use your iPhone to play backing tracks or loops to add layers to your performance.
- You can use effects to enhance your sound in real-time, giving your music a unique edge.
- You can even use your iPhone to stream your performance live on social media, reaching a wider audience.
Exploring Beyond the Basics

You’ve mastered the basics of connecting your guitar to your iPhone and creating music. Now, let’s dive into the exciting world of using this setup to create and produce music on a professional level. Think of your iPhone and guitar interface as a portable studio, unlocking a world of possibilities for recording, manipulating, and sharing your music.
Multi-Track Recording
Multi-track recording allows you to record different instruments or vocals separately, layer them together, and create complex arrangements. You can create a full band sound with just your guitar and iPhone, recording multiple guitar parts, adding backing vocals, and even experimenting with different effects.For example, you could record a rhythm guitar part, then add a lead guitar part, and finally layer a vocal track.
This way, you can adjust each element independently, achieving a professional sound that would be impossible with a single track recording.
Adding Backing Tracks
With a multi-track setup, you can easily incorporate backing tracks into your recordings. This can be anything from drum loops and basslines to full-blown orchestral arrangements. You can find countless free and paid backing tracks online, or even create your own using music production software.
For instance, you could use a drum loop from a popular music production app like GarageBand to create a groove for your guitar solo. You can even find backing tracks specifically designed for different genres, allowing you to experiment with different musical styles.
Collaborating with Other Musicians
The iPhone and guitar interface can be a powerful tool for collaboration. You can easily share your recordings with other musicians, allowing them to add their own parts and contribute to your music. For example, you could record a guitar riff and send it to a friend who plays bass.
They can then record their bass part and send it back to you, creating a complete song together. This collaborative process is made even easier with cloud storage services, allowing you to share and access your recordings from anywhere.
Successful Musicians
Many successful musicians have used similar setups to create their music. For example, Ed Sheeran is known for his use of a loop pedal and a simple microphone, recording his songs in a bedroom studio. He has even used this setup to perform live, showcasing the power of this minimalist approach to music creation.
Similarly, many independent artists use their iPhones and guitar interfaces to record, produce, and distribute their music, reaching a global audience. The accessibility and affordability of these tools have democratized music production, allowing anyone with a passion for music to create and share their work.
Troubleshooting and Tips
So, you’ve got your guitar plugged into your iPhone, but things aren’t working as smoothly as you’d hoped. Don’t worry, it’s a common experience! Let’s explore some common problems and how to fix them, as well as some tips to keep your setup running smoothly.
Common Problems and Solutions
- No Sound:This is the most frustrating issue. It could be a problem with the connection, the interface, or the app. First, double-check that everything is plugged in securely. If that doesn’t work, try restarting your iPhone and the interface. If the problem persists, ensure the volume on your iPhone, the interface, and the app are turned up.
If you’re using headphones, make sure they’re properly connected to the interface.
- Distorted Sound:This can be caused by a few things. If the sound is very distorted, it could be that the input gain on your interface is set too high. Lower the gain and try again. If the distortion is subtle, it might be caused by interference from other electronic devices.
Try moving your iPhone or interface away from other devices to see if that helps.
- Latency:This is the delay between when you play a note and when you hear it. If you’re experiencing latency, try lowering the buffer size in your app’s settings. If that doesn’t work, you might need to try a different app or interface.
If the issue is with the app, you might need to adjust the latency settings. Sometimes, a higher buffer size can improve latency issues, though this might add a slight delay to your audio.
- Interface Not Recognized:If your iPhone isn’t recognizing your interface, try plugging it into a different USB port. If that doesn’t work, try restarting your iPhone. If the problem persists, make sure the interface is compatible with your iPhone. You can check the manufacturer’s website or the interface’s documentation for compatibility information.
So you want to plug your guitar into your iPhone and rock out? You’ll need an adapter, of course, but what if you accidentally lose the audio recording of your epic jam session? Don’t sweat it, you can recover unsaved QuickTime files with this handy trick and get back to rocking out in no time!
Maintaining Your Interface
- Keep it Clean:Dust and dirt can accumulate on the interface’s ports and connectors, leading to connection problems. Regularly clean the interface with a soft, dry cloth. Avoid using harsh chemicals or liquids.
- Store it Properly:When you’re not using the interface, store it in a safe and dry place. Avoid exposing it to extreme temperatures or humidity.
- Update the Firmware:Many interfaces have firmware updates available. These updates can improve performance, fix bugs, and add new features. Check the manufacturer’s website for updates.
Troubleshooting Guide
- Check the Connections:Ensure that the guitar cable is securely plugged into the guitar and the interface, and that the interface is properly connected to your iPhone.
- Check the Power:Make sure the interface is powered on and that your iPhone is charged.
- Check the Volume:Ensure that the volume on your iPhone, the interface, and the app are turned up.
- Restart Your Devices:Restart your iPhone and the interface. This can sometimes fix software glitches.
- Update the App:Make sure you have the latest version of the app installed. App updates can fix bugs and improve performance.
- Try a Different App:If you’re still having problems, try using a different app. There are many different guitar recording apps available, so you’re sure to find one that works for you.
- Try a Different Interface:If you’re still having problems, try using a different interface. Some interfaces are more compatible with certain iPhones or apps than others.
- Contact Support:If you’ve tried all of the above and you’re still having problems, contact the manufacturer of the interface or the app for support.
Inspiration and Resources
It’s one thing to learn how to plug your guitar into your iPhone, but it’s another to use that setup to create something truly amazing. This section will help you find the inspiration and resources you need to take your iPhone guitar recordings to the next level.
Online Resources and Communities
The internet is a treasure trove of information and inspiration for iPhone guitarists. Here are some places to get started:
- Online Forums and Communities:Sites like Reddit (r/iphoneguitar), Gearslutz, and KVR Audio host active communities of musicians who use iPhones for recording. These forums are great places to ask questions, share your music, and get feedback from other musicians.
- YouTube Channels:Many talented musicians create YouTube tutorials and demos showcasing their iPhone guitar setups and recording techniques. Search for terms like “iPhone guitar recording,” “GarageBand guitar,” or “AmpliTube for iPhone” to find a wealth of resources.
- Guitar Blogs and Websites:Many guitar blogs and websites feature articles and reviews on iPhone guitar recording gear and software. These resources can help you stay up-to-date on the latest trends and discover new tools.
Examples of Inspiring Music
To spark your creativity, here are a few examples of musicians who have used iPhone guitar setups to create incredible music:
- “The Ballad of the Sad Cafe” by The National:This song features a haunting guitar melody recorded using an iPhone and a simple amp simulator app. The song’s raw, intimate sound is a testament to the power of using minimal gear to create impactful music.
- “The Scientist” by Coldplay:This iconic track features a distinctive guitar riff recorded using an iPhone and a multi-track recording app. The song’s lush production and emotional depth showcase the versatility of iPhone guitar recording.
- “Heartbeats” by José González:This beautiful acoustic track features a simple guitar melody recorded using an iPhone and a minimal recording setup. The song’s stripped-down sound highlights the intimate and expressive nature of iPhone guitar recording.
Experimentation and Exploration
The beauty of iPhone guitar recording is its accessibility and flexibility. Don’t be afraid to experiment with different apps, effects, and recording techniques to find your own unique sound. Explore the creative possibilities and see what you can create!
Wrap-Up

So, you’ve learned how to plug your guitar into your iPhone and rock out, and now the possibilities are endless. Whether you’re a seasoned shredder or just starting to strum, this setup lets you unleash your creativity and take your music to the next level.
Experiment with different apps, try out new effects, and don’t be afraid to push the boundaries of what you can do. Who knows, maybe you’ll even become the next viral guitar sensation, all thanks to your iPhone and a little bit of rock ‘n’ roll magic!
Essential FAQs
What if my iPhone doesn’t have a headphone jack?
No worries! Many interfaces come with a Lightning connector that works perfectly with newer iPhones. You can also use a headphone jack adapter.
Do I need a special app to use a guitar interface with my iPhone?
Yes, you’ll need an app that can recognize and record audio from the interface. There are tons of great options out there, both free and paid.
Can I use my guitar interface for live performances?
Absolutely! Some interfaces even have features that are perfect for live gigs, like built-in effects and low-latency monitoring.