How To Make Your Own Power-Only Usb Cable
How to make your own power-only USB cable is a great way to save money and learn a new skill. It’s also a handy project to have in your toolkit, as you can use these cables for a variety of purposes.
You can power a Raspberry Pi, charge your phone from a computer, or even create a makeshift power adapter for a device that uses a USB power connector.
In this guide, we’ll walk you through the process of creating your own power-only USB cable, from gathering the necessary materials to testing the finished product. We’ll cover everything from identifying the different wires in a USB cable to soldering the connectors.
By the end of this guide, you’ll be able to make your own power-only USB cables with confidence.
Understanding USB Power-Only Cables

USB cables are ubiquitous, powering and connecting our devices. While most cables handle both data and power, there are specialized cables designed solely for power delivery. This guide explores the nuances of USB power-only cables, their applications, and key components.
The Distinction Between Data and Power-Only USB Cables
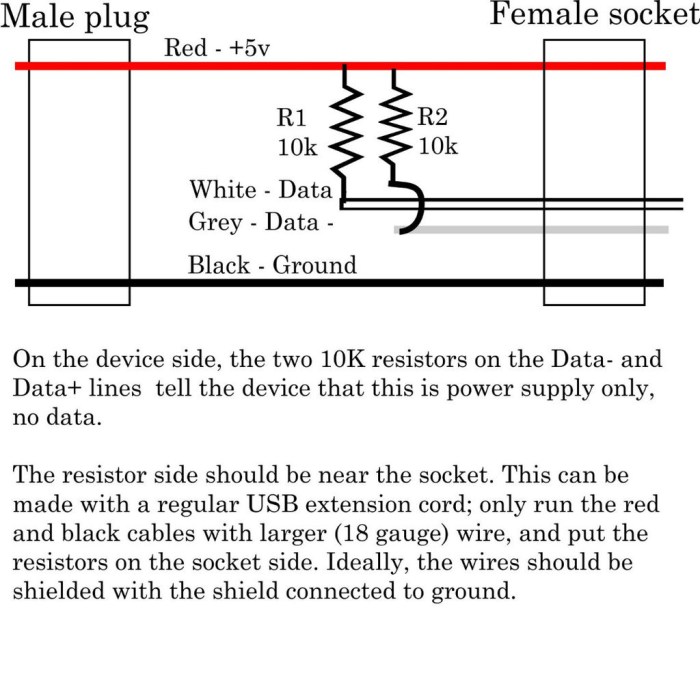
The primary difference lies in the internal wiring. Data cables contain four wires: two for data transfer (D+ and D-) and two for power (VBUS and GND). Power-only cables, however, omit the data wires, leaving only the power lines. This simplification allows for a more focused and efficient power delivery, eliminating any data transmission capabilities.
The Purpose and Applications of Power-Only USB Cables
Power-only cables serve a specific purpose: to provide power to devices without the need for data transfer. They are commonly used in scenarios where a device only requires power, such as charging smartphones, tablets, or external hard drives. They also find application in power banks, where the sole function is to deliver power to connected devices.
Key Components of a USB Power-Only Cable
The key components of a USB power-only cable are:
- USB Type-A Connector:The male connector that plugs into a power source, typically a computer or wall adapter.
- USB Type-B or Type-C Connector:The female connector that connects to the device requiring power. The type of connector depends on the device’s specifications.
- VBUS Wire:Carries the positive voltage supply from the power source to the device.
- GND Wire:Provides the ground connection, completing the circuit for power flow.
Materials and Tools
You’ll need a few basic materials and tools to build a power-only USB cable. The materials are readily available at most electronics stores or online retailers. The tools are common household items, so you likely already have them. This section will provide a list of materials and tools required for building a power-only USB cable, along with their descriptions and sources.
Materials
A list of materials needed for this project is provided below. The table includes the material, quantity, description, and source.
| Material | Quantity | Description | Source |
|---|---|---|---|
| USB Type-A Male Connector | 1 | A standard USB Type-A male connector, often found on devices like computers and chargers. | Electronics stores, online retailers |
| USB Type-B Female Connector | 1 | A standard USB Type-B female connector, commonly used on devices like printers and external hard drives. | Electronics stores, online retailers |
| USB Cable (any length) | 1 | Any USB cable with a length suitable for your needs. This cable will be cut and used to connect the connectors. | Electronics stores, online retailers |
| Wire Strippers | 1 | Used to remove the insulation from the wires of the USB cable. | Electronics stores, online retailers |
| Soldering Iron | 1 | Used to melt solder and connect the wires to the connectors. | Electronics stores, online retailers |
| Solder | 1 roll | Used to create a strong electrical connection between the wires and the connectors. | Electronics stores, online retailers |
| Heat Shrink Tubing | 1 roll | Used to insulate the soldered connections and protect them from damage. | Electronics stores, online retailers |
| Wire Cutter | 1 | Used to cut the wires of the USB cable to the desired length. | Electronics stores, online retailers |
Tools
The tools listed below are necessary for building a power-only USB cable. Each tool has a specific function and is essential for the project.
- Wire Strippers:Wire strippers are essential for removing the insulation from the wires of the USB cable. This is important for exposing the copper wires for soldering. Wire strippers typically have adjustable blades that can be set to the appropriate size for the wire gauge.
- Soldering Iron:A soldering iron is used to melt solder and connect the wires to the connectors. A soldering iron should have a temperature-controlled tip that can be adjusted to the appropriate temperature for the type of solder being used. The tip should be cleaned regularly to ensure proper heat transfer.
- Solder:Solder is a metal alloy used to create a strong electrical connection between the wires and the connectors. Solder comes in various types, including lead-free solder, which is often used in electronics. The type of solder used will depend on the specific project and the temperature rating of the soldering iron.
- Heat Shrink Tubing:Heat shrink tubing is used to insulate the soldered connections and protect them from damage. Heat shrink tubing is a type of plastic tubing that shrinks when heated, providing a tight seal around the connection. Heat shrink tubing is available in various sizes and colors, and it’s important to choose the correct size for the connection.
- Wire Cutter:Wire cutters are used to cut the wires of the USB cable to the desired length. Wire cutters should be sharp and able to cleanly cut through the wire without damaging the conductors. It’s important to use wire cutters that are rated for the size of the wire being cut.
Wire Stripping and Preparation
You’ve got your USB cable and tools ready, so now it’s time to get down to the nitty-gritty: stripping the insulation from the wires. This step is crucial for exposing the bare wires you’ll need to connect to your power source.
Proper wire stripping techniques are essential for a successful power-only USB cable. If you don’t strip the wires correctly, you could damage the wires, compromise the connection, or even create a safety hazard.
Making your own power-only USB cable is a pretty easy DIY project. Just cut off the data wires, and you’re good to go. Speaking of good to go, Pro Tip: How to pick a new thumbnail for your Live Photos is a great way to customize your phone’s look.
And once you’ve got that power-only USB cable ready, you can finally ditch those bulky wall chargers for a slimmer, more convenient setup.
Stripping the Wires
You’ll need to strip the insulation off the four wires inside the USB cable. The most common type of wire stripper uses a small blade to cut through the insulation and expose the bare wire. Here’s a step-by-step guide:* Choose the right stripper.Wire strippers come in different sizes to accommodate various wire gauges.
Select a stripper that matches the size of the wires in your USB cable.
Identify the wires.The USB cable typically has four wires
red (+5V), black (ground), green (data+), and white (data-). You only need the red and black wires for a power-only cable.
- Cut the insulation.Place the wire in the stripper and squeeze the handles to cut through the insulation. Be careful not to cut into the wire itself.
- Strip the insulation.Once the insulation is cut, you can slide it off the wire, exposing the bare wire.
- Trim the wire.Use a pair of wire cutters to trim any excess insulation or exposed wire.
Handling Exposed Wires
Once you’ve stripped the wires, it’s important to handle them carefully to avoid damaging them or creating a short circuit.Here are some tips:* Keep the wires separated.Don’t let the exposed wires touch each other or any metal objects.
- Don’t twist the wires.Twisting the wires can damage the insulation and make it difficult to connect them properly.
- Use a non-conductive surface.Work on a non-conductive surface, such as a piece of wood or plastic, to prevent electrical shocks.
- Handle the wires with care.Avoid bending or kinking the wires, as this can damage them.
Identifying USB Cable Wires
You’ve got your USB cable ready, and you’re ready to strip the insulation to expose the wires. Now it’s time to figure out which wire is which.The standard USB cable has four wires inside, each serving a specific purpose.
The most common type of USB cable is a Type A to Type B cable.
Identifying USB Cable Wires
The four wires inside a USB cable are color-coded to help you identify them. Here is a table showing the wire color, its function, and its corresponding USB pin:
| Wire Color | Wire Function | Corresponding USB Pin |
|---|---|---|
| Red | +5V Power | Pin 1 (Vcc) |
| Black | Ground | Pin 4 (GND) |
| Green | Data- | Pin 2 (D-) |
| White | Data+ | Pin 3 (D+) |
In a power-only cable, you’ll only be using the red and black wires, which carry the +5V power and ground, respectively. The green and white wires, which carry the data signals, are not needed for a power-only cable.
Connecting the Wires: How To Make Your Own Power-only USB Cable
Now that the wires are stripped and prepared, it’s time to connect them to the USB connector. This is a crucial step that requires careful attention to ensure the power-only cable functions correctly.Connecting the wires involves soldering them to the appropriate pins on the USB connector.
Soldering is a process that uses heat to melt solder, a metal alloy, to create a permanent electrical connection between two components. It’s a common technique in electronics, but it requires some practice and safety precautions.
Connecting Wires to the USB Connector
The USB connector has four pins: VCC, GND, D+, and D-. The power-only cable only utilizes the VCC and GND pins. The VCC pin is the positive power supply, while the GND pin is the ground reference. Connecting the wires to the wrong pins can result in damage to the device or even a fire hazard.
Therefore, it’s essential to ensure correct polarity when connecting the wires.
- VCC (Red Wire):Connect the red wire to the VCC pin on the USB connector. The VCC pin is typically located at the top of the connector, on the side with the USB symbol.
- GND (Black Wire):Connect the black wire to the GND pin on the USB connector. The GND pin is typically located at the bottom of the connector, on the side with the USB symbol.
Soldering the Wires to the Connectors
Soldering requires a soldering iron, solder, and flux. Flux is a chemical that helps to clean the metal surfaces and improve the flow of solder.
- Prepare the Soldering Iron:Plug in the soldering iron and allow it to heat up to the recommended temperature. The temperature will vary depending on the type of solder being used.
- Apply Flux:Apply a small amount of flux to the wire and the connector pin. This will help to create a better connection.
- Heat the Connection:Use the soldering iron to heat the wire and the connector pin simultaneously. The solder will melt and flow into the connection, creating a bond between the two components.
- Remove the Soldering Iron:Once the solder has flowed into the connection, remove the soldering iron and allow the connection to cool. Avoid moving the connection while it is cooling, as this could cause the solder to crack or break.
It’s important to use a soldering iron that is appropriate for the size of the wires and the connector pins. A smaller soldering iron is generally better for smaller wires and connectors.
It’s essential to be careful when soldering, as the soldering iron can get very hot and cause burns. Always wear safety glasses and gloves when soldering.
Assembling the Cable
You’ve prepped the wires and connectors, now it’s time to bring it all together. This step requires a bit of patience and attention to detail, but with the right tools and techniques, you can create a professional-looking power-only USB cable.
Securing the Connectors
It’s important to secure the connectors to the cable properly. A loose connector can lead to intermittent connections or even damage to the cable.
- Solder the Wires:Once the wires are stripped and positioned in the connector, use a soldering iron to melt solder onto the connection points. This creates a strong, reliable connection. Be sure to use a flux to help the solder flow smoothly and prevent oxidation.
- Crimp the Connectors:If you’re using crimp connectors, ensure you use the correct size and type of crimping tool. Apply pressure evenly to the connector to create a secure connection.
- Secure with Heat Shrink Tubing:Heat shrink tubing is a great way to protect the soldered or crimped connections and provide strain relief. Apply the tubing over the connection and use a heat gun to shrink it down tightly.
Creating a Professional-Looking Cable Assembly, How to make your own power-only USB cable
Here are some tips for creating a cable that looks as good as it performs:
- Use the Right Tools:Invest in quality tools like wire strippers, soldering iron, and heat gun. These tools will help you create a clean and professional-looking cable.
- Organize the Wires:Keep the wires organized and neatly routed throughout the assembly process. This will make the finished cable look more professional and prevent tangling.
- Consider Cable Sleeves:Cable sleeves can help to protect the cable and give it a more finished look. Choose a sleeve that matches the color of your cable or the overall aesthetic of your project.
Testing the Cable
You’ve assembled your power-only USB cable, but is it working correctly? Now it’s time to test your creation and make sure it delivers the power it’s designed for. Testing the cable’s functionality is crucial to ensure it’s safe and effective.
A properly functioning cable should deliver the correct voltage and amperage to your device.
Verifying Power Output
To verify the cable’s power output, you’ll need a multimeter. A multimeter is a versatile tool that can measure voltage, current (amperage), and resistance. To test the cable, you’ll need to connect the multimeter to the cable’s power wires.
- Set the multimeter to the DC voltage setting.
- Connect the red probe of the multimeter to the positive (red) wire of the USB cable.
- Connect the black probe of the multimeter to the negative (black) wire of the USB cable.
The multimeter should display the voltage output of the cable. For a standard USB power cable, the voltage should be around 5V.
Troubleshooting Common Issues
If your multimeter doesn’t show the expected voltage, or if you encounter other issues during testing, here are some common troubleshooting steps:
- Check the connections:Ensure the wires are securely connected to the USB connector and the device. Make sure the wires are stripped to the correct length and that the wire ends are clean.
- Verify the wire polarity:Double-check that the red wire is connected to the positive (+) terminal of the USB connector and the black wire is connected to the negative (-) terminal. Incorrect polarity can damage your device.
- Test the multimeter:Make sure your multimeter is working correctly. You can test it with a known good battery or power supply.
- Inspect the cable:Look for any visible damage to the cable, such as broken wires or loose connections.
If you’ve checked all of these points and the cable still isn’t working, it’s possible that you have a faulty wire or connector. In this case, you may need to replace the cable or its components.
Safety Precautions
While making your own USB power-only cable is a fun and rewarding project, it’s essential to prioritize safety throughout the process. Working with electrical components and tools requires caution and adherence to proper safety guidelines. This section will Artikel some crucial safety precautions to ensure a safe and successful project.
Electrical Safety
Working with electrical components can be dangerous if proper precautions are not taken. Always remember that electricity can be fatal, so it’s crucial to take all necessary steps to protect yourself. Here are some key electrical safety tips:
- Always disconnect the power source before working on any electrical components.
- Use insulated tools and gloves to avoid direct contact with live wires.
- Never work on electrical components with wet hands or in a wet environment.
- Be aware of the potential for electrical shock and take precautions to avoid it.
- Ensure that all electrical connections are properly insulated and secured.
Tool Safety
Using tools correctly and safely is essential for any DIY project. Always use the appropriate tools for the task at hand and follow the manufacturer’s instructions for each tool. Here are some general tool safety guidelines:
- Keep tools clean and in good working order.
- Use safety glasses to protect your eyes from flying debris.
- Wear appropriate clothing and footwear to avoid injury.
- Always use tools in a well-lit area.
- Be aware of the potential hazards associated with each tool and take precautions to avoid them.
Material Safety
The materials used in this project can also pose certain safety risks. It’s important to handle these materials with care and follow the manufacturer’s instructions for safe use. Here are some material safety tips:
- Store materials in a cool, dry place away from children and pets.
- Avoid contact with skin and eyes, and wash hands thoroughly after handling materials.
- Dispose of materials properly according to local regulations.
- Be aware of the potential hazards associated with each material and take precautions to avoid them.
Electrical Safety Regulations
It’s essential to follow all applicable electrical safety regulations when working on any electrical project. These regulations are designed to protect you and others from harm. Some common electrical safety regulations include:
- Never work on electrical components while they are energized.
- Always use properly rated electrical components and tools.
- Ensure that all electrical connections are properly insulated and secured.
- Be aware of the potential for electrical shock and take precautions to avoid it.
- Follow all local and national electrical safety codes.
Alternative Power-Only Cable Designs
While the basic power-only cable design is straightforward, there are variations that cater to specific needs or applications. These designs offer advantages and disadvantages that should be considered when choosing the right power-only cable for your project.
Making your own power-only USB cable is pretty easy, just cut the data wires and you’re good to go. It’s a good way to charge your phone without worrying about data transfer, but it can be a pain if you’re trying to use your AirPods with multiple devices.
If you want to prevent your AirPods from automatically switching, check out this guide: How to prevent AirPods from automatically switching to different devices. Once you’ve got that figured out, you can get back to your power-only cable project.
Comparison of Different Designs
Power-only cable designs can be categorized based on their connector types, wire configurations, and intended applications. Here’s a breakdown of some common designs:
- Standard USB-A to USB-A Cable: This design is the most basic, using a standard USB-A connector on both ends. It’s commonly used for charging devices that don’t require data transfer, such as power banks or external hard drives. It’s simple and cost-effective, but might not be suitable for all applications.
- USB-A to Micro-USB Cable: This design uses a standard USB-A connector on one end and a Micro-USB connector on the other. It’s commonly used for charging smartphones, tablets, and other devices with Micro-USB ports. It offers greater compatibility but can be prone to wear and tear due to the smaller Micro-USB connector.
- USB-C to USB-C Cable: This design uses USB-C connectors on both ends, offering faster charging speeds and improved data transfer capabilities. It’s becoming increasingly popular for charging laptops, smartphones, and other devices with USB-C ports. However, it can be more expensive than other designs.
- USB-A to Barrel Jack Cable: This design uses a standard USB-A connector on one end and a barrel jack connector on the other. It’s commonly used for charging devices with barrel jack power inputs, such as laptops and external hard drives. It offers flexibility in terms of power output but might require a specific barrel jack adapter.
Advantages and Disadvantages of Different Designs
The choice of power-only cable design depends on the specific application and requirements. Here’s a summary of the advantages and disadvantages of different designs:
| Design | Advantages | Disadvantages |
|---|---|---|
| Standard USB-A to USB-A Cable | Simple, cost-effective, widely compatible | Limited charging speed, not suitable for all devices |
| USB-A to Micro-USB Cable | Widely compatible with smartphones and tablets, affordable | Prone to wear and tear, limited charging speed |
| USB-C to USB-C Cable | Fast charging speeds, improved data transfer, versatile | More expensive, not compatible with all devices |
| USB-A to Barrel Jack Cable | Flexible power output, compatible with various devices | Requires specific barrel jack adapter, can be bulky |
Examples of Commonly Used Power-Only Cable Designs
Examples of commonly used power-only cable designs include:
- USB-A to USB-A Cable: Used for charging power banks, external hard drives, and other devices that don’t require data transfer.
- USB-A to Micro-USB Cable: Used for charging smartphones, tablets, and other devices with Micro-USB ports.
- USB-C to USB-C Cable: Used for charging laptops, smartphones, and other devices with USB-C ports, offering fast charging speeds and improved data transfer.
- USB-A to Barrel Jack Cable: Used for charging laptops, external hard drives, and other devices with barrel jack power inputs.
Applications of Power-Only USB Cables

Power-only USB cables, as the name suggests, are designed to deliver power without data transfer capabilities. They find application in various scenarios where power is the primary requirement and data transfer is not necessary.
Charging Devices
Power-only USB cables are extensively used for charging various electronic devices, such as smartphones, tablets, laptops, and portable power banks. These cables ensure efficient power delivery, maximizing charging speed without the overhead of data transfer protocols.
Powering Peripherals
These cables can power peripherals like external hard drives, USB fans, and LED lights. They provide a convenient and efficient way to power these devices without requiring a separate power adapter.
Powering Raspberry Pi
Power-only USB cables are commonly used to power Raspberry Pi boards, which are small, single-board computers. This allows for a compact and efficient setup, especially in projects where space is limited.
Industrial Applications
Power-only USB cables are employed in industrial settings to power sensors, actuators, and other devices that require a reliable power source. They are often used in automation systems, where data transfer is not a primary concern.
Automotive Applications
Power-only USB cables are used in automotive applications to power accessories like car chargers, dashcams, and GPS devices. They offer a reliable and convenient way to power these devices from the car’s USB port.
Making your own power-only USB cable is a great way to save some money and learn a new skill. It’s a simple project, and you can find all the parts you need at your local electronics store. While you’re working on your project, check out this article on 4 useful things you can do with the Digital Crown on AirPods Max , it might give you some ideas for your next project.
Once you’re done, you’ll have a handy cable that you can use to charge your devices.
Medical Applications
In medical settings, power-only USB cables are used to power medical devices, such as blood pressure monitors, pulse oximeters, and other portable diagnostic tools.
Benefits of Using Power-Only USB Cables
Using power-only USB cables offers several benefits:
- Increased Charging Speed:By eliminating data transfer protocols, power-only cables can deliver power more efficiently, resulting in faster charging times.
- Improved Reliability:Without the overhead of data transfer, power-only cables provide a more stable and reliable power source for devices.
- Reduced Cost:Power-only USB cables are often less expensive than data transfer cables, as they require fewer components.
- Space Savings:Power-only cables are typically smaller and more compact than data transfer cables, which can be advantageous in tight spaces.
Examples of Power-Only USB Cables in Different Industries
- Consumer Electronics:Smartphones, tablets, laptops, and portable power banks all rely on power-only USB cables for charging.
- Automotive:Car chargers, dashcams, and GPS devices are commonly powered using power-only USB cables.
- Industrial Automation:Power-only USB cables are used to power sensors, actuators, and other devices in industrial automation systems.
- Medical Devices:Portable medical devices, such as blood pressure monitors and pulse oximeters, often utilize power-only USB cables for power.
Troubleshooting and Maintenance
While crafting your own power-only USB cable can be a rewarding experience, it’s essential to understand potential issues and how to address them. This section will guide you through troubleshooting common problems and implementing preventative maintenance strategies to ensure your custom cable’s longevity.
Troubleshooting Common Issues
Common issues with power-only USB cables often stem from faulty connections, incorrect wiring, or damaged components. The following table Artikels some common problems and their corresponding solutions:
| Issue | Solution |
|---|---|
| Cable doesn’t deliver power |
|
| Device doesn’t recognize the cable |
|
| Cable overheats |
|
Preventative Maintenance
Implementing preventative maintenance measures can significantly extend the lifespan of your power-only USB cable. Here are some tips:
- Regularly inspect the cable: Look for any signs of wear and tear, such as frayed wires, cracked insulation, or loose connections.
- Avoid bending or twisting excessively: Excessive bending or twisting can damage the wires and insulation, leading to problems.
- Store the cable properly: When not in use, store the cable in a cool, dry place to prevent damage.
- Avoid using the cable with incompatible devices: Using the cable with devices that require a higher voltage or amperage can damage the cable.
Identifying and Addressing Potential Problems
To identify potential problems with your power-only USB cable, you can use a multimeter to check for continuity, voltage, and current.
A multimeter is a versatile tool that can measure various electrical properties.
If you detect any abnormalities, you can use the troubleshooting tips mentioned earlier to address the issue.
Final Wrap-Up
With a little patience and practice, you’ll be able to make your own power-only USB cables in no time. You can use these cables for a variety of projects, and you’ll have the satisfaction of knowing that you made them yourself.
So grab your tools and get started!
FAQ
Can I use any USB cable to make a power-only cable?
It’s best to use a cable specifically designed for data transfer, as these cables typically have thicker wires that can handle more power.
What if I don’t have a soldering iron?
You can use wire connectors to join the wires, but soldering provides a more secure and reliable connection.
What if the cable doesn’t work?
Double-check that you’ve connected the wires to the correct pins on the connectors and that you haven’t accidentally shorted any of the wires. If you’re still having trouble, you can try testing the cable with a multimeter.