How To Hand Off Your Old Iphone To Family Or Friends
How to hand off your old iPhone to family or friends? It’s a great way to give your device a new life while making sure your personal data stays safe. Whether you’re upgrading to a newer model or simply need to declutter, handing off your old iPhone is easier than you think.
This guide will walk you through the process, from preparing your iPhone to setting it up for the new owner.
First, you’ll need to back up your data, remove your accounts, and reset the iPhone to factory settings. Then, you can choose the best transfer method, whether it’s handing it off directly, using Apple’s Find My app, or erasing the device completely.
After transferring ownership, you can help the new owner set up their iPhone, choose essential apps, and understand the key features. This guide will also address security and privacy concerns, common troubleshooting issues, and provide additional tips to ensure a smooth transition.
Prepare Your iPhone for Transfer
It’s important to ensure your old iPhone is clean and ready for its new owner. Before handing it over, take some time to back up your data, remove your personal accounts, and reset the phone to factory settings. This will ensure that your personal information is protected and that the phone is ready for its new user.
Backing Up Your Data
Before you start erasing your iPhone, it’s crucial to create a backup of your important data. This backup will contain all your settings, apps, and data, allowing you to restore them to a new iPhone or even your current iPhone if needed.
You can create a backup using iCloud or iTunes.
Using iCloud
iCloud is a cloud-based service that allows you to store your data online. It’s a convenient option for backing up your data wirelessly. To back up your iPhone using iCloud, follow these steps:
- Go to Settings on your iPhone.
- Tap on your Apple ID banner at the top.
- Select iCloud.
- Turn on iCloud Backup.
- Tap on Back Up Now to start the backup process.
Using iTunes
iTunes is a desktop application that you can use to back up your iPhone to your computer. This is a good option if you prefer a wired backup or have a large amount of data to back up. To back up your iPhone using iTunes, follow these steps:
- Connect your iPhone to your computer using a USB cable.
- Open iTunes on your computer.
- Select your iPhone from the list of devices in iTunes.
- Click on the Summary tab.
- Click on This Computer under Backups.
- Click on Back Up Now to start the backup process.
Removing Personal Accounts and Data
Once you’ve backed up your data, it’s time to remove your personal accounts and data from your iPhone. This will ensure that your personal information is not accessible to the new owner.
Removing Accounts
To remove your accounts from your iPhone, follow these steps:
- Go to Settings on your iPhone.
- Tap on your Apple ID banner at the top.
- Select “Sign Out” at the bottom of the screen.
- Repeat this process for any other accounts you have on your iPhone, such as Gmail, Facebook, or Twitter.
Deleting Data
After removing your accounts, you can delete your personal data from your iPhone. This includes photos, videos, messages, and other files. To delete your data, follow these steps:
- Go to Settings on your iPhone.
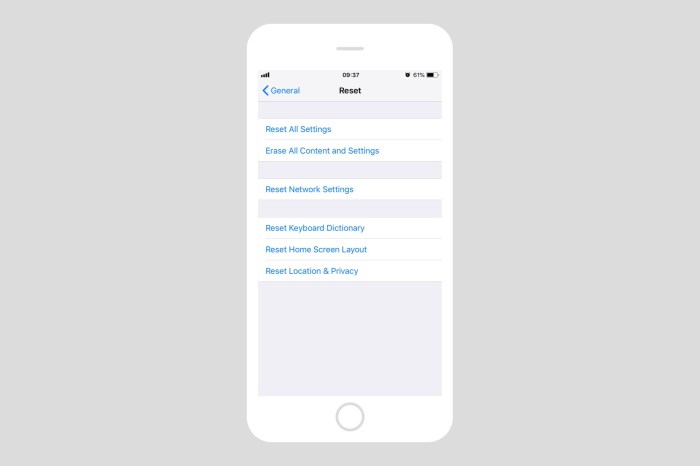
- Select General.
- Scroll down and tap on Transfer or Reset iPhone.
- Select Erase All Content and Settings.
- Enter your passcode if prompted.
- Confirm that you want to erase all content and settings.
Factory Resetting Your iPhone
After removing your accounts and data, it’s a good idea to factory reset your iPhone. This will erase all data and settings from the phone, returning it to its original state. This ensures that the new owner starts with a clean slate and that no remnants of your data remain on the device.
If you’re thinking of handing down your old iPhone to a family member or friend, make sure they’re not stuck with the latest beta software. If you’ve been testing out iOS 12 and want to revert back to the stable iOS 11.4, you can check out this guide on how to downgrade to iOS 11.4 after installing the iOS 12 beta.
Once you’ve downgraded, you’ll be ready to pass on your old iPhone without any compatibility issues.
Performing a Factory Reset
To factory reset your iPhone, follow these steps:
- Go to Settings on your iPhone.
- Select General.
- Scroll down and tap on Transfer or Reset iPhone.
- Select Erase All Content and Settings.
- Enter your passcode if prompted.
- Confirm that you want to erase all content and settings.
Choose the Right Transfer Method
Now that your iPhone is prepped, it’s time to decide how you’ll transfer ownership. There are a few different ways to do this, each with its own advantages and disadvantages. We’ll break down the most common methods to help you choose the one that best suits your situation.
Direct Handoff
Directly handing off your iPhone is the simplest and most straightforward method. This involves physically giving your iPhone to the recipient and allowing them to set it up.
- Advantages:Easy, quick, and requires no additional steps or apps.
- Disadvantages:All data remains on the device, potentially exposing sensitive information to the recipient.
If you’re transferring your iPhone to a trusted family member or friend, and you’ve already deleted sensitive data, this method might be suitable.
Using “Find My” App for Remote Transfer
Apple’s “Find My” app allows you to remotely transfer ownership of your iPhone, even if you’re not physically present. This method ensures that all your data is erased before the device is handed over.
- Advantages:Securely erases all data, prevents access to your personal information, and allows you to transfer ownership from a distance.
- Disadvantages:Requires an internet connection and access to the “Find My” app on your device.
This method is ideal if you’re transferring your iPhone to someone who lives far away or if you want to ensure maximum data security.
Erasing the iPhone and Setting It Up as New
If you’re concerned about privacy or want to ensure that your old iPhone is completely wiped clean, you can erase it and set it up as a new device. This will remove all your data and settings, effectively resetting the iPhone to its factory defaults.
- Advantages:Completely removes all your data, provides maximum privacy, and allows the recipient to personalize the device from scratch.
- Disadvantages:Requires time and effort to erase and set up the device, and you’ll lose access to all your data and settings.
This method is recommended if you’re selling or donating your iPhone or if you’re concerned about security breaches.
Transferring Data to the New Owner
You’ve decided to give your old iPhone a new home, but what about all your precious data? Don’t worry, there are several ways to transfer your data to the new owner. You can choose the method that best suits your needs and the new owner’s preferences.
Restoring from a Backup
Restoring from a backup is a straightforward way to transfer all your data, including apps, settings, and photos. This is a great option if you want to give the new owner a complete copy of your iPhone’s contents. Here are the steps to restore from a backup:
- On the new owner’s iPhone, set it up as a new device.
- During the setup process, choose to restore from a backup.
- Select the backup you want to restore from. This could be an iCloud backup or a backup from your computer.
- Wait for the restoration process to complete. This may take some time depending on the size of the backup.
Sharing Data Through Cloud Services, How to hand off your old iPhone to family or friends
Cloud services like iCloud and Google Drive offer a convenient way to share specific data with the new owner. This method is perfect for transferring photos, documents, or other files without transferring the entire iPhone’s contents.Here are the steps to share data through cloud services:
- Ensure both you and the new owner have accounts on the chosen cloud service.
- On your iPhone, access the cloud service app (e.g., iCloud or Google Drive).
- Select the files you want to share.
- Share the files with the new owner’s account. You can either invite them to a shared folder or send them a direct link.
- The new owner can then download the shared files on their iPhone.
Manually Transferring Files via Bluetooth or USB Cable
For smaller files or specific items, you can manually transfer data using Bluetooth or a USB cable. This method offers greater control over the data being transferred and can be helpful for transferring individual photos or documents.Here are the steps to manually transfer files via Bluetooth:
- Enable Bluetooth on both iPhones.
- On your iPhone, select the files you want to transfer.
- Tap the “Share” button and choose “Bluetooth.”
- Select the new owner’s iPhone from the list of available devices.
- Wait for the transfer to complete.
Here are the steps to manually transfer files via USB cable:
- Connect both iPhones to a computer using USB cables.
- Open the “Files” app on your computer.
- Navigate to the storage location of the files you want to transfer.
- Copy the files and paste them into the storage location on the new owner’s iPhone.
- Disconnect both iPhones from the computer.
Setting Up the iPhone for the New Owner
Now that you’ve transferred the data, it’s time to give the iPhone a fresh start for its new owner. This involves setting up essential features and personalizing the device for their needs.
Creating an Apple ID or Signing In
Before the new owner can use the iPhone, they need an Apple ID. This is like a digital passport for accessing Apple services, including the App Store, iCloud, and Apple Music.
- Creating a new Apple ID:If the new owner doesn’t have an Apple ID, they can create one during the setup process. They’ll need to provide basic information like their name, email address, and birthday.
- Signing in with an existing Apple ID:If the new owner already has an Apple ID, they can simply sign in using their credentials.
Setting Up Network Connections
The iPhone needs to connect to the internet to work properly. The new owner will need to configure the following:
- Wi-Fi:This is the most common way to connect to the internet. The iPhone will scan for available Wi-Fi networks, and the new owner can choose the one they want to connect to.
- Cellular Data:If the iPhone has a cellular data plan, the new owner can use it to access the internet even when Wi-Fi is unavailable. They’ll need to activate the cellular data plan with their carrier.
Customizing Settings
Once the iPhone is connected to the internet, the new owner can personalize their experience by adjusting settings like:
- Language:This determines the language used in the iPhone’s interface and apps.
- Region:This sets the region for features like currency, time zones, and date formats.
- Accessibility:These settings make the iPhone easier to use for people with disabilities. For example, the new owner can adjust text size, color contrast, and audio cues.
Checklist for Setting Up the iPhone
Here’s a detailed checklist to help you guide the new owner through the setup process:
- Turn on the iPhone:Press and hold the side button until the Apple logo appears.
- Choose a language:Select the preferred language for the iPhone’s interface.
- Connect to Wi-Fi:Select the Wi-Fi network and enter the password.
- Create or sign in to an Apple ID:Follow the on-screen prompts to create a new Apple ID or sign in with an existing one.
- Set up Touch ID or Face ID:Enable fingerprint or facial recognition for unlocking the iPhone.
- Transfer data (if applicable):If you’re transferring data from your old iPhone, follow the steps Artikeld in the previous section.
- Customize settings:Adjust language, region, accessibility options, and other preferences.
- Download apps:Help the new owner find and download the apps they need from the App Store.
- Set up iCloud:Enable iCloud backup to protect the new owner’s data.
- Explore the iPhone:Show the new owner how to use the iPhone’s features, including the home screen, control center, and app library.
Essential Apps and Features for New Owners
Giving your old iPhone to someone else means they’ll be starting fresh with a device that’s already familiar to you. It’s important to make sure they’re equipped with the essential apps and features to make the most of their new phone.
Essential Apps
These apps are generally considered must-haves for iPhone users, providing a wide range of functionalities that enhance everyday life.
- Messaging: The default Messages app on iPhone is great for texting, sending photos, and even making audio or video calls. It’s also seamlessly integrated with other Apple devices, so you can easily switch between your phone and a Mac or iPad.
- Email: Whether you use Gmail, Yahoo Mail, Outlook, or another service, the built-in Mail app makes managing your emails simple. You can set up multiple accounts, organize your inbox with folders, and even use it to send attachments.
- Safari: Apple’s web browser, Safari, is fast, secure, and efficient. It’s integrated with iCloud, so you can easily sync your bookmarks and browsing history across all your Apple devices.
- Photos: The Photos app is where all your pictures and videos are stored. It’s automatically organized by date and location, making it easy to find what you’re looking for. You can also edit your photos, create albums, and share them with friends and family.
- Calendar: The Calendar app helps you stay on top of your schedule. You can create events, set reminders, and even share your calendar with others. It also integrates with other Apple apps, like Siri, so you can easily add events or set reminders with your voice.
Giving your old iPhone to a friend or family member is a great way to keep it out of the landfill. Before you do, though, make sure you wipe it clean and delete any personal data. You might also want to show them a few handy iPhone tricks, like how to quickly scroll back to the bottom of the camera roll with a single tap.
That’ll save them a ton of time and frustration! Once you’re done, your old phone is ready for a new life with its new owner.
- Clock: The Clock app isn’t just for telling time. It also includes a timer, stopwatch, and world clock. You can use it to set alarms, track your workouts, or keep track of different time zones.
- Notes: The Notes app is a versatile tool for taking notes, creating lists, and sketching. It’s easy to use and syncs across all your Apple devices. You can even share notes with others, making it a great collaboration tool.
- Maps: Apple Maps is a comprehensive navigation app that provides turn-by-turn directions, real-time traffic updates, and street views. It’s also integrated with Siri, so you can easily get directions by voice.
- Weather: The Weather app gives you up-to-date weather information for your current location or any other location you choose. It also includes hourly forecasts, radar maps, and air quality reports.
Key Features
The iPhone offers a variety of features that can be a game-changer for new owners.
- Siri: Apple’s virtual assistant, Siri, can help with a variety of tasks, such as setting reminders, making calls, sending messages, and even playing music. You can access Siri by saying “Hey Siri” or by pressing and holding the side button.
- Face ID: Face ID is a secure and convenient way to unlock your iPhone. It uses your face to authenticate your identity, so you don’t need to enter a passcode every time you want to use your phone.
- iCloud: iCloud is a cloud storage service that allows you to sync your data across all your Apple devices. This includes your photos, videos, documents, and even your app settings. You can also use iCloud to back up your iPhone, so you can restore it to its previous state if something happens to your device.
- Apple Pay: Apple Pay is a contactless payment system that allows you to make purchases with your iPhone. It’s secure and convenient, and you can use it at millions of locations around the world.
Navigating the iPhone
The iPhone’s interface is intuitive and easy to use. Here are a few tips for navigating the phone:
- Home Screen: The Home Screen is where you’ll find your most frequently used apps. You can rearrange the icons by dragging them to different locations.
- App Library: The App Library is a new feature in iOS 14 that organizes all your apps into categories. It’s a great way to find apps quickly and easily.
- Control Center: Control Center gives you quick access to common settings and features, such as Wi-Fi, Bluetooth, brightness, and volume. You can access Control Center by swiping down from the top-right corner of the screen.
- Notification Center: Notification Center is where you’ll find all your notifications, such as messages, emails, and calendar events. You can access Notification Center by swiping down from the top of the screen.
- Settings: The Settings app is where you can customize your iPhone’s settings. You can change things like your wallpaper, notification sounds, and data usage.
Security and Privacy Considerations
You’ve gone through the effort of transferring your old iPhone to a new owner, but there’s one more crucial step: securing the device and protecting the personal data it contains. Think of it as locking the door after you’ve handed over the keys! You wouldn’t want someone else to access your personal information or make unauthorized changes to your device, so taking the necessary precautions is essential.
Enabling Security Features
Enabling security features is like putting a lock on your iPhone’s door. It prevents unauthorized access to your data and protects your privacy. Let’s dive into the key features you should enable.
Find My iPhone
Find My iPhone is a powerful tool that lets you locate your iPhone remotely, even if it’s lost or stolen. This feature is especially useful in the event that the new owner misplaces the device or decides to sell it.
Giving your old iPhone to a family member or friend is a great way to give it a second life. Just remember to wipe it clean first, right? It’s also important to be aware of the security settings on your AirPods, especially if you’re selling them.
Check out Why you should turn off Activation Lock when selling your AirPods for some tips on making sure your old AirPods are ready for a new owner. Once you’ve taken care of that, you can hand off your iPhone with peace of mind knowing it’s ready for its next adventure!
To enable Find My iPhone:
- Open the Settings app.
- Tap on your Apple ID banner at the top.
- Select “Find My” and then “Find My iPhone.”
- Toggle the “Find My iPhone” switch to the ON position.
Passcode Lock
A passcode lock acts as a barrier to prevent unauthorized access to your iPhone. Setting a strong passcode is crucial to ensure that only authorized users can unlock your device. Here’s how to set a passcode:
- Open the Settings app.
- Tap on “Face ID & Passcode” or “Touch ID & Passcode” (depending on your iPhone model).
- Enter your current passcode if you have one.
- Tap on “Change Passcode.”
- Enter a new six-digit passcode or choose a custom alphanumeric passcode.
- Confirm your new passcode by entering it again.
Managing Privacy Settings
Privacy settings act as the guardians of your personal information on your iPhone. By carefully managing these settings, you can control which apps have access to your data and ensure that your privacy is protected.
Location Services
Location Services allow apps to access your iPhone’s location data. While this can be useful for navigation and location-based services, it’s important to be selective about which apps have access to this sensitive information. To manage location services:
- Open the Settings app.
- Tap on “Privacy” and then “Location Services.”
- Review the list of apps and choose the level of access you want to grant each app. You can choose “Always,” “While Using the App,” “Never,” or “Ask Next Time.”
Contacts, Calendar, and Photos
Apps often request access to your contacts, calendar, and photos. You should carefully consider which apps need access to this data and restrict access to apps that you don’t trust. To manage access to contacts, calendar, and photos:
- Open the Settings app.
- Tap on “Privacy” and then select “Contacts,” “Calendar,” or “Photos.”
- Review the list of apps and toggle the switch to the OFF position for apps that you don’t want to have access to your data.
Other Privacy Settings
There are many other privacy settings that you can adjust to protect your personal information. These include:
- Advertising:You can limit ad tracking by going to Settings > Privacy > Advertising and turning on “Limit Ad Tracking.”
- Safari:You can control website tracking by going to Settings > Safari and turning on “Prevent Cross-Site Tracking” and “Block All Cookies.”
- Siri & Dictation:You can choose whether or not Siri should listen to your requests by going to Settings > Siri & Search and turning off “Listen for “Hey Siri”.
Troubleshooting Common Issues
It’s natural to encounter some hiccups during the transfer process. Don’t worry! We’ll cover some common issues and how to fix them.
Failed Backups
A failed backup can be frustrating, but there are a few things you can try to resolve the issue.
- Ensure Enough Storage:Make sure you have enough free space on your computer or iCloud to store the backup. You can check your storage space in your device settings.
- Check Internet Connection:A stable internet connection is crucial for backing up your iPhone to iCloud. If you’re using a Wi-Fi network, make sure it’s working properly.
- Try a Different Backup Method:If iCloud backups are failing, you can try backing up your iPhone to your computer using iTunes. Make sure you have the latest version of iTunes installed.
- Restart Your Devices:Sometimes restarting your iPhone and computer can resolve backup issues.
- Delete Old Backups:If you have multiple backups, consider deleting older ones to free up space and prevent potential conflicts.
Activation Errors
Activation errors can occur when trying to set up the iPhone for the new owner. Here are some common causes and solutions:
- SIM Card Issue:Ensure the SIM card is inserted correctly and is compatible with the iPhone model.
- Network Issues:Check your internet connection and try connecting to a different Wi-Fi network or cellular data.
- Apple Server Issues:Occasionally, Apple servers may experience temporary outages. Wait a few minutes and try again later.
- Contact Apple Support:If you’ve tried the above steps and are still experiencing activation errors, contact Apple support for further assistance.
Data Transfer Problems
Data transfer issues can happen during the transfer process. Here’s what you can do:
- Check Connection:Make sure the devices are connected properly and the cable is functioning.
- Try a Different Cable:If possible, try using a different Lightning cable to rule out a faulty cable.
- Restart Devices:Restarting both the iPhone and the computer can resolve connectivity issues.
- Update Software:Ensure both devices are running the latest software versions.
- Use Wi-Fi Transfer:If possible, use Wi-Fi transfer instead of a cable to avoid potential connectivity issues.
Additional Tips and Considerations
You’ve gone through the process of transferring your old iPhone to a new owner, but there are a few more things to keep in mind to ensure a smooth transition and maximize the value of your old device.
Maximizing iPhone Lifespan
Taking care of your iPhone can extend its lifespan and help you get the most out of it. Here are a few tips:
- Use a protective case:A good case can protect your iPhone from scratches, bumps, and drops, which can prolong its lifespan.
- Install a screen protector:A screen protector can help prevent scratches and cracks on your iPhone’s display.
- Keep your software updated:Software updates often include security patches and bug fixes that can improve your iPhone’s performance and longevity.
- Clean your iPhone regularly:Wipe down your iPhone with a microfiber cloth to remove dust, dirt, and fingerprints.
- Avoid extreme temperatures:Excessive heat or cold can damage your iPhone’s battery and other components.
Benefits of Upgrading to a Newer iPhone Model
Upgrading to a newer iPhone model can provide you with the latest features, improved performance, and enhanced security.
- Faster processor and more RAM:Newer iPhones often have faster processors and more RAM, which can make apps run smoother and multitasking easier.
- Improved camera capabilities:Newer iPhones typically have better camera systems, with higher resolution sensors, wider apertures, and advanced features like Night Mode and Portrait Mode.
- Longer battery life:Newer iPhones often have more efficient batteries that can last longer on a single charge.
- Enhanced security features:Newer iPhones often include advanced security features like Face ID or Touch ID, which can protect your device from unauthorized access.
- Support for the latest iOS updates:Newer iPhones are guaranteed to receive the latest iOS updates, which provide new features, bug fixes, and security patches.
Selling or Trading In an Old iPhone
If you’re looking to get rid of your old iPhone, you have a few options:
- Sell it directly to someone:You can sell your iPhone directly to a friend, family member, or someone online.
- Trade it in to Apple:Apple offers a trade-in program where you can trade in your old iPhone for credit towards a new iPhone or other Apple products.
- Sell it to a third-party reseller:There are many third-party resellers that buy used iPhones, such as Gazelle, Swappa, and Decluttr.
Final Thoughts: How To Hand Off Your Old IPhone To Family Or Friends
Handing off your old iPhone to family or friends is a great way to extend the life of your device and share the joy of using Apple’s ecosystem. By following the steps Artikeld in this guide, you can ensure a seamless transfer process while protecting your personal data.
Whether you’re gifting your old iPhone or simply passing it on to a loved one, you can rest assured that your device is in good hands.
Clarifying Questions
What if I don’t have a backup?
If you haven’t backed up your data, you can still transfer the iPhone, but you’ll lose all your photos, apps, and settings. It’s always best to back up your data before handing off your iPhone.
What if the new owner doesn’t have an Apple ID?
They can create a new Apple ID during the setup process. It’s a simple process that takes just a few minutes.
Can I sell my old iPhone after handing it off?
Yes, but make sure you’ve erased all your personal data and removed your Apple ID before selling it. You can also use Apple’s trade-in program for a credit towards a new iPhone.

