How To Delete Your Unwanted Iphone Photos In One Quick Purge
How to Delete your unwanted iPhone photos in one quick purge? It’s a question many of us face, especially when our iPhone storage starts to scream for mercy. Whether you’re drowning in blurry selfies, duplicate pictures, or screenshots you no longer need, we’ve got you covered.
This guide will walk you through the process of clearing out your photo library efficiently and effectively, freeing up precious space and giving your iPhone a fresh start.
We’ll cover everything from understanding iPhone photo storage and selecting photos for deletion to using bulk deletion techniques and ensuring your privacy. We’ll also explore alternative storage solutions and troubleshoot any common issues you might encounter along the way.
Understanding iPhone Photo Storage: How To Delete Your Unwanted IPhone Photos In One Quick Purge
Your iPhone’s photo storage is a vital part of your digital life, capturing memories and moments you cherish. However, managing this storage effectively is crucial to avoid storage issues and ensure your photos are readily accessible. Let’s delve into the different types of photo storage on your iPhone and understand how they work.
Photo Storage Options
Your iPhone offers various options for storing your photos. These options determine where your photos are saved, how they are accessible, and how much storage space they consume.
- Camera Roll:This is the default location where your iPhone saves photos and videos you capture using the camera app. The Camera Roll is directly accessible on your iPhone and is a primary storage location for your photos.
- iCloud Photos:This is Apple’s cloud-based photo storage service. Enabling iCloud Photos allows your photos and videos to be stored and synced across all your Apple devices. It also provides features like photo editing, sharing, and access from any device.
- Albums:Within the Photos app, you can create albums to organize your photos into specific categories. These albums can be used to group photos by event, location, or any other criteria you choose.
Potential Issues with Excessive Photo Storage
While capturing memories is essential, storing an excessive number of photos can lead to various issues.
- Storage Space Limitations:Your iPhone has a limited amount of storage space. As you accumulate more photos, you may start to run out of space, making it difficult to download new apps, install updates, or take new photos.
- Performance Degradation:Excessive photo storage can slow down your iPhone’s performance. The device might take longer to load apps, respond to commands, or navigate through menus.
- Backup Issues:Backing up your iPhone with a large photo library can take a significant amount of time and data. It might also require more storage space on your backup destination.
Managing Photo Storage Effectively
Managing your photo storage is essential for a smooth and efficient iPhone experience. Here are some tips for effective photo storage management:
- Delete Unwanted Photos:Regularly review your photo library and delete photos you no longer need. This includes blurry, duplicate, or irrelevant photos.
- Optimize iCloud Photos:If you use iCloud Photos, consider using the “Optimize iPhone Storage” option. This feature will store lower-resolution versions of your photos on your iPhone while keeping the full-resolution versions in iCloud. This can save significant storage space on your device.
Deleting a bunch of photos on your iPhone can feel like a chore, but it doesn’t have to be! Once you’ve freed up some space, why not check out Try these great emoji shortcuts on iPhone and iPad to make your texts even more fun.
Then, when you’re ready to clean up your photo library again, just select the photos you want to get rid of and tap “Delete”. It’s that easy!
- Utilize Albums:Organize your photos into albums to easily find the ones you need and delete those you don’t. Albums can also help you identify photos you might want to keep even if they’re not your favorites.
- Consider External Storage:For large photo libraries, consider using an external storage device like a hard drive or a cloud storage service. This allows you to free up space on your iPhone while still maintaining access to your photos.
Selecting Photos for Deletion
The first step to purging your iPhone photos is to identify the ones you want to delete. This can be a daunting task, especially if you have a large photo library. But don’t worry, there are some strategies you can use to make the process easier.
Identifying Unwanted Photos
To effectively delete unwanted photos, you need to identify them. There are several types of photos that are typically good candidates for deletion:
- Blurry Images:These are often the result of poor lighting or camera shake. If a photo is so blurry that you can’t make out what it is, it’s probably not worth keeping.
- Duplicates:It’s easy to accidentally take multiple photos of the same subject. Duplicates take up unnecessary space, so you can delete all but one of each photo.
- Screenshots:Screenshots are often temporary files that you don’t need to keep forever. If you’ve already saved the information from a screenshot, you can delete it.
- Unnecessary Selfies:Let’s face it, we all take a lot of selfies. But most of us only need a few good ones. You can delete the rest.
Organizing Photos
Organizing your photos can make it easier to identify unwanted ones. Here are some strategies for organizing your photo library:
- Create Albums:You can create albums for different categories of photos, such as “Family,” “Vacation,” or “Pets.” This will help you quickly find the photos you’re looking for and identify photos that don’t belong in any of your albums.
- Tag Photos:You can tag photos with s to make them easier to find. For example, you could tag a photo of your dog with the s “dog,” “pet,” and “Fido.” This will make it easier to find all of your photos of your dog later on.
- Use the “Favorites” Feature:If you have a photo that you really love, you can mark it as a favorite. This will make it easier to find later on. You can also use the “Favorites” feature to quickly identify photos that you want to keep.
Deleting a bunch of photos on your iPhone can be a pain, but there’s a super easy way to do it. Just select all the photos you want to get rid of, then tap “Delete” – it’s that simple! While you’re on the topic of iPhone tips, check out this Pro Tip: How to get quick info in Apple Maps with 3D Touch – it’s a game-changer for navigating around town.
Once you’ve cleared out your photo library, you’ll have more space for all the awesome pics you’re gonna take next!
Using the “Recently Deleted” Folder
The “Recently Deleted” folder is a safety net for your photos. When you delete a photo, it’s not permanently deleted. It’s moved to the “Recently Deleted” folder, where it’s kept for 30 days. This gives you time to change your mind and recover the photo if you need to.
You can also use the “Recently Deleted” folder to review photos before permanently deleting them. This is a good way to make sure that you’re not accidentally deleting any photos that you want to keep.
Deleting Photos Individually
Deleting photos one by one is a straightforward way to clear out unwanted images. It’s a good option for smaller batches or when you want to be extra careful about what you’re removing.
Deleting Photos One by One, How to Delete your unwanted iPhone photos in one quick purge
To delete a single photo, follow these steps:
- Open the Photosapp on your iPhone.
- Navigate to the photo you want to delete.
- Tap on the phototo open it.
- Tap on the trash can iconin the bottom right corner of the screen.
- Confirm by tapping Delete Photo.
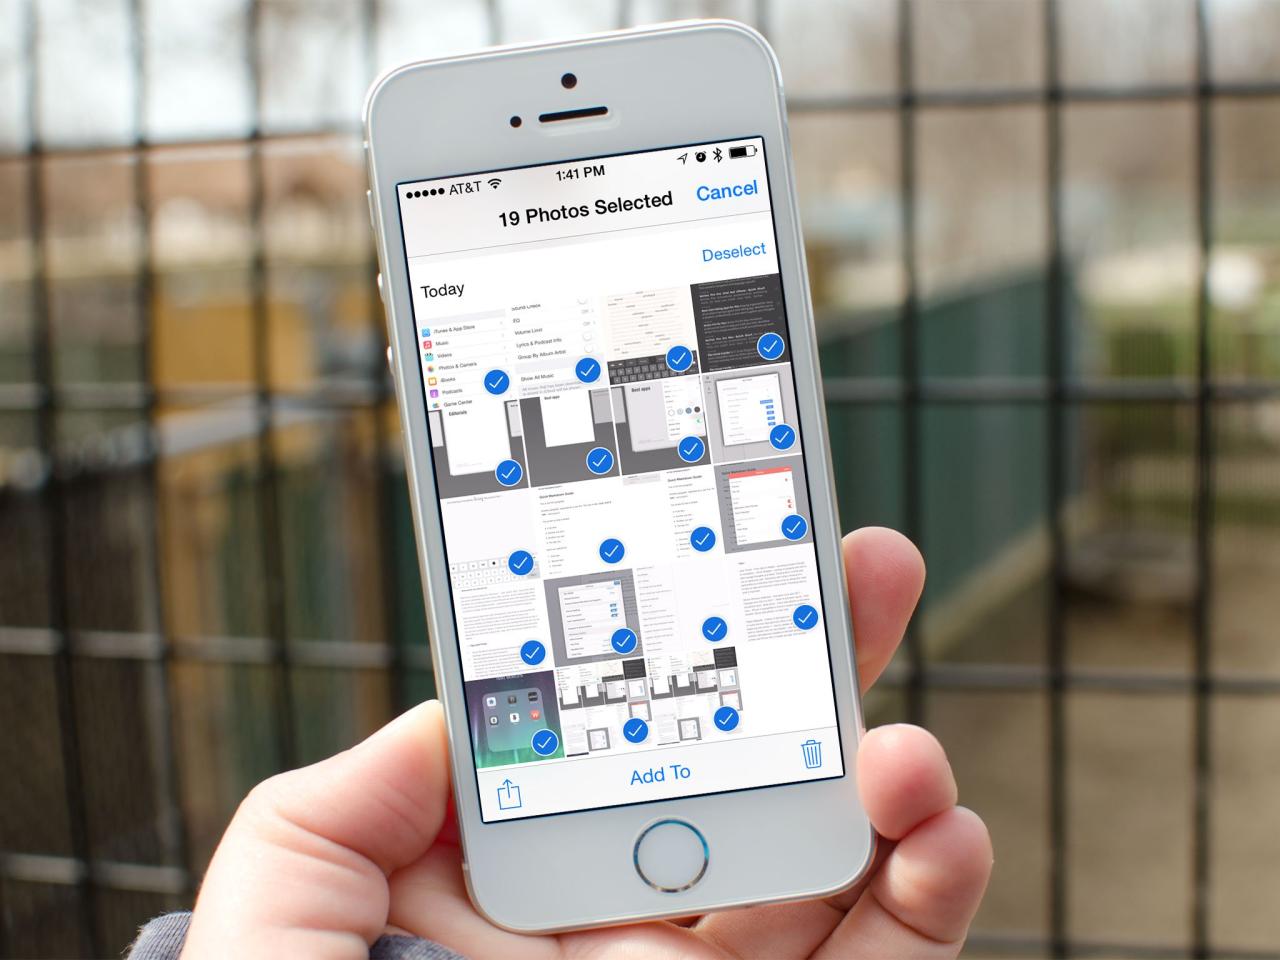
Using the “Select” Option to Delete Multiple Photos
If you want to delete several photos at once, the “Select” option is a convenient way to do so.
- Open the Photosapp.
- Go to the album or view where the photos you want to delete are located.
- Tap on the Selectbutton in the top right corner of the screen.
- Tap on each photo you want to delete to selectthem.
- Once you’ve selected all the photos, tap on the trash can iconat the bottom of the screen.
- Confirm by tapping Delete [number] Photos.
Deleting Photos from a Specific Album
You can delete photos from a specific album by following these steps:
- Open the Photosapp.
- Navigate to the albumcontaining the photos you want to delete.
- Tap on the Selectbutton in the top right corner of the screen.
- Choose the photos you want to delete by tapping on them.
- Once selected, tap on the trash can iconat the bottom of the screen.
- Confirm by tapping Delete [number] Photos.
Bulk Deletion Techniques
Sometimes, you might want to delete a large number of photos at once, especially if you have a lot of duplicates or unwanted images. Thankfully, iOS offers several ways to delete multiple photos quickly and efficiently.
Using the “Select All” Option
The “Select All” option allows you to delete all photos in an album with a single tap. To do this, open the album containing the photos you want to delete. Tap “Select” in the top right corner. You’ll see a small checkmark next to each photo.
Tap “Select All” at the top of the screen. A checkmark will appear next to all photos in the album. Finally, tap the trash can icon at the bottom of the screen and confirm the deletion. This method is great for quickly clearing out entire albums of unwanted photos, like screenshots or temporary images.
Third-Party Apps for Bulk Photo Deletion
While iOS provides basic bulk deletion tools, third-party apps offer more advanced features and customization options. These apps can automatically detect and delete duplicate photos, identify blurry or poorly-lit images, and even organize your photos based on various criteria.
- Benefits:Third-party apps offer more advanced features and customization options, including automatic duplicate detection, blur identification, and photo organization.
- Drawbacks:These apps require you to grant access to your photo library, which might raise privacy concerns for some users. Additionally, some apps might have a limited free trial or require a subscription.
Comparison of Bulk Deletion Methods
Here’s a comparison of different bulk deletion methods:
| Method | Pros | Cons |
|---|---|---|
| Select All (iOS) | Fast and efficient for deleting entire albums. | No selective deletion; deletes all photos in the album. |
| Third-Party Apps | Advanced features, customization, automatic duplicate detection. | Privacy concerns, potential subscription fees, app performance can vary. |
Deleting Photos from iCloud
Deleting photos from iCloud Photos allows you to remove them from your iCloud storage and make them inaccessible across all your devices that are linked to your iCloud account. This is different from deleting photos directly from your iPhone, which only removes them from your device’s storage.
Impact of iCloud Photo Deletion on Other Devices
Deleting photos from iCloud Photos will also remove them from all your devices that are signed in to the same iCloud account. This includes your iPhone, iPad, Mac, and any other Apple devices you use. It will also remove them from the iCloud.com website, where you can access your photos online.
Using the “Recently Deleted” Folder
The “Recently Deleted” folder on your iPhone is like a temporary holding area for photos you’ve deleted. It’s a safety net that gives you a chance to recover photos you may have deleted accidentally. It’s a bit like a recycling bin on your computer, allowing you to retrieve accidentally deleted items before they’re gone forever.
Recovering Deleted Photos
The “Recently Deleted” folder allows you to recover accidentally deleted photos. If you realize you’ve deleted a photo you want to keep, you can easily restore it.
- Open the Photos app:Launch the Photos app on your iPhone.
- Navigate to “Albums”:Tap on “Albums” at the bottom of the screen.
- Select “Recently Deleted”:Scroll down and tap on the “Recently Deleted” album.
- Choose photos to recover:Select the photos you want to restore. You can tap on a single photo to recover it or tap on the “Select” button at the top to choose multiple photos.
- Restore photos:Tap on the “Recover” button at the bottom right corner of the screen. The photos will be restored to their original location in your photo library.
Photo Deletion Time Limit
Photos in the “Recently Deleted” folder remain there for 30 days. After 30 days, they are permanently deleted from your iPhone and iCloud. If you don’t recover them within this time frame, they will be gone for good. This 30-day window gives you ample time to review your deleted photos and recover any you might have accidentally deleted.
Protecting Your Privacy
Deleting unwanted photos from your iPhone isn’t just about freeing up storage space; it’s also about safeguarding your privacy. Your phone contains a treasure trove of personal information, and photos, especially those containing sensitive content, can be a potential vulnerability.
Safeguarding Your Privacy While Deleting Photos
It’s crucial to be mindful of your privacy when deleting photos. Here are some tips to ensure you’re not leaving any traces of sensitive information behind:
- Use a secure method for deleting photos.Don’t just rely on the standard “delete” function. Consider using a dedicated photo shredding app, which overwrites the deleted files multiple times, making them virtually unrecoverable.
- Be aware of cloud backups.If you have iCloud photo backup enabled, deleting a photo from your phone doesn’t necessarily erase it permanently. You’ll need to manually delete it from your iCloud account as well.
- Be cautious about sharing photos.Think twice before sharing photos with others, especially if they contain sensitive information. Once a photo is shared, it’s difficult to control who sees it or where it ends up.
- Consider using a privacy-focused photo app.Some photo apps are designed with privacy in mind, offering features like end-to-end encryption and password protection.
Alternative Storage Solutions

Sometimes, deleting photos isn’t enough. You might want to keep your precious memories but free up space on your iPhone. That’s where alternative storage solutions come in handy. These options allow you to store your photos elsewhere, keeping your iPhone’s storage clean and your memories safe.
Cloud Storage
Cloud storage services offer a convenient way to store your photos online, accessible from any device. This means you can access your photos anytime, anywhere.
- Benefits:
- Easy access from any device.
- Automatic backups, ensuring your photos are safe even if your phone is lost or damaged.
- Many services offer photo editing and sharing features.
- Popular Options:
- iCloud:Apple’s built-in cloud storage solution, seamlessly integrated with your iPhone. It offers 5GB of free storage, with additional storage plans available.
- Google Photos:Google’s cloud storage service that offers unlimited photo storage at a lower resolution. It also provides powerful search and organization features.
- Dropbox:A versatile cloud storage service that offers a generous free storage plan and integrates well with other apps.
External Hard Drives
External hard drives provide a physical storage solution for your photos. These drives offer a large storage capacity and are relatively inexpensive.
- Benefits:
- Large storage capacity, allowing you to store a vast number of photos.
- Offline access, meaning you can access your photos even without an internet connection.
- Relatively inexpensive compared to cloud storage plans.
- Considerations:
- Requires physical storage and can be bulky.
- Photos are not automatically backed up.
- Susceptible to damage or loss if not properly handled.
Transferring Photos
Moving your photos from your iPhone to an external storage device is a simple process.
- Cloud Storage:
- For iCloud, enable iCloud Photos in your iPhone’s settings. This automatically uploads your photos to your iCloud account.
- For other cloud storage services, download the respective app and follow the instructions to upload your photos.
- External Hard Drives:
- Connect your external hard drive to your iPhone using a Lightning to USB adapter.
- Open the Photos app and select the photos you want to transfer.
- Tap the “Share” button and choose “Save to Files”.
- Select your external hard drive as the destination and tap “Save”.
Troubleshooting Common Issues

While deleting photos is generally straightforward, you might encounter some hiccups along the way. Here’s a breakdown of common issues and their solutions to help you navigate any obstacles.
Unexpected Errors
Errors can pop up during the deletion process, preventing photos from being removed.
- Insufficient Storage:Your iPhone might not have enough free space to complete the deletion. This can occur when you’re trying to delete a large number of photos, especially high-resolution images or videos.
- Software Glitch:Sometimes, temporary software glitches can interfere with the deletion process.
- Network Connectivity Issues:If you’re deleting photos from iCloud, a weak or unstable internet connection could cause errors.
To resolve these issues, try the following:
- Free up Storage:Delete other files or apps to create more space.
- Restart Your iPhone:A simple restart can often resolve software glitches.
- Check Your Internet Connection:Ensure you have a stable internet connection, especially if deleting photos from iCloud.
- Try Again Later:If the issue persists, try deleting the photos again later.
The error might be temporary.
Photos Not Deleting
Sometimes, you might find that photos aren’t disappearing even after attempting to delete them.
- Photos in Shared Albums:If you’ve shared a photo in an album with others, deleting it from your iPhone won’t remove it from the shared album. You’ll need to delete it from the shared album as well.
- Photos Synced with Other Devices:If you’re using iCloud Photo Library, photos are synced across all your Apple devices.
Deleting all those old selfies and blurry photos from your iPhone can be a pain, but it’s a necessary evil to free up space. If you’re feeling really ambitious, you could even take on a more complex task like manually migrating your entire Mac system, How To Perform a Manual Mac System Migration , but let’s be real, deleting those iPhone photos is a way better use of your time.
Once you’ve purged your phone, you’ll have tons of space for all the new pics you’re about to take.
Deleting a photo from one device might not remove it from others unless you also delete it from iCloud.
- Photos in Hidden Albums:Some photos might be hidden in albums like “Recently Deleted” or “Hidden.” Check these albums to see if the photos are still present.
To resolve these issues, try the following:
- Delete from Shared Albums:Access the shared album and delete the photo from there.
- Delete from iCloud:If you’re using iCloud Photo Library, log into iCloud.com and delete the photo from there.
- Check Hidden Albums:Navigate to the “Recently Deleted” or “Hidden” albums to see if the photos are still there.
Photos Appearing Again
You might notice that photos you deleted have reappeared.
- Automatic Backup:If you have iCloud Photo Library enabled, deleted photos might reappear if they’re backed up to iCloud.
- Restore from Backup:If you’ve recently restored your iPhone from a backup, deleted photos might be restored as well.
To resolve these issues, try the following:
- Disable iCloud Photo Library:If you don’t want photos to be automatically backed up, disable iCloud Photo Library.
- Delete from Backup:If you’ve restored from a backup, you might need to delete the photos again.
End of Discussion

Deleting unwanted iPhone photos is a simple process that can make a big difference in your phone’s performance and your peace of mind. By understanding the different storage options, utilizing effective deletion methods, and safeguarding your privacy, you can keep your iPhone clutter-free and your memories organized.
So, take a deep breath, dive into this guide, and say goodbye to those unwanted photos for good!
Commonly Asked Questions
Can I accidentally delete photos from iCloud by deleting them from my iPhone?
Yes, deleting photos from your iPhone will also delete them from iCloud if you have iCloud Photos enabled. If you want to keep your photos in iCloud but remove them from your iPhone, you can disable “Optimize iPhone Storage” in your iCloud settings.
What happens to my deleted photos after they’re moved to the “Recently Deleted” folder?
Photos in the “Recently Deleted” folder remain there for 30 days. After that, they are permanently deleted from your device and iCloud. You can recover accidentally deleted photos from the “Recently Deleted” folder within those 30 days.
Is there a way to delete photos from my iPhone without deleting them from iCloud?
Yes, you can disable “Optimize iPhone Storage” in your iCloud settings. This will ensure that all your photos are stored in iCloud, and deleting them from your iPhone will only remove them from your device, not from iCloud.
What are some alternative storage solutions for my iPhone photos?
Cloud storage services like Google Photos, Dropbox, and Amazon Photos offer free or paid storage options for your photos. You can also use external hard drives or USB drives to store your photos locally.