How To Automatically Import New Music Into Itunes
How to automatically import new music into iTunes is a game-changer for anyone who wants to keep their music library up-to-date without lifting a finger. It’s like having a personal music assistant that finds your new tunes and adds them to your iTunes library, so you can enjoy them whenever you want.
Imagine discovering a new band at a concert, ripping their CD onto your computer, and having it automatically show up in your iTunes library, ready to be added to a playlist or synced to your phone. That’s the power of automatic importing in iTunes, and it’s easier than you might think to set up.
Understanding iTunes Automatic Importing: How To Automatically Import New Music Into ITunes
So you want to keep your music library up-to-date without manually adding each new track? iTunes’ automatic importing feature is your best friend. It automatically adds new music to your library when you connect your device or add files to specific folders.
Let’s break down how it works and explore its capabilities.
iTunes Automatic Importing Process
iTunes automatically imports new music when you connect your iOS device or add files to designated folders on your computer. The process involves scanning for new files, identifying them, and adding them to your iTunes library.
Default Settings for Automatic Importing
iTunes has default settings that determine which files are automatically imported and how they are organized. These settings can be customized to suit your preferences.
Default Automatic Importing Settings
- Automatic Importing Enabled:By default, iTunes is set to automatically import new music. This means that when you connect your iPhone or iPad, iTunes will scan for any new music and add it to your library.
- Import Location:iTunes typically imports music to the “Music” folder within your iTunes library. You can change this location if you prefer.
- File Types:iTunes automatically imports common music file formats, including MP3, AAC, WAV, and AIFF.
iTunes Supported File Types
iTunes can import a variety of music file formats, ensuring compatibility with various music sources.
Supported File Types
- MP3:The most common audio file format, offering a balance between quality and file size.
- AAC:Apple’s preferred audio format, known for its high quality and efficiency.
- WAV:An uncompressed audio format that preserves the original sound quality.
- AIFF:Another uncompressed audio format commonly used for high-quality audio.
- ALAC:Apple Lossless Audio Codec, a lossless compression format that preserves the original sound quality while reducing file size.
- FLAC:Free Lossless Audio Codec, another popular lossless compression format.
Setting Up Automatic Importing
Alright, so you’ve decided to let iTunes do the heavy lifting when it comes to adding new music to your library. It’s pretty cool, and with a little setup, it’s a breeze! Let’s walk through how to make it happen.
Enabling Automatic Importing
First things first, you need to tell iTunes to actually import your new tunes. Here’s how to do it:
- Open iTunes and go to Preferences(or Edit > Preferenceson a Mac).
- Click on the Generaltab.
- Check the box next to “Import Using”. This will bring up a drop-down menu where you can choose the format you want to import your music as. For most people, AAC Encoderis the best choice, as it offers good sound quality while keeping file sizes manageable.
- Now, click on “Settings…”to adjust the audio quality of your imported files. This is where you can decide how much space you’re willing to give up for better sound quality.
- Finally, click “OK”to save your changes.
Configuring Automatic Importing
Now that you’ve told iTunes to import music, let’s get specific about what it should import. You can customize iTunes to your liking, and it’s pretty easy.
File Types
iTunes can handle a wide variety of music files, but you can tell it to only import specific types. To do this:
- Go back to Preferencesand click on the Generaltab.
- Under “Import Using”, you’ll see a drop-down menu that says “Import Settings…”. Click on it.
- This will bring up a window where you can choose which file types iTunes should import. You can select “All Files”if you want iTunes to import everything, or you can choose specific types, like MP3, AAC, or WAV.
Locations
You can tell iTunes to look for music in specific folders on your computer. This is helpful if you have a lot of music scattered around, or if you want to keep your iTunes library separate from your main music collection.
- In the Preferenceswindow, click on the Advancedtab.
- Under “When Importing Files”, click on the “Add…”button.
- Choose the folder where you want iTunes to look for music.
- Repeat steps 2 and 3 for any other folders you want to add.
Naming Conventions
You can also customize how iTunes names your imported files. This is a great way to keep your music library organized and easy to navigate.
Setting up automatic music imports in iTunes is super easy, but it’s worth knowing what kind of phone you’re using. If you’re rocking an iPhone, make sure you check out Know the differences between iPhone XS and iPhone XR to see which features might impact your music experience.
Once you’re all set, you can start importing new music into iTunes with a few clicks, and you’ll be jammin’ in no time!
- In the Preferenceswindow, click on the Advancedtab.
- Under “When Importing Files”, you’ll see a section for “Naming Convention”. Here, you can choose how iTunes should name your imported files. For example, you can tell iTunes to name files based on the artist, album, and track number, or you can use a custom format.
Tips for Customizing Automatic Importing
Now that you’ve got the basics down, here are some extra tips to make automatic importing work for you:* Use iTunes Match:If you subscribe to iTunes Match, you can automatically import all of your music from your computer to the cloud. This is a great way to keep your music library accessible from any device.
Create Playlists
Once you’ve imported your music, you can create playlists to organize your music by genre, mood, or anything else you can think of.
Use Smart Playlists
Smart Playlists automatically update themselves based on criteria you set. For example, you could create a Smart Playlist that includes all of the new music you’ve imported in the last week.
Managing Imported Music
Once your music is imported into iTunes, you can organize and manage it in a way that suits your preferences. iTunes offers several tools and features to help you keep your music library tidy and easily accessible.
Using Playlists
Playlists are a great way to group songs together based on various criteria, such as mood, genre, or even specific events. You can create playlists manually by dragging and dropping songs, or you can use smart playlists to automatically create playlists based on specific rules.Playlists are helpful for organizing music into categories, allowing you to quickly find specific songs or groups of songs.
You can create playlists for different occasions, moods, or even for specific albums.
Creating Smart Playlists
Smart playlists are dynamic playlists that automatically update based on rules you set. For example, you could create a smart playlist that includes all the songs in your library that are rated four stars or higher, or all the songs that are in the “Rock” genre.
“Smart playlists are great for discovering new music in your library or creating playlists based on specific criteria without manually adding songs.”
Editing Metadata
Metadata refers to information about your music files, such as the artist, album, track title, and genre. You can edit metadata in iTunes to ensure your music library is accurately labeled and organized. Editing metadata can improve the overall organization of your library, enhance the user experience, and make it easier to find and enjoy your music.
Editing Album Art
Album art is the cover art for your albums. You can edit album art in iTunes to ensure that your library has visually appealing and accurate artwork. You can edit album art by adding new artwork, removing existing artwork, or replacing it with a different image.
“Editing album art is important for creating a visually appealing and organized music library.”
Editing Track Information
Track information includes the track title, artist, album, genre, and other details about each song. You can edit track information to ensure that your music library is accurately labeled and organized. You can also edit the track number, year, and other details to ensure that your library is accurate and up-to-date.
“Editing track information is essential for creating a well-organized and accurate music library.”
Editing Genre
Genre is a classification of music based on its style or characteristics. You can edit the genre of your music in iTunes to ensure that your library is accurately organized. You can also edit the genre to create custom genres that reflect your personal preferences.
“Editing the genre of your music can help you find and enjoy music based on your personal preferences.”
Importing Music from Different Sources
So far, we’ve covered the basics of setting up iTunes to automatically import music. But what if your music isn’t already on your computer? Don’t worry, iTunes makes it easy to import music from various sources.Let’s dive into the process of importing music from external drives, cloud storage services, and other music players.
You can set up iTunes to automatically import new music, which is super helpful for keeping your workout playlist fresh. And speaking of keeping things fresh, check out this article on How to mix up activities for a more effective Apple Watch workout.
Once you’ve got your playlist dialed in, you’ll be ready to crush your next workout!
Importing Music from External Drives
Importing music from external drives, such as USB drives or network drives, is a straightforward process. iTunes recognizes these drives as additional storage locations and allows you to browse their contents. Here’s how you can import music from external drives:
1. Connect your external drive
Plug your USB drive or connect to your network drive.
2. Open iTunes
Setting up iTunes to automatically import new music is a total game-changer, especially if you’re always adding new tracks. But if you’re looking for a way to spice up your photos, you should check out 7 amazing iPad apps to make your photos pop.
Once you’re done with that, you can get back to iTunes and set up your automatic import – it’s super easy and you’ll never miss a beat again.
Launch the iTunes application on your computer.
3. Navigate to the external drive
In the iTunes window, look for the “Devices” section in the sidebar. You’ll see your external drive listed there.
4. Select the music you want to import
Browse through the folders on your external drive and select the music files you want to add to your iTunes library.
5. Drag and drop
Simply drag and drop the selected music files into the iTunes window.
6. Import
iTunes will automatically start importing the music files into your library.
Importing Music from Cloud Storage Services
Cloud storage services like iCloud, Dropbox, and Google Drive offer a convenient way to store and access your music files from anywhere. iTunes allows you to import music directly from these services.Here’s how you can import music from cloud storage services:
1. Install the cloud storage service app
Ensure that you have the app for your chosen cloud storage service installed on your computer.
2. Open iTunes
Launch the iTunes application.
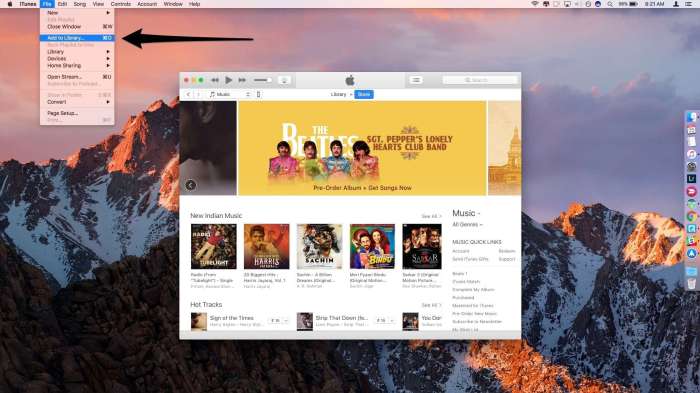
3. Select “File” > “Add File to Library”
In the iTunes menu, choose “File” and then “Add File to Library.”
4. Navigate to your cloud storage folder
Use the file browser to navigate to the folder within your cloud storage service where your music files are located.
5. Select the music you want to import
Choose the music files you want to add to your iTunes library.
6. Import
iTunes will start importing the selected music files from your cloud storage service.
Importing Music from Other Music Players
If you have music stored in other music players, such as Spotify, Apple Music, or Amazon Music, you can import them into iTunes. However, you’ll need to use third-party tools or download the music files first.Here are some ways to import music from other music players:
1. Download music files
Some music streaming services allow you to download music files for offline listening. You can then import these downloaded files into iTunes.
2. Use third-party tools
There are several third-party tools available that can help you import music from other music players into iTunes. These tools may require you to subscribe to their service or pay a one-time fee.
3. Convert music files
If the music files from other music players are in a format that iTunes doesn’t support, you can use a file converter to change the format to a compatible one.Remember, importing music from other music players may not be possible for all services, and some services may have limitations on the number of songs you can download or the duration of offline playback.
Troubleshooting Automatic Importing
Even with the best setup, you might encounter some bumps in the road when automatically importing music into iTunes. Here’s a guide to help you identify and fix common issues.
File Recognition Issues
File recognition issues occur when iTunes fails to identify the imported files correctly. This can result in missing metadata, incorrect file types, or even skipped tracks.
- Unsupported File Types:iTunes supports a wide range of audio formats, but some might not be recognized. Ensure your files are in compatible formats like MP3, AAC, WAV, or AIFF.
- Corrupted Files:Damaged files can prevent iTunes from reading them correctly. Try repairing or re-downloading the files.
- File Naming Conventions:iTunes relies on file names and folder structures to organize music. If your files are named inconsistently or are in unexpected locations, iTunes might have trouble identifying them.
Importing Errors
Importing errors often occur due to file access issues, storage limitations, or conflicts with other software.
- Disk Space:Ensure you have enough free disk space for the imported music. iTunes needs space to store the files and their metadata.
- File Permissions:If iTunes doesn’t have permission to access the files you’re trying to import, you might see errors. Check your file permissions and ensure iTunes has access.
- Conflicting Software:Other programs running on your computer could interfere with iTunes’ importing process. Try closing other applications while importing music.
Missing Metadata
Missing metadata can leave your music library looking incomplete, with missing album art, track information, or artist details.
- Incomplete Metadata:Some files might have incomplete or inaccurate metadata. You can manually edit metadata in iTunes or use third-party tools to improve it.
- Missing Metadata Sources:iTunes relies on online databases to retrieve metadata. If the database can’t find information about your music, you’ll have missing metadata. Try searching for the music in other online databases or manually adding the information.
iTunes Support Resources
If you encounter persistent importing problems, consider utilizing iTunes support resources for help.
- Apple Support Website:The Apple Support website offers a wealth of information, troubleshooting guides, and community forums where you can connect with other users and find solutions.
- Apple Support Phone and Chat:Apple offers phone and chat support for troubleshooting iTunes issues.
iTunes for Windows vs. macOS
While iTunes has been discontinued for macOS and Windows, its functionality has been integrated into the Music app. This integration means that both operating systems now have similar features for automatic importing. However, there are some minor differences in how the Music app functions across platforms.
Automatic Importing Features
The Music app on both Windows and macOS offers similar features for automatic importing. Both platforms allow you to:
- Import music from a variety of sources, including CDs, local folders, and online streaming services.
- Set up automatic importing rules based on criteria such as artist, album, or genre.
- Choose whether to import entire albums or individual tracks.
- Manage imported music by organizing it into playlists and libraries.
Platform-Specific Differences
Although the Music app on both platforms offers similar functionality, there are a few subtle differences.
- User Interface:The Music app on Windows and macOS has slightly different user interfaces. While the overall layout and functionality are similar, the specific locations of buttons and menus may vary.
- File System Integration:The Music app on macOS is more deeply integrated with the operating system’s file system. For example, it can automatically detect and import music from shared folders and network drives. Windows users may need to manually configure these settings.
- Third-Party Integrations:The Music app on macOS may have better support for third-party apps and services that integrate with music management. Windows users may find fewer options available for extending the Music app’s functionality.
Setting Up Automatic Importing
Setting up automatic importing in the Music app is a straightforward process on both Windows and macOS.
Setting Up Automatic Importing on Windows
- Open the Music app and navigate to the Settingsmenu.
- Select the Generaltab and then choose the Automatic Importingoption.
- Configure the automatic importing settings according to your preferences. This includes selecting the source folders for music, the import format, and the destination for imported files.
- Save the settings and the Music app will automatically import music that meets your criteria.
Setting Up Automatic Importing on macOS
- Open the Music app and navigate to the Preferencesmenu.
- Select the Generaltab and then choose the Automatic Importingoption.
- Configure the automatic importing settings according to your preferences. This includes selecting the source folders for music, the import format, and the destination for imported files.
- Save the settings and the Music app will automatically import music that meets your criteria.
The Future of iTunes Importing
The music industry is in constant flux, driven by technological advancements and evolving consumer preferences. The rise of streaming services has dramatically altered how we listen to music, impacting the traditional methods of music management like iTunes importing.
The Evolving Landscape of Music Management and Streaming Services
The music industry has shifted from physical media to digital downloads and now, primarily, to streaming services. Streaming platforms like Spotify, Apple Music, and Amazon Music offer vast libraries of music on demand, eliminating the need for individual song purchases or extensive local music libraries.
These services provide personalized recommendations, curated playlists, and offline listening capabilities, making them highly convenient for users.
The Potential Impact of These Changes on iTunes’ Automatic Importing Features
The dominance of streaming services might diminish the relevance of iTunes’ automatic importing features. Users may opt for streaming platforms that provide a more comprehensive and integrated listening experience, reducing the need for locally stored music libraries. However, iTunes might adapt by integrating streaming services more seamlessly, offering a hybrid approach that combines local libraries with streaming content.
The Future of Music Importing in the Digital Age
Music importing might become less prevalent as streaming services become the primary music consumption method. However, some users might still prefer to maintain local music libraries for reasons like offline access, high-fidelity audio, or personal collections. iTunes might evolve to cater to these needs, offering advanced features for managing and organizing local music libraries alongside streaming services.
The future of music importing might be characterized by a hybrid approach, combining the convenience of streaming with the control and customization of local libraries.
Security and Privacy Considerations
While automatic importing streamlines your music library, it’s essential to consider potential security risks and implement measures to protect your music collection. It’s crucial to understand that any time you connect your computer to the internet, you open yourself up to potential vulnerabilities.
This is especially true when dealing with software like iTunes, which handles a large amount of personal data, including your music library.
Potential Security Risks
Automatic importing can expose your music library to potential threats, including:
- Malware Infection:If you download music from untrusted sources, you risk downloading malicious software that can compromise your computer’s security.
- Data Breaches:Hackers may target iTunes to steal your music files or personal information, such as your Apple ID credentials.
- Unauthorized Access:If your computer is not properly secured, others may gain access to your music library, potentially copying or deleting your files.
Protecting Your Music Library
To mitigate these risks, consider the following measures:
- Download Music from Trusted Sources:Stick to reputable online stores like the iTunes Store or other authorized music providers. Avoid downloading music from suspicious websites or file-sharing platforms.
- Keep Your Software Updated:Regularly update iTunes and your operating system to patch security vulnerabilities.
- Use Strong Passwords:Choose strong and unique passwords for your Apple ID and any other accounts you use to access music services.
- Enable Two-Factor Authentication:This adds an extra layer of security to your Apple ID, making it much harder for hackers to gain access to your account.
- Secure Your Computer:Use a strong password for your computer and install a reputable antivirus program.
- Back Up Your Music Library:Regularly back up your music library to an external hard drive or cloud storage service. This way, even if your computer is compromised, you can restore your music collection.
Ensuring Privacy, How to automatically import new music into iTunes
Protecting the privacy of your music collection is just as important as securing it from unauthorized access. Here are some best practices:
- Review iTunes Privacy Settings:Go to the iTunes Preferences and review the privacy settings. Ensure you’re comfortable with the information iTunes is collecting and sharing.
- Limit Access to Your Music Library:Use file permissions to restrict access to your music library to authorized users.
- Be Mindful of Sharing:Be cautious about sharing your music library with others, especially over public Wi-Fi networks.
Ultimate Conclusion
Whether you’re a seasoned music enthusiast or just starting out, mastering the art of automatic importing in iTunes is a game-changer. It streamlines your music management, keeps your library fresh, and lets you focus on enjoying your favorite tunes. So, dive into the world of iTunes automatic importing and unlock a whole new level of music enjoyment!
FAQ Summary
What if iTunes doesn’t recognize a file type?
iTunes can import a variety of audio file types, but if it doesn’t recognize one, you can try converting it to a supported format using a third-party tool.
Can I import music from a CD?
Yes, you can import music from a CD by inserting it into your computer’s CD drive and following the prompts in iTunes.
What happens to my music when I upgrade to a new version of iTunes?
Your music library should be preserved when you upgrade to a new version of iTunes. However, it’s always a good idea to back up your library before upgrading, just in case.
How do I prevent duplicate tracks from being imported?
iTunes can usually detect duplicate tracks and avoid importing them. If you encounter duplicates, you can manually delete them from your library.

