Get Itunes To Stop Asking You To Authorize Your Mac
Get iTunes to stop asking you to authorize your Mac—it’s a common frustration for Mac users. Whether you’re dealing with a constant barrage of authorization prompts or just want to understand why iTunes is asking for your credentials, this guide will help you troubleshoot and resolve this issue.
From basic troubleshooting steps to advanced solutions, we’ll explore various techniques to regain control over your iTunes experience.
There are several reasons why iTunes might keep asking for authorization. It could be a simple glitch, a problem with your Apple ID, or even a conflict with other software on your Mac. Understanding the potential causes can help you identify the best approach to fixing the issue.
Understanding the Issue
It’s frustrating when iTunes keeps asking you to authorize your Mac, especially when you’ve already done it. This persistent prompt can disrupt your workflow and make it difficult to enjoy your music. Let’s explore the reasons behind this issue and what you can do about it.
Common Reasons for Repeated Authorization Requests
iTunes may repeatedly ask for authorization due to a few common factors. Here are some scenarios that could lead to this problem:
- Changes to your Apple ID or password: If you recently updated your Apple ID or password, iTunes might need to re-authenticate itself. This is a security measure to ensure that your account is protected.
- Multiple devices using the same Apple ID: If you’re using the same Apple ID on multiple Macs or iOS devices, iTunes might request authorization on each device to prevent unauthorized access to your content.
- Recent iTunes updates: Sometimes, iTunes updates can cause authorization issues, requiring you to re-authorize your computer.
- Software conflicts: Occasionally, software conflicts or errors can interfere with iTunes’ authorization process, leading to repeated prompts.
Implications of Ignoring or Repeatedly Authorizing iTunes
Ignoring or repeatedly authorizing iTunes can have a few consequences.
- Limited access to your content: If you don’t authorize iTunes, you may not be able to access your purchased music, movies, or TV shows.
- Security risks: Repeatedly authorizing iTunes without addressing the underlying issue could potentially expose your Apple ID to security risks, especially if the problem is related to software conflicts or errors.
- Frustration and inconvenience: Continuously being prompted to authorize iTunes can be frustrating and disrupt your workflow.
Basic Troubleshooting Steps

Before diving into more complex solutions, let’s try some basic troubleshooting steps that can often resolve the issue of iTunes constantly asking for authorization. These steps are designed to refresh the system and ensure everything is running smoothly.
Restarting iTunes and the Mac
Restarting both iTunes and your Mac can resolve temporary glitches or software conflicts that might be causing the authorization problem.
- Close iTunes:Click the “iTunes” menu at the top of the screen, then select “Quit iTunes”.
- Restart Your Mac:Click the Apple menu in the top left corner, then select “Restart”.
- Open iTunes:After your Mac restarts, open iTunes again. Check if the authorization prompt has disappeared.
Checking for Updates to iTunes and macOS, Get iTunes to stop asking you to authorize your Mac
Outdated software can sometimes lead to compatibility issues. Make sure you have the latest versions of iTunes and macOS installed.
If you’re tired of iTunes constantly asking you to authorize your Mac, you might want to check out this awesome article on How to make your old iPhone last longer. It’s got some great tips for extending the life of your phone, and who knows, maybe it’ll even help you figure out why iTunes keeps bugging you about authorization.
- Update iTunes:Open iTunes, click the “Help” menu, and select “Check for Updates”. If an update is available, follow the onscreen instructions to install it.
- Update macOS:Click the Apple menu in the top left corner, then select “About This Mac”. Click the “Software Update” tab and follow the instructions to install any available updates.
Revoking Authorization on Other Devices
If you’ve authorized iTunes on multiple devices, it’s possible that one of those devices is causing the problem. Revoking authorization on other devices can sometimes resolve the issue.
If you’re tired of iTunes constantly nagging you to authorize your Mac, you might be dealing with a software update issue. A stuck update can lead to all sorts of weird behavior, including iTunes acting up. Check out this guide on how to fix a stuck iOS software update and hopefully, you can get your Mac back to its usual smooth sailing.
Once you’ve sorted out the update, you should be able to get rid of that annoying authorization prompt for good.
- Open iTunes:Open iTunes on your Mac.
- Go to Account:Click the “Account” menu at the top of the screen, then select “Authorizations”.
- Revoke Authorization:Click the “Deauthorize This Computer” button. This will remove authorization from your Mac.
- Authorize Again:After revoking authorization, you’ll need to reauthorize your Mac. Click the “Authorize This Computer” button and follow the onscreen instructions.
Advanced Troubleshooting
If the basic troubleshooting steps haven’t resolved the issue, you may need to delve into more advanced solutions. These steps involve manipulating system files and resetting account information, so proceed with caution.
Removing iTunes Authorization Files
The iTunes authorization files are located in your user library folder. To access this folder:
- Open Finder.
- In the menu bar, click Go > Go to Folder.
- Paste the following path into the dialog box and press Enter:
~/Library/Preferences
Once in the Preferences folder, locate and delete the following files:
com.apple.iTunes.plistcom.apple.iTuneStore.plist
Deleting these files will reset your iTunes authorization and force a re-authorization.
Resetting the iTunes Store Account Password
If you suspect your iTunes Store account password might be compromised, resetting it can resolve authorization issues. Here’s how to do it:
- Visit the Apple ID website.
- Log in with your Apple ID and password.
- Click on “Security” in the menu.
- Select “Reset Password” and follow the on-screen instructions.
Once you’ve reset your password, you’ll need to re-authorize iTunes on your Mac.
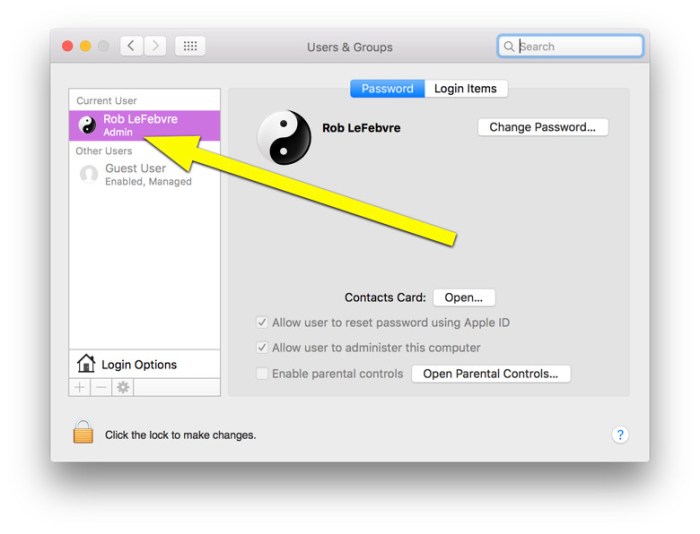
Creating a New User Account
Creating a new user account on your Mac can help isolate the issue. If the problem persists in the new account, it’s likely a system-wide issue. If the issue is resolved in the new account, it indicates a conflict with your original user account.
Ugh, iTunes keeps bugging me to authorize my Mac! It’s like it doesn’t trust me with my own computer. I’m all about privacy, so I’m glad Apple introduced the ability to stop apps from tracking you in iOS 14.5, How to stop apps from tracking you in iOS 14.5.
Maybe if I can figure out how to make iTunes chill, I’ll finally have some peace and quiet.
To create a new user account:
- Open System Preferences.
- Click on “Users & Groups”.
- Click on the lock icon to make changes.
- Click on the “+” button to add a new user.
- Follow the on-screen instructions to create the new user account.
Once the new user account is created, log into it and try to use iTunes. If the authorization issue is resolved, you may need to transfer your data from the old account to the new one.
Authorization Issues with Specific Content
You might encounter authorization issues with specific content types, such as music, movies, or apps. This is because Apple ID authorization is tied to the type of content you’re accessing. Let’s delve into the details.
Authorizing iTunes for Specific Media Types
iTunes authorization for specific media types ensures that you have the necessary permissions to access and play your purchased content. This process involves linking your Apple ID with your device. Here’s a breakdown:
- Music:Authorizing iTunes for music allows you to play music purchased from the iTunes Store or Apple Music. You can authorize up to five computers for music playback.
- Movies:Authorizing iTunes for movies enables you to watch movies purchased from the iTunes Store or Apple TV+. You can authorize up to five computers for movie playback.
- Apps:Authorizing iTunes for apps enables you to download and install apps from the App Store. You can authorize up to five computers for app downloads.
Implications of Using Different Apple IDs for Different Media Types
Using different Apple IDs for different media types can lead to a few complications:
- Separate Content Libraries:You’ll have separate content libraries for each Apple ID, meaning you won’t be able to access content purchased with one Apple ID using another.
- Separate Purchase Histories:Each Apple ID will have its own purchase history, making it difficult to track all your purchases.
- Separate Device Authorizations:You’ll need to authorize your devices separately for each Apple ID, which can become cumbersome if you use multiple Apple IDs.
Managing Authorized Devices for Specific Apple IDs
You can manage authorized devices for specific Apple IDs through the Apple ID website or the iTunes app:
- Apple ID Website:Visit appleid.apple.com, sign in with your Apple ID, and navigate to the “Devices” section. You can see a list of authorized devices and deauthorize them if needed.
- iTunes App:Open iTunes on your computer, go to “Account” > “Authorizations” > “Deauthorize This Computer.” This will remove the authorization for all content types associated with your Apple ID.
System Preferences and Security
Your Mac’s System Preferences hold crucial security settings that can directly impact authorization issues. By examining these settings and ensuring they’re configured appropriately, you can often resolve authorization problems with iTunes.
Firewall Settings
Your Mac’s firewall acts as a security barrier, controlling which applications and services can access your computer’s network. If iTunes is blocked by the firewall, it might not be able to communicate with Apple’s servers, leading to authorization issues.To check your firewall settings:
- Open System Preferences.
- Click on Security & Privacy.
- Select the Firewalltab.
- Ensure that Firewall is onand that iTunesis allowed to receive incoming connections.
If iTunes is not listed in the firewall’s allowed applications, you can add it by clicking the +button and selecting iTunesfrom the list.
Software Conflicts
Sometimes, authorization issues can arise from conflicts between iTunes and other software installed on your Mac. This might occur if a program interferes with iTunes’ ability to connect to Apple’s servers or modify system settings.To identify potential conflicts:
1. Check for recent software installations
If you recently installed new software, consider temporarily removing it to see if it resolves the authorization problem.
2. Run a system scan
Use a reputable anti-malware tool to scan your Mac for any potential malware or viruses that could be causing interference.
3. Disable unnecessary programs
Temporarily disable any programs you don’t need while using iTunes to see if they are contributing to the issue.By carefully reviewing and adjusting your Mac’s system preferences, firewall settings, and identifying any potential software conflicts, you can often pinpoint and resolve authorization issues with iTunes.
Troubleshooting Tools: Get ITunes To Stop Asking You To Authorize Your Mac

Troubleshooting tools can be invaluable when dealing with authorization issues on your Mac. These tools provide insights into your system’s behavior, helping you identify potential problems and pinpoint the source of the authorization issue.
System Logs
System logs are a treasure trove of information about your Mac’s activities. They record everything from app launches and network connections to system errors and security events. These logs can be accessed using the Console application, which comes pre-installed on macOS.To use Console, open it from the Applications > Utilities folder.
The main window displays a list of log files. You can filter these logs by time, severity, and . For authorization issues, look for entries related to “Authorization Manager,” “iTunes,” or “Apple ID.”
System logs provide a comprehensive view of your Mac’s activities, but they can be overwhelming for beginners. It’s crucial to understand the different log levels and how to interpret error messages.
Activity Monitor
Activity Monitor provides a real-time snapshot of your Mac’s performance and resource usage. It’s a powerful tool for identifying processes that are consuming excessive resources, causing slowdowns, or interfering with other applications. To access Activity Monitor, open it from the Applications > Utilities folder.
The main window displays a list of processes running on your Mac. You can sort these processes by CPU usage, memory consumption, and other metrics. Look for processes related to “iTunes,” “Authorization Manager,” or “Apple ID” that are using a disproportionate amount of resources.
Activity Monitor can help identify processes that are causing problems, but it’s important to be cautious when terminating processes, as doing so can disrupt your system’s operation.
Network Utility
Network Utility is a collection of tools for diagnosing and troubleshooting network connectivity issues. It includes utilities for pinging servers, tracing network routes, and checking DNS settings.To access Network Utility, open it from the Applications > Utilities folder. The main window displays a list of utilities.
For authorization issues, the “Ping” and “Trace Route” utilities can be helpful in determining if there are network connectivity problems between your Mac and Apple’s servers.
Network Utility is a powerful tool for diagnosing network connectivity issues, but it requires a basic understanding of network concepts.
Seeking Support
Sometimes, even after trying all the troubleshooting steps, you might still be stuck. In these cases, seeking help from Apple Support or the Apple community can be the best way to get your issue resolved.
Contacting Apple Support
Apple offers various ways to get in touch with their support team, each with its own advantages:
- Phone Support:You can call Apple directly to speak with a support representative. This is a good option if you need immediate assistance or prefer a more personalized approach. You can find the Apple Support phone number for your region on their website.
- Chat Support:If you prefer a more convenient way to get help, you can use Apple’s online chat support. This option allows you to type your questions and receive responses from a support representative in real-time. You can access chat support through the Apple website.
- Email Support:For less urgent issues, you can send an email to Apple Support. This allows you to describe your problem in detail and receive a response within a reasonable timeframe. You can find the email address for Apple Support on their website.
- Apple Store Genius Bar:If you’re near an Apple Store, you can schedule an appointment with a Genius to get in-person assistance. This is a great option if you need hands-on help or have a complex issue that requires physical inspection.
Finding Relevant Articles and Resources
Apple’s website is a treasure trove of information, including articles, guides, and FAQs that can help you troubleshoot various issues. To find relevant resources:
- Visit the Apple Support website:This is the central hub for all Apple support information. You can find articles, guides, and troubleshooting tips for a wide range of Apple products and services.
- Use the search bar:The Apple Support website has a powerful search bar that allows you to quickly find the information you need. Simply enter your issue or s related to your problem, and the website will provide relevant search results.
- Browse by product:If you know which product you’re having trouble with, you can browse the Apple Support website by product category. This will help you narrow down your search and find the specific resources you need.
Community Forums and Online Resources
The Apple community is a vibrant online forum where users can connect, share their experiences, and get help from other Apple enthusiasts. Here are some resources to explore:
- Apple Support Communities:This is an official Apple forum where you can post your questions and get help from other users and Apple experts. You can find the Apple Support Communities forum on the Apple website.
- Third-party forums:There are many third-party forums and websites dedicated to Apple products and services. These forums can be a great source of information and troubleshooting tips from experienced users.
- Online resources:You can also find helpful articles, guides, and videos on various online resources like YouTube, Reddit, and other tech blogs. These resources can provide insights and alternative solutions to your issue.
Preventive Measures

Preventing iTunes from repeatedly asking you to authorize your Mac requires proactive measures to ensure your Apple ID and your Mac are secure and up-to-date. By implementing these best practices, you can avoid unnecessary authorization prompts and maintain a smooth experience.
Apple ID Management
Managing your Apple ID effectively is crucial for preventing authorization issues. Here’s how to do it:
- Keep your Apple ID password strong and unique.A strong password should be at least 12 characters long, including a combination of uppercase and lowercase letters, numbers, and symbols. Using the same password for multiple accounts increases your risk of compromise.
- Enable two-factor authentication.This adds an extra layer of security to your Apple ID by requiring a verification code sent to your trusted device whenever you sign in from a new device.
- Regularly review your Apple ID account activity.Check your recent sign-in attempts, devices associated with your account, and any changes made to your account settings.
- Report any suspicious activity immediately.If you notice any unauthorized sign-in attempts or changes to your account, contact Apple support right away.
Software Updates
Keeping iTunes and macOS up-to-date is essential for maintaining a secure and stable system, which can help prevent authorization issues.
- Update iTunes regularly.Apple releases updates for iTunes to fix bugs, improve performance, and address security vulnerabilities. Make sure you have the latest version installed.
- Install macOS updates promptly.macOS updates often include security patches and bug fixes that can improve system stability and reduce the likelihood of authorization issues.
Mac Maintenance
A clean and organized Mac environment can help prevent authorization problems and improve overall system performance.
- Remove unnecessary files and applications.Cluttered storage can slow down your Mac and potentially interfere with iTunes’s functionality. Regularly delete unused files, applications, and downloads.
- Run a disk cleanup utility.macOS includes built-in tools to scan your hard drive for unnecessary files and remove them. This can help free up space and optimize your system.
- Optimize your startup items.Applications that launch automatically at startup can slow down your Mac and potentially cause conflicts with iTunes. Review your startup items and disable any unnecessary applications.
Final Thoughts
By following the troubleshooting steps Artikeld in this guide, you can effectively address the persistent iTunes authorization requests and restore a smooth and hassle-free iTunes experience. Remember to keep your software up to date, manage your Apple ID securely, and be mindful of potential software conflicts to prevent future authorization issues.
If you’re still facing difficulties, don’t hesitate to reach out to Apple Support for further assistance.
FAQ Overview
Why does iTunes keep asking for authorization even though I’ve already authorized it?
There could be a few reasons. You might have accidentally revoked authorization on another device, there could be a problem with your Apple ID, or there might be a conflict with another app. Try the troubleshooting steps in this guide to see if you can identify the cause.
What happens if I ignore the authorization requests?
Ignoring the requests will prevent you from accessing certain features of iTunes, like downloading or playing music, movies, or apps. It’s best to address the authorization issue to ensure you can use iTunes fully.
Is there a way to prevent future authorization requests?
While you can’t completely prevent authorization requests, you can minimize them by keeping your iTunes and macOS updated, managing your Apple ID securely, and being mindful of potential software conflicts.