Everything You Need To Know About White Balance For Your Iphone Camera
Everything you need to know about white balance for your iPhone camera – it’s not just about making your photos look good, it’s about capturing the true colors of the world as you see them. Imagine taking a picture of a beautiful sunset, only to have it turn out with a weird orange tint.
Or snapping a photo of a friend at a party, but their skin looks strangely blue. That’s what happens when your iPhone’s white balance is off, and it’s a common issue that can easily be fixed with a little understanding.
This guide will take you through the basics of white balance, showing you how to use the iPhone camera app to achieve accurate and vibrant colors in your photos. We’ll cover everything from understanding color temperature to adjusting white balance settings for different lighting conditions, and even offer tips for fixing those pesky color casts that can creep into your images.
Introduction to White Balance
White balance is a fundamental concept in photography that determines how colors are displayed in an image. It’s essentially the process of adjusting the color temperature of an image to make white objects appear white, regardless of the lighting conditions.
Accurate white balance is crucial for iPhone photos because it ensures that colors are represented realistically and that the image has a natural look. Without proper white balance, colors can appear too warm (yellowish), too cool (bluish), or even have a green or magenta tint.
Importance of Accurate White Balance
Accurate white balance ensures that the colors in your photos are represented realistically and that the image has a natural look. When white balance is off, colors can appear too warm (yellowish), too cool (bluish), or even have a green or magenta tint.
For example, if you take a photo indoors under fluorescent lighting without adjusting the white balance, the photo may have a greenish cast. Similarly, a photo taken outdoors on a cloudy day may appear too cool if the white balance isn’t adjusted.
Examples of Incorrect White Balance
- Photos taken under fluorescent lightingoften have a greenish cast. This is because fluorescent lights emit a cooler light than sunlight, which can make white objects appear greenish in photos.
- Photos taken outdoors on a cloudy daycan appear too cool (bluish). This is because the light on a cloudy day is less warm than sunlight.
- Photos taken under incandescent lightingcan have a warm, yellowish cast. This is because incandescent lights emit a warmer light than sunlight.
White Balance Settings on iPhone
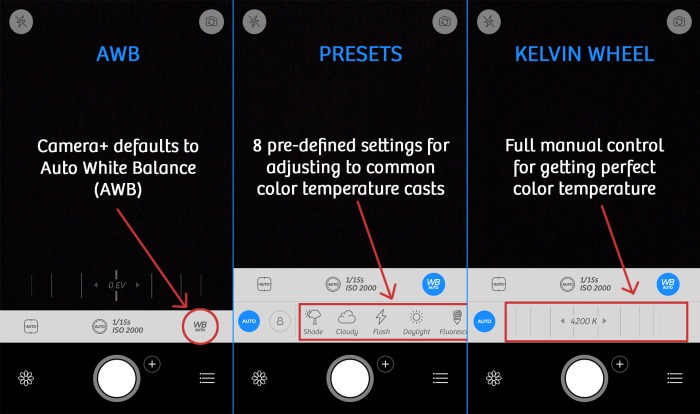
The iPhone camera app provides a variety of white balance presets and manual adjustments to ensure accurate color representation in your photos. Understanding these settings and how to use them effectively can greatly enhance the quality of your images.
White Balance Presets
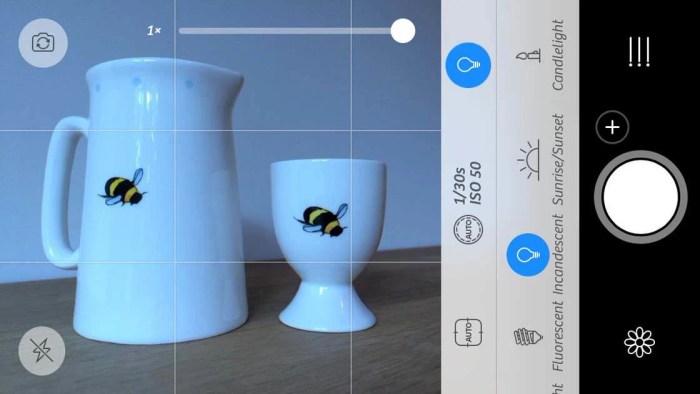
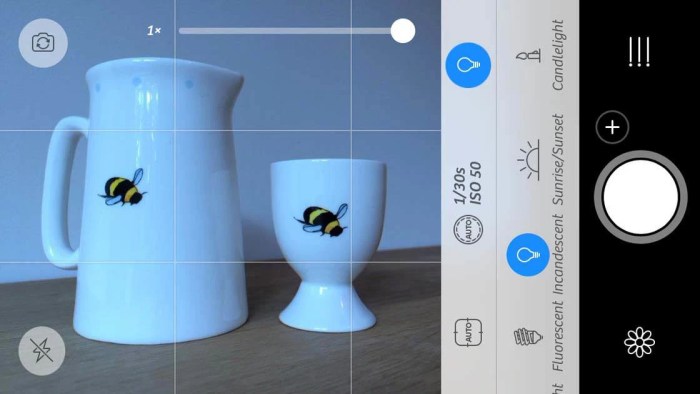
The iPhone camera app offers a selection of white balance presets designed to adapt to different lighting conditions. These presets help to neutralize the color cast of the light source, ensuring that white objects appear white in your photos.
- Auto:This is the default setting and automatically adjusts the white balance based on the scene’s lighting. While it often works well, it may not always produce the most accurate results.
- Cloudy:This preset is ideal for overcast days or shaded areas, where the light is cooler and bluer.
- Incandescent:This preset is designed for indoor lighting, such as traditional incandescent bulbs, which emit a warm, yellowish light.
- Fluorescent:This preset is suitable for fluorescent lighting, which can often cast a greenish or bluish hue.
- Shade:This preset is similar to “Cloudy” and works well in shaded areas, compensating for the cooler light.
- Sunlight:This preset is for bright, sunny conditions, where the light is warm and yellow.
- Flash:This preset is used when taking photos with the flash, as it compensates for the artificial light source.
Manual White Balance Adjustment
For more precise control over white balance, you can manually adjust it using the “WB” slider. This slider allows you to fine-tune the color temperature of the image, effectively altering the overall warmth or coolness of the photo.
- Open the Camera App:Launch the camera app on your iPhone.
- Tap the “WB” Icon:Locate the “WB” icon, usually found in the upper right corner of the screen.
- Adjust the Slider:Tap and drag the “WB” slider left or right to increase or decrease the color temperature. Moving the slider to the left makes the image cooler (more blue), while moving it to the right makes it warmer (more yellow).
- Preview the Changes:Observe the live preview of your image as you adjust the slider. Stop when the white balance appears accurate and pleasing to your eye.
Tips for Selecting the Appropriate White Balance Setting
Choosing the right white balance setting is crucial for capturing accurate and natural-looking photos. Here are some tips to help you select the appropriate setting based on the lighting conditions:
- Consider the Light Source:Identify the primary light source in your scene. Is it sunlight, fluorescent lighting, incandescent lighting, or something else? The type of light source will determine the appropriate white balance preset.
- Look for a Neutral Color:When unsure about the white balance, try to find a neutral object in the scene, such as a white wall or a piece of white paper. Adjust the white balance until this object appears truly white in the preview.
- Experiment with Different Settings:Don’t be afraid to experiment with different white balance settings. Sometimes, a slight adjustment can significantly improve the overall color balance of your photo.
- Review Your Photos:After taking a few photos, review them on your iPhone’s screen. If the white balance doesn’t look accurate, adjust the settings accordingly for subsequent photos.
Understanding Color Temperature: Everything You Need To Know About White Balance For Your IPhone Camera
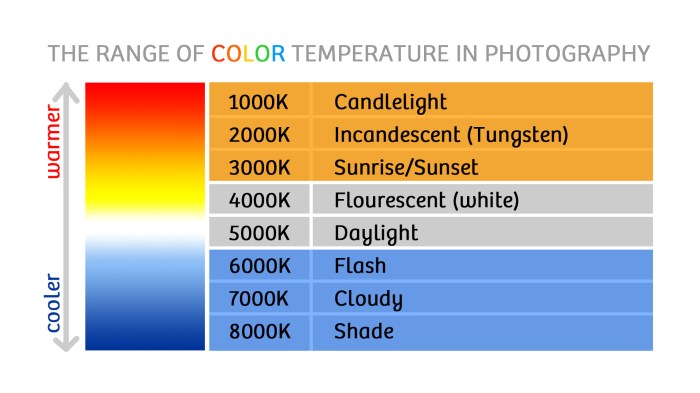
Imagine taking a picture of a sunset. You want to capture the warm, golden hues, but your photo ends up looking too blue. This is where color temperature comes in. It’s all about how we perceive the color of light, and how it affects the colors in our photos.Color temperature is a way of describing the color of light, measured in degrees Kelvin (K).
The higher the Kelvin number, the cooler (bluer) the light. The lower the Kelvin number, the warmer (redder) the light.
The Kelvin Scale
The Kelvin scale is a way to measure temperature, but it’s also used to measure color temperature. The Kelvin scale starts at absolute zero, which is
- 273.15 degrees Celsius or
- 459.67 degrees Fahrenheit.
Color temperature is measured in degrees Kelvin (K).
Examples of Color Temperatures
- Candlelight:Around 1800K, a warm, yellowish light.
- Incandescent light bulb:Around 2700K, a warm, slightly orange light.
- Sunlight at noon:Around 5500K, a neutral, white light.
- Overcast sky:Around 7000K, a cooler, bluish light.
- Flash:Around 5500K, a neutral, white light.
White Balance in Different Lighting Situations
Knowing how to adjust white balance in different lighting situations can make a big difference in the overall look and feel of your photos. Let’s explore how to achieve accurate white balance in various lighting scenarios.
Natural Light
Natural light, with its varying intensities and color temperatures, can pose challenges for achieving accurate white balance. Here’s a breakdown of how to adjust for different natural light conditions:
- Sunlight: Sunlight offers a bright and warm light source, typically resulting in a slightly yellow cast. For accurate white balance, choose the “Sunny” or “Cloudy” preset depending on the intensity of the sunlight.
- Shade: Shade casts a cooler, bluish light compared to direct sunlight. To compensate, use the “Shade” preset, which will add warmth to your image.
- Cloudy: Cloudy days produce a softer, diffused light that is typically cooler than direct sunlight. Use the “Cloudy” preset to balance out the cool tones.
Artificial Light
Artificial light sources, like incandescent bulbs, fluorescent lights, and LEDs, emit different color temperatures, requiring specific white balance adjustments.
- Incandescent Bulbs: Incandescent bulbs produce a warm, yellowish light. Use the “Incandescent” preset to counterbalance the warm tones.
- Fluorescent Lights: Fluorescent lights emit a cool, bluish light. Use the “Fluorescent” preset to warm up the image.
- LED Lights: LED lights can vary in color temperature, ranging from warm white to cool white. Use the “Custom” white balance setting to fine-tune the color temperature based on the specific LED light source.
Mixed Lighting Environments
Mixed lighting environments present the most challenging scenarios for achieving accurate white balance. Here are some tips for navigating these situations:
- Identify the Dominant Light Source: Determine the primary light source in the scene, whether it’s natural light or artificial light. Adjust the white balance based on this dominant source.
- Use the Custom White Balance Setting: The “Custom” white balance setting provides the most flexibility for fine-tuning. Use a white or gray card to take a reference reading, which will help the camera accurately interpret the colors in the scene.
- Post-Processing: If you’re unable to achieve perfect white balance in-camera, you can always adjust it during post-processing using photo editing apps like Adobe Lightroom or Snapseed.
White Balance and Editing
While capturing a perfect white balance in-camera is ideal, sometimes you might need to adjust it later in photo editing apps. Thankfully, your iPhone’s Photos app and other third-party editing apps provide tools to refine your white balance and enhance your images.
Adjusting White Balance in Editing Apps
You can adjust white balance in post-processing to correct color casts and achieve a more natural look. Most photo editing apps offer tools like white balance sliders or presets that let you fine-tune the color temperature and tint of your image.
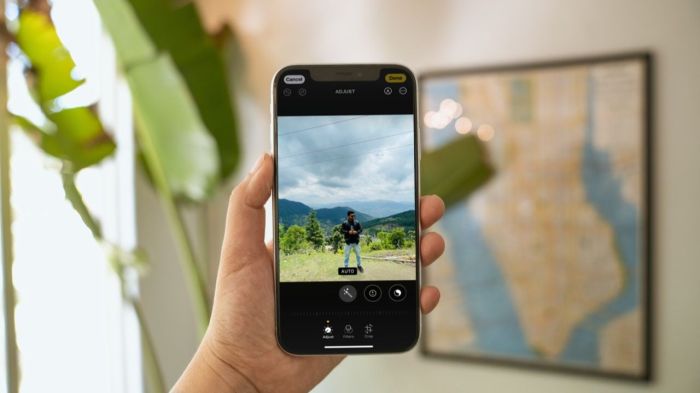
- Photos App:The iPhone’s built-in Photos app offers basic white balance adjustments. Open an image in the Photos app, tap “Edit,” and then tap the “Adjust” icon. You’ll find a slider labeled “White Balance” that allows you to shift the color temperature from warm to cool.
- Third-Party Apps:Third-party editing apps like Snapseed, Adobe Lightroom, and VSCO offer more advanced white balance controls. These apps often include a “White Balance” tool that lets you manually adjust the color temperature and tint, or they may offer presets that apply specific white balance settings to your image.
Benefits of Adjusting White Balance in Post-Processing
Adjusting white balance in post-processing can improve the overall appearance of your photos in several ways:
- Correcting Color Casts:White balance adjustments can remove unwanted color casts caused by artificial light, fluorescent lights, or other lighting conditions. This helps ensure that your images accurately reflect the colors of the scene.
- Enhancing Mood and Atmosphere:White balance can subtly influence the mood and atmosphere of your photos. Shifting the color temperature toward warmer tones can create a cozy and intimate feeling, while cooler tones can evoke a sense of calmness and serenity.
- Creating Artistic Effects:White balance adjustments can be used creatively to enhance the visual impact of your images. For example, you can intentionally shift the white balance to create a vintage or moody effect.
Examples of White Balance Adjustments
Here are a few examples of how white balance adjustments can be used to enhance images:
- Correcting a Color Cast from Incandescent Lighting:If a photo taken under incandescent lighting has a yellow or orange cast, you can adjust the white balance to shift the color temperature toward a cooler tone, removing the unwanted warmth. This will make the colors in the image appear more natural.
- Creating a Warm and Intimate Feeling:If you want to create a cozy and intimate feel in a photo taken indoors, you can shift the white balance towards warmer tones. This will make the image feel more inviting and comfortable.
- Creating a Cool and Serene Atmosphere:To create a cool and serene atmosphere in a photo, you can shift the white balance towards cooler tones. This can be effective for images of landscapes, seascapes, or cityscapes, adding a sense of tranquility.
Common White Balance Issues
White balance errors are common, especially in situations with mixed lighting or when the automatic white balance setting struggles to accurately interpret the scene. These errors can result in color casts, inaccurate skin tones, and overall undesirable color balance in your photos.
So, you’ve mastered the art of nailing that perfect white balance on your iPhone camera. Now, why not share your photography knowledge with the world? You can easily publish your own ebook on Apple Books using Pages, check out this guide for a step-by-step walkthrough.
Once you’ve got your ebook out there, you can even use it as a jumping-off point to teach others how to capture those vibrant, true-to-life colors with their iPhone camera.
Understanding the causes of these issues and how to address them will help you achieve more accurate and visually appealing results.
Color Casts, Everything you need to know about white balance for your iPhone camera
Color casts are a common white balance issue that can significantly affect the overall tone of your image. They occur when the camera interprets the color temperature of the light source incorrectly, resulting in an unwanted color tint throughout the photo.
For example, a photo taken under incandescent lighting might have a yellow or orange cast, while a photo taken under fluorescent lighting might have a greenish or bluish cast.
- Incandescent lighting, often found in homes, tends to produce a warm, yellowish light, which can result in a yellow or orange cast in photos.
- Fluorescent lighting, commonly used in offices and stores, emits a cooler, bluish-white light, which can lead to a greenish or bluish cast in photos.
- Sunlight, while generally considered neutral, can also produce color casts depending on the time of day and weather conditions. For example, early morning and late afternoon sunlight can have a warm, golden hue, while midday sunlight tends to be more neutral.
Inaccurate Skin Tones
Another common white balance issue is inaccurate skin tones. When the white balance is off, skin tones can appear too warm, too cool, or even unnatural. This can be particularly noticeable in portraits, where accurate skin tones are crucial for creating a flattering and realistic image.
Causes of White Balance Errors
Several factors can contribute to white balance errors:
- Mixed Lighting: When multiple light sources with different color temperatures are present in a scene, the camera might struggle to determine the correct white balance, resulting in an uneven color balance.
- Automatic White Balance Settings: While automatic white balance settings are often helpful, they can sometimes misinterpret the scene, especially in challenging lighting conditions.
- Camera Sensor Limitations: Even the most advanced cameras have limitations in their ability to accurately interpret color temperatures, especially in extreme lighting conditions.
Correcting White Balance Errors in Post-Processing
Fortunately, you can often correct white balance errors in post-processing using photo editing apps like Apple’s Photos app or more advanced tools like Adobe Lightroom. These apps provide various tools for adjusting the color balance, including:
- White Balance Sliders: These sliders allow you to adjust the color temperature and tint of your image to achieve a more natural and accurate color balance.
- Color Temperature Presets: Many editing apps offer preset white balance settings for different lighting conditions, such as incandescent, fluorescent, and daylight. You can try these presets to see if they improve the color balance of your photo.
- White Balance Dropper Tool: This tool allows you to sample a neutral area in your photo, such as a white piece of paper, and use that area to set the white balance. This can be a helpful technique for correcting color casts.
White Balance and iPhone Camera Features
White balance, while a crucial aspect of photography, doesn’t exist in isolation. It interacts with and influences other iPhone camera features, shaping the final image in subtle and sometimes dramatic ways. Let’s explore how white balance plays a role in enhancing your iPhone photography.
White Balance and HDR
HDR (High Dynamic Range) is a feature that helps capture detail in both the highlights and shadows of an image. White balance, in conjunction with HDR, ensures that the colors in your HDR image remain accurate and natural. When HDR is enabled, your iPhone takes multiple exposures of the same scene, blending them together to create a balanced image.
The white balance setting you choose will affect the color balance of each individual exposure, ultimately influencing the final HDR image. For example, if you’re shooting a scene with a warm sunset, setting a warmer white balance will ensure that the sunset colors are accurately captured in the HDR image.
White Balance and Live Photos
Live Photos, a feature that captures a short video clip before and after you take a still photo, also benefits from accurate white balance. The white balance setting you choose will apply to both the still photo and the accompanying video clip.
If you’re capturing a dynamic scene with changing lighting conditions, a well-chosen white balance setting will ensure that the colors in your Live Photo remain consistent throughout the video clip. For instance, if you’re taking a Live Photo of a fireworks display, setting a white balance that compensates for the warm light of the fireworks will result in a more accurate and vibrant video clip.
White Balance and Black and White Photography
White balance plays a crucial role in achieving a specific black and white photographic style. While the iPhone camera offers a dedicated black and white filter, you can achieve more nuanced results by adjusting the white balance before taking the photo.
Setting a cooler white balance, for example, will produce a higher contrast black and white image with more dramatic shadows, while a warmer white balance will result in a softer black and white image with more subtle tonal variations.
White Balance for Creative Effects
Beyond simply ensuring accurate color representation, white balance can be used to enhance creative effects in your iPhone photography. For example, you can create a vintage or retro look by setting a warmer white balance, which will give your photos a yellowish or orange hue.
Alternatively, you can achieve a cool and moody look by setting a cooler white balance, which will give your photos a bluish or purplish hue. By experimenting with different white balance settings, you can discover unique and creative ways to express your artistic vision.
Advanced White Balance Techniques
You’ve learned the basics of white balance on your iPhone, but there’s more to explore! Let’s dive into some advanced techniques that can help you take your mobile photography to the next level. These techniques offer more control over the color of your photos, ensuring they accurately reflect the scene you captured.
White balance is super important for getting good photos on your iPhone, but sometimes it can be tricky to nail. If you’re having trouble with your iPhone’s camera, it might be worth checking your settings. And if you’re having trouble with your Mac, you can check out How to fix common Mac startup problems for some troubleshooting tips.
Once you’ve got your tech running smoothly, you can get back to taking awesome photos with your iPhone!
Custom White Balance
Custom white balance allows you to manually set the white balance using a reference point in your scene. This is useful when the automatic white balance isn’t accurate or when you want to achieve a specific color cast. To use custom white balance on your iPhone:
- Open the Camera app and tap the “WB” icon (usually a small circle with a line through it).
- Select “Custom” from the menu.
- Point your camera at a neutral gray or white object in the scene.
- Tap the screen to lock the white balance.
Custom white balance can be especially useful in situations with mixed lighting or when you want to achieve a specific color mood.
White Balance Tools in Professional Photography
Professional photographers often use specialized tools to ensure accurate white balance. These tools help them create consistent color across multiple photos and manage color temperature more precisely.Here are some examples:
White balance cards
These cards are used to create a reference point for setting custom white balance. They are typically gray or white and feature a specific color temperature.
Color meters
These devices measure the color temperature of light and provide readings for setting white balance.
Software
Photo editing software like Adobe Lightroom and Photoshop offer advanced white balance tools, allowing for precise adjustments and color correction.These tools are particularly valuable for photographers who need to achieve consistent color across multiple images, such as in commercial or editorial photography.
Consistent White Balance Across Multiple Photos
Maintaining consistent white balance across multiple photos is crucial for creating a cohesive and professional look. Here are some tips:
Shoot in RAW format
RAW files capture more color information than JPEGs, giving you more flexibility in post-processing.
Use a consistent white balance setting
Stick to a specific white balance setting throughout your shoot, whether it’s automatic or custom.
Use a white balance card
If you’re shooting in a variety of lighting conditions, a white balance card can help you maintain consistent color across your images.
Edit your photos in a single software
Editing your photos in a single software ensures consistent color adjustments across all images.By following these tips, you can achieve consistent white balance and create a professional look for your photos.
White Balance Resources
You’ve learned the basics of white balance and how to use it on your iPhone. Now, you might be wondering where to go to further your knowledge and explore more advanced techniques. This section provides you with a list of resources that can help you take your iPhone photography skills to the next level, including websites, articles, tutorials, and photography communities.
So you’ve mastered the art of capturing those perfect iPhone pics, but are your colors looking a little off? White balance is key to making your photos pop, and luckily, the iPhone camera has some pretty cool features to help you out.
If you’re looking for a way to easily manage your downloads on your iPad, check out How to use Yoink as an iPad download manager and more , a handy tool that can help you streamline your workflow. Once you’ve got your downloads under control, you can get back to focusing on those perfect shots with your iPhone.
Recommended Websites and Articles
- PetaPixel: This website offers a wealth of articles and tutorials on photography, including a dedicated section on iPhone photography. You can find articles on white balance, as well as other aspects of iPhone photography, such as composition, lighting, and editing.
- Digital Photography School: This website offers a wide range of resources for photographers of all levels, including a section on iPhone photography. You can find articles on white balance, as well as other topics, such as how to take better photos in different lighting conditions and how to use your iPhone camera’s features to their full potential.
- iPhone Photography School: This website is specifically dedicated to iPhone photography. It offers a variety of resources, including articles, tutorials, and courses, that can help you improve your iPhone photography skills. You can find a dedicated section on white balance, as well as other topics, such as composition, lighting, and editing.
- The iPhone Photography Blog: This blog features articles and tutorials on a wide range of iPhone photography topics, including white balance. You can find articles on how to use white balance to achieve different effects, as well as tips and tricks for taking better photos in different lighting conditions.
iPhone Photography Communities
- r/iPhoneography: This subreddit is a community of iPhone photographers who share their work, discuss techniques, and offer advice. You can find a lot of helpful information on white balance, as well as other aspects of iPhone photography.
- iPhone Photography School Facebook Group: This Facebook group is a community of iPhone photographers who share their work, discuss techniques, and offer advice. You can find a lot of helpful information on white balance, as well as other aspects of iPhone photography.
- Instagram: You can find many iPhone photographers on Instagram. Search for hashtags like #iphoneography, #iphonephotography, and #whitebalance to find photographers who are sharing their work and tips.
iPhone Photography Resources
- Apple Support: Apple offers a variety of resources on its website, including a section on iPhone photography. You can find articles on white balance, as well as other topics, such as how to use your iPhone camera’s features to their full potential.
- iPhone Photography School Courses: iPhone Photography School offers a variety of online courses that can help you improve your iPhone photography skills. You can find courses on white balance, as well as other topics, such as composition, lighting, and editing.
Final Summary
Mastering white balance is a game-changer for any iPhone photographer. With a little practice and these tips, you’ll be able to capture stunning images that truly reflect the beauty of the world around you. So, ditch the dull and embrace the vibrant – your iPhone camera is waiting to unlock its full potential!
Question Bank
What is the difference between automatic white balance and manual white balance?
Automatic white balance (AWB) is where your iPhone camera tries to guess the best white balance setting for the scene. Manual white balance gives you more control to fine-tune the white balance yourself.
Can I change white balance after I’ve taken a photo?
Yes! You can adjust white balance in photo editing apps like Photos or third-party apps like Snapseed or Lightroom Mobile.
How do I know if my white balance is correct?
Look for neutral colors like whites and grays. If they appear to have a color cast (like a blue or yellow tint), then your white balance might be off.
What’s the best white balance setting for taking pictures of food?
For food photography, try using the “Fluorescent” or “Incandescent” white balance presets, depending on the type of lighting you’re using.
Is there a way to use white balance to create a specific mood or style?
Absolutely! Experiment with different white balance settings to create warmer or cooler tones in your photos, or even try a black and white look.

