How To Use The Iphone Camera’S Built-In Manual Controls
How to use the iPhone camera’s built-in manual controls unlocks a whole new level of creativity for your photos. It’s like going from driving a car with automatic transmission to taking the wheel and having complete control over the journey.
You can fine-tune everything from exposure to focus, capturing stunning images that perfectly reflect your artistic vision.
This guide will break down the iPhone’s manual controls, explaining the purpose and benefits of each setting. We’ll cover everything from adjusting exposure to mastering focus and white balance, all with practical tips and examples. Whether you’re a photography enthusiast or simply want to take better photos with your iPhone, this guide will equip you with the knowledge and skills to capture amazing images.
Understanding Manual Controls

The iPhone camera app offers manual controls that give you more creative freedom and allow you to take photos with a more professional look. By understanding and using these controls, you can achieve desired effects and capture stunning images that you might not be able to with automatic settings.
Manual Controls Available
The iPhone camera app provides a range of manual controls, each serving a specific purpose. Here’s a table summarizing the key controls:
| Manual Control | Description | Use Cases |
|---|---|---|
| Exposure | Controls the overall brightness of the image. | Adjusting for scenes with high contrast, like a sunset, to ensure both the sky and foreground are properly exposed. |
| Focus | Determines the sharpness of a specific area within the image. | Focusing on a subject while blurring the background to create a shallow depth of field, emphasizing the subject. |
| White Balance | Adjusts the color temperature of the image, affecting how colors are perceived. | Correcting for different lighting conditions, like warm indoor lighting or cool daylight, to achieve a more natural color balance. |
| ISO | Controls the camera’s sensitivity to light. | Increasing ISO in low-light situations to allow for faster shutter speeds and reduce blur, but potentially introducing more noise. |
| Shutter Speed | Determines the duration of time the camera’s shutter remains open, capturing light. | Using a slow shutter speed to capture motion blur in a moving subject or a fast shutter speed to freeze a moment in time. |
Exposure Control
Exposure is the amount of light that reaches the camera sensor. It’s a fundamental aspect of photography, and getting it right is crucial for producing well-exposed images. If you’re shooting in automatic mode, your iPhone will try to determine the correct exposure for you.
However, using manual controls gives you more control over the final image.
Understanding Exposure Triangle
The exposure triangle is a concept that illustrates the relationship between three key settings: ISO, shutter speed, and aperture. These three settings work together to determine the exposure of your photo.
The exposure triangle is a visual representation of how ISO, shutter speed, and aperture interact to determine the exposure of a photograph.
- ISO: This setting determines the sensitivity of the camera’s sensor to light. A higher ISO setting means the sensor is more sensitive to light, allowing you to take pictures in darker conditions. However, a higher ISO can also lead to more noise (grain) in the image.
- Shutter Speed: This setting determines the length of time the camera’s shutter remains open. A faster shutter speed freezes motion, while a slower shutter speed allows for motion blur. A faster shutter speed requires more light, while a slower shutter speed requires less light.
- Aperture: This setting controls the size of the opening in the lens. A wider aperture (smaller f-number) allows more light to enter the camera, resulting in a shallower depth of field (blurred background). A narrower aperture (larger f-number) allows less light to enter the camera, resulting in a deeper depth of field (more of the scene in focus).
Focusing Techniques: How To Use The IPhone Camera’s Built-in Manual Controls
Focusing is a crucial aspect of photography, ensuring your subject is sharp and clear. The iPhone camera offers several focusing modes, each with its strengths and weaknesses. Understanding these modes allows you to achieve precise focus in various shooting scenarios.
Focusing Modes
The iPhone camera provides several focusing modes to help you achieve sharp images.
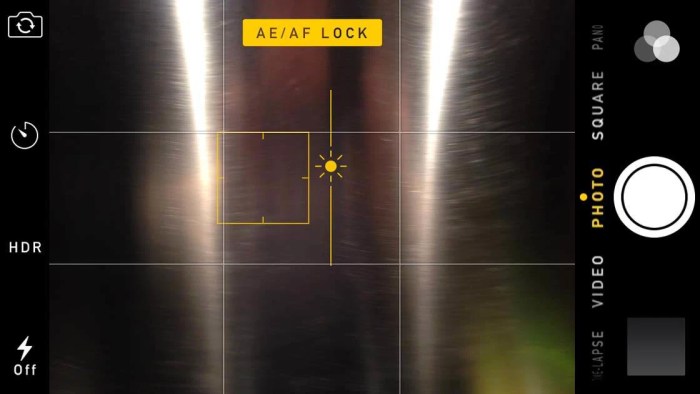
- Tap to Focus:This is the most basic and intuitive mode. Simply tap on the screen where you want the camera to focus, and the iPhone will automatically adjust the focus and exposure. It’s great for quick shots, but it may not always be accurate in complex scenes.
Learning how to use your iPhone camera’s manual controls can be a game-changer for your photography. You can tweak settings like shutter speed and ISO to capture incredible images, even in challenging lighting situations. And speaking of things that can change your tech game, check out this article on How to get the Microsoft OneDrive preview that runs natively on M1 Macs – it’s a total game-changer for Mac users.
Once you’ve mastered your iPhone’s manual controls, you’ll be able to capture those epic photos and then easily share them with the world using OneDrive.
- Focus and Exposure Lock:After tapping to focus, press and hold the focus point to lock the focus and exposure. This is useful when you want to maintain a specific focus point even as the scene changes. For example, if you’re taking a picture of a moving subject, locking the focus will help ensure the subject stays in focus.
- Continuous Autofocus (CAF):This mode continuously adjusts the focus as the subject moves, ensuring it remains sharp. It’s ideal for shooting moving subjects, such as children playing or animals running.
- Face Detection:This mode automatically detects faces in the scene and prioritizes them for focus. It’s a great option for portraits and group shots, ensuring everyone’s faces are sharp.
- Focus Peaking:This feature, found in the iPhone camera’s ProRAW mode, highlights the edges of objects in focus, making it easier to achieve precise focus. It’s helpful for macro photography and landscapes where fine details are crucial.
Tips for Achieving Sharp Focus
- Steady Your Hand:Use a tripod or stabilize your phone with your hands to minimize camera shake, which can lead to blurry images.
- Use the Volume Buttons:Instead of tapping the screen to take a picture, use the volume buttons on the side of your phone. This helps minimize camera shake.
- Experiment with Different Focusing Modes:Each focusing mode has its strengths and weaknesses. Experiment with different modes to see which works best for your shooting situation.
- Adjust the Focus Manually:In ProRAW mode, you can adjust the focus manually using the slider on the screen. This allows for precise control over the focus point.
White Balance Adjustment

White balance is a crucial aspect of photography that determines how colors are rendered in an image. It ensures that white objects appear white in the photograph, even under different lighting conditions. Inaccurate white balance can lead to images that appear too warm (yellowish) or too cool (bluish).
Manually Adjusting White Balance
To manually adjust white balance on your iPhone camera, follow these steps:
- Open the Camera app.
- Tap the “WB” icon (which stands for “White Balance”) located on the right side of the screen.
- You will see a slider with different white balance presets. You can swipe left or right to choose the desired preset.
- Alternatively, you can tap the “+” icon to manually adjust the white balance using the color temperature slider.
- Adjust the slider until the image appears natural and balanced.
White Balance Presets
Different white balance presets are designed to compensate for different lighting conditions. Here are some common presets and their applications:
- Auto:This preset automatically adjusts the white balance based on the lighting conditions. It is generally a good starting point.
- Cloudy:This preset is designed for overcast conditions, where there is a lot of blue light. It adds warmth to the image.
- Incandescent:This preset is designed for indoor lighting, which is typically yellowish. It adds a cooler tone to the image.
- Fluorescent:This preset is designed for fluorescent lighting, which can often be green or blue. It adds a warmer tone to the image.
- Shade:This preset is designed for shady areas, where there is less light. It adds a warmer tone to the image.
- Flash:This preset is designed for using the flash. It adjusts the white balance to compensate for the flash’s color temperature.
Composition and Framing
Composition is the art of arranging elements within a photograph to create a visually appealing and impactful image. It’s like a painter carefully placing objects on a canvas, using techniques to guide the viewer’s eye and tell a story. A well-composed photograph is balanced, harmonious, and draws the viewer’s attention to the subject.
The Rule of Thirds
The rule of thirds is a fundamental principle in photography that divides the frame into nine equal sections using two horizontal and two vertical lines. This creates four intersection points, known as “power points,” where the viewer’s eye naturally gravitates.
Placing the subject of your photograph at or near these points can create a more dynamic and visually interesting composition. For example, imagine a landscape photo with a majestic mountain in the background. Instead of placing the mountain dead center, you could position it on the right third, leaving the left two-thirds of the frame for the sky and foreground.
This creates a more balanced and aesthetically pleasing composition.
Leading Lines
Leading lines are elements within the photograph that guide the viewer’s eye toward the subject. These lines can be straight, curved, or diagonal and can be found in various forms, such as roads, fences, rivers, or even shadows. By strategically using leading lines, you can create a sense of depth, direction, and movement within your image.
Think about a photo of a winding road leading to a distant town. The road acts as a leading line, drawing the viewer’s eye along its path and creating a sense of journey and anticipation.
Symmetry
Symmetry is a powerful composition technique that creates a sense of balance and order. It involves arranging elements in a mirror-like reflection, creating a harmonious and visually pleasing image. Symmetrical compositions can be found in nature, architecture, and even everyday objects.
For instance, a photo of a building with a perfectly symmetrical facade, or a portrait with the subject centered and balanced, can create a sense of stillness, elegance, and formality.
Advanced Techniques

Now that you have a good grasp of the iPhone camera’s manual controls, let’s explore some advanced techniques that can elevate your photography.
Filters and Effects
Filters and effects can add a creative touch to your photos, transforming the look and feel of your images. The iPhone camera app comes with a selection of built-in filters that you can apply in real-time.
These filters adjust color, contrast, and other aspects of the image, creating a range of artistic styles.
You can access these filters by tapping the “Filters” icon at the bottom of the screen.
Long Exposures and Time-lapses
Long exposures allow you to capture the movement of light and create ethereal effects, while time-lapses condense time into a short video, capturing a sequence of events. The iPhone camera app doesn’t offer dedicated long exposure or time-lapse modes, but you can achieve these effects using third-party apps.
Many apps, like “Slow Shutter Cam” and “TimeLapse,” provide manual controls for capturing long exposures and time-lapses.
These apps allow you to set the shutter speed and capture multiple images that can be combined into a single long exposure or a time-lapse video.
Low-Light Photography
Shooting in low-light conditions can be challenging, but with a few tricks, you can capture stunning images even when the light is dim.
The key to low-light photography is to minimize noise and maximize clarity.
Here are some tips for taking great photos in low light:
- Use the iPhone’s Night Mode: If your iPhone has Night Mode, it’s a powerful tool for capturing sharp, detailed images in low-light conditions. Night Mode uses a combination of longer exposure times and image processing to reduce noise and enhance detail.
- Increase the ISO: Raising the ISO sensitivity increases the camera’s ability to capture light, but it can also introduce noise. Experiment with different ISO settings to find the right balance between brightness and noise.
- Use a Tripod: A tripod will help to keep your iPhone steady, minimizing blur and allowing you to capture longer exposures. You can also use a table or other stable surface as a makeshift tripod.
- Turn on the Flash: While using the flash can sometimes result in harsh lighting, it can be helpful in low-light situations where you need extra light. Experiment with different flash settings to find the best results.
Troubleshooting and Tips
Using manual controls on your iPhone camera can be a powerful way to take amazing photos, but it’s also a bit of a learning curve. Sometimes things don’t go as planned, and you might encounter some common issues. Don’t worry, these issues are usually easy to fix, and once you understand the basics, you’ll be snapping like a pro in no time.
Common Issues and Solutions
It’s helpful to know what to expect when you’re first starting out with manual controls. Here are some common problems and how to solve them:
- Overexposed or Underexposed Photos:These are common issues when you’re learning how to adjust exposure. Overexposed photos are too bright, while underexposed photos are too dark.
- Solution:Adjust your shutter speed and ISO to control the amount of light entering the camera. A faster shutter speed lets in less light, while a slower shutter speed lets in more light.
Learning how to use the iPhone camera’s manual controls can really take your photography to the next level, but sometimes you just need to get things done quickly. That’s where autofill comes in handy. You can save yourself a ton of time by setting up autofill for passwords, email addresses, and even credit card info – check out this guide on how to autofill passwords, email addresses and more on iPhone.
Once you’ve got autofill set up, you can focus on mastering those manual camera controls and snapping some awesome pics!
A higher ISO is more sensitive to light, while a lower ISO is less sensitive.
- Solution:Adjust your shutter speed and ISO to control the amount of light entering the camera. A faster shutter speed lets in less light, while a slower shutter speed lets in more light.
- Blurry Photos:Blurry photos can be caused by a variety of factors, including camera shake, a slow shutter speed, or a subject moving too quickly.
- Solution:Try using a tripod or a stabilizer to reduce camera shake. You can also increase your shutter speed to freeze motion.
- Incorrect White Balance:White balance affects the color temperature of your photos. If your white balance is off, your photos may have a yellow, blue, or orange tint.
- Solution:Use the white balance controls to adjust the color temperature of your photos. You can also use a custom white balance setting by taking a photo of a white object.
- Unfocused Photos:If your subject is not in focus, your photos will be blurry.
- Solution:Use the focus controls to ensure your subject is sharp. You can also use the tap-to-focus feature to quickly focus on a specific area of the image.
Tips for Better Photos
Here are some general tips to help you take even better photos with your iPhone’s manual controls:
- Practice Makes Perfect:The best way to improve your photography is to practice. Experiment with different settings and see how they affect your photos.
- Use a Tripod:A tripod can help you take sharper photos, especially in low-light conditions.
- Explore Different Perspectives:Don’t be afraid to get creative with your angles. Try shooting from different heights, angles, and distances.
- Learn the Rule of Thirds:The rule of thirds is a basic composition guideline that can help you create more balanced and interesting photos. Imagine dividing your image into nine equal squares, with two horizontal and two vertical lines. Place your subject along one of these lines or at one of the points where the lines intersect.
- Use the HDR Feature:HDR (High Dynamic Range) combines multiple exposures to create a photo with more detail in the highlights and shadows. It’s a great way to capture photos in high-contrast lighting situations.
- Edit Your Photos:Even the best photos can benefit from a little post-processing. Use the built-in editing tools in the Photos app or a third-party editing app to adjust brightness, contrast, color, and other settings.
Understanding Light, How to use the iPhone camera’s built-in manual controls
Light is the most important element in photography. Understanding how light affects your photos is essential for taking better pictures.
If you’re looking to take your iPhone photography to the next level, mastering the built-in manual controls is key. You can adjust settings like exposure, focus, and white balance to capture the perfect shot. But if you’re finding yourself constantly distracted by notifications or switching between apps, you might want to check out How to disable multitasking on your iPad.
Once you’ve got your multitasking under control, you can fully focus on your photography and experiment with the manual controls on your iPhone camera.
- Natural Light:Natural light is generally the most flattering type of light. It’s soft and diffused, which helps to create a more even illumination. The best time to shoot with natural light is during the “golden hours” – the hour after sunrise and the hour before sunset.
- Artificial Light:Artificial light can be more challenging to work with, but it can also be very creative. Be aware that different types of artificial light can cast different colors on your subject. For example, incandescent light tends to be warm, while fluorescent light can be cool.
Experiment and Have Fun!
Remember, photography is all about creativity and experimentation. Don’t be afraid to try new things and see what works for you. The more you experiment, the better you’ll become at using your iPhone’s manual controls to take amazing photos.
Final Thoughts
By understanding and utilizing the iPhone camera’s manual controls, you can elevate your photography to new heights. You’ll be able to capture stunning images with precise control over exposure, focus, and white balance, making your photos truly unique and expressive.
So, dive into the world of manual controls and discover the limitless possibilities of your iPhone camera.
FAQs
What are the benefits of using manual controls?
Manual controls give you complete creative control over your photos, allowing you to achieve specific effects and capture images that you wouldn’t be able to with automatic settings. You can adjust exposure, focus, white balance, and more, ensuring your photos look exactly the way you envision them.
Do I need a special iPhone to use manual controls?
No, all iPhones with a camera app have manual controls available. The specific controls and their features may vary slightly depending on the iPhone model.
Is it difficult to use manual controls?
It might seem intimidating at first, but using manual controls is actually quite intuitive. With a little practice, you’ll be able to adjust the settings with ease and create stunning photos.
How do I know if I’m using the right settings?
The best way to learn is through experimentation. Play around with the different settings and see how they affect your photos. You’ll quickly develop an understanding of what works best for you.