How To Try Ubuntu Linux Without Risking Your Mac
How to try Ubuntu Linux without risking your Mac sets the stage for this enthralling narrative, offering readers a glimpse into a story that is rich in detail and brimming with originality from the outset.
Want to explore the world of Linux without ditching your trusty Mac? You’re in luck! This guide will walk you through how to try Ubuntu Linux, a popular and user-friendly Linux distribution, on your Mac without making any permanent changes to your system.
We’ll cover everything from understanding virtual machines to exploring the Ubuntu desktop, all while keeping your Mac safe and sound.
Understanding Ubuntu Linux
Ubuntu Linux is a popular and user-friendly operating system based on the Linux kernel. It’s known for its stability, security, and wide range of applications. Let’s dive into the features and benefits of Ubuntu Linux, explore its differences from macOS, and see how it can be used on a Mac.
Key Features and Benefits of Ubuntu Linux
Ubuntu Linux is renowned for its user-friendly interface and robust features.
- Open Source:Ubuntu Linux is open source, meaning its code is freely available for anyone to view, modify, and distribute. This fosters a collaborative community of developers who constantly improve the system.
- Free to Use:Ubuntu Linux is completely free to download and use. This makes it an attractive option for individuals and organizations looking to save money on operating system costs.
- Stability and Security:Ubuntu Linux is known for its stability and security. It receives regular updates and security patches, making it a reliable choice for both personal and professional use.
- Vast Software Ecosystem:Ubuntu Linux has a vast ecosystem of software, including popular applications like LibreOffice, Firefox, and GIMP. The Ubuntu Software Center makes it easy to find and install applications.
- Command Line Interface:Ubuntu Linux features a powerful command-line interface (CLI) that allows for advanced system administration and automation tasks.
Differences Between Ubuntu Linux and macOS
Ubuntu Linux and macOS are distinct operating systems with their own unique strengths and weaknesses.
- Operating System Kernel:Ubuntu Linux is based on the Linux kernel, while macOS is based on the Darwin kernel. The Linux kernel is known for its open-source nature and flexibility, while Darwin is a Unix-based kernel developed by Apple.
- User Interface:Ubuntu Linux uses the GNOME desktop environment, which offers a clean and intuitive user interface. macOS has its own proprietary user interface, known for its elegance and simplicity.
- Software Compatibility:Ubuntu Linux has a wide range of software available, but some applications may not be compatible with macOS. Conversely, some macOS-specific applications may not be available on Ubuntu Linux.
- Hardware Compatibility:Ubuntu Linux is generally more compatible with a wider range of hardware compared to macOS. This is due to its open-source nature and the efforts of the Linux community to support various hardware components.
Using Ubuntu Linux on a Mac
There are several ways to experience Ubuntu Linux on a Mac without impacting your existing macOS installation.
- Virtual Machine:One popular method is to run Ubuntu Linux in a virtual machine (VM) environment. This allows you to run Ubuntu Linux alongside macOS without modifying your Mac’s operating system. VirtualBox and Parallels Desktop are popular VM software options.
- Dual Booting:Another option is to dual boot your Mac, which allows you to choose between Ubuntu Linux and macOS at startup. This method requires partitioning your hard drive and installing Ubuntu Linux alongside macOS.
- Live USB:You can create a bootable USB drive with Ubuntu Linux and try it out without installing it on your Mac. This allows you to explore Ubuntu Linux without making any permanent changes to your system.
Virtual Machine Options

So you’re ready to try out Ubuntu Linux without messing with your Mac’s operating system? Great! Virtual machines are the perfect way to do that. They let you run a separate operating system inside your Mac, just like a computer within a computer.
Let’s explore the popular options and see how to get them up and running.
Trying out Ubuntu Linux on your Mac without messing up your system is totally possible! You can use a virtual machine to run it, which is like having a separate computer inside your computer. But if you’re worried about your privacy, you might want to check out how to Disable Facebook Places, which you can learn about here.
Once you’re comfortable with Ubuntu, you can always install it on a separate partition if you want to go all-in.
Virtual Machine Software Comparison
Virtual machine software creates a virtual environment where you can install and run an operating system separate from your Mac’s operating system. This allows you to explore new software, test applications, or even use Linux as your primary operating system without affecting your Mac.
There are a few popular choices available, each with its strengths and weaknesses:
- Parallels Desktop:This is a popular choice for Mac users who want a seamless integration with their Mac’s operating system. It’s known for its performance, ease of use, and compatibility with a wide range of applications. Parallels Desktop also offers features like Coherence mode, which allows you to run Linux applications directly within macOS, making it feel like a native application.
Trying out Ubuntu Linux on your Mac doesn’t have to be risky. You can use a virtual machine to run it without affecting your main operating system. Before you click on any links related to virtual machines, though, it’s always a good idea to expand a potentially dangerous shortened URL on your iPhone to make sure it’s safe.
That way, you can enjoy the experience of Ubuntu Linux without worrying about harming your Mac.
However, it’s a paid software, and the cost can be a deterrent for some users.
- VMware Fusion:Another paid option that’s highly regarded for its performance and stability. VMware Fusion offers a similar experience to Parallels Desktop, with features like Unity mode, which allows you to run Linux applications within macOS. It’s also known for its strong support for enterprise-level features and its ability to run virtual machines on a variety of hardware.
- VirtualBox:This is a free and open-source option, making it a great choice for users who are on a budget or want to explore virtual machines without any upfront cost. VirtualBox is known for its simplicity and compatibility with a wide range of operating systems, including Linux, Windows, and macOS.
However, it might not offer the same level of performance or seamless integration as paid options.
Installing Virtual Machine Software
The installation process for each virtual machine software is generally straightforward and involves downloading the software from the vendor’s website and running the installer. Here’s a quick overview:
- Parallels Desktop:Download the Parallels Desktop installer from the official website, run the installer, and follow the on-screen instructions. You’ll need to enter your license key if you’ve purchased the software.
- VMware Fusion:Download the VMware Fusion installer from the official website, run the installer, and follow the on-screen instructions. You’ll need to enter your license key if you’ve purchased the software.
- VirtualBox:Download the VirtualBox installer from the official website, run the installer, and follow the on-screen instructions. You can choose to install the software for all users or just for your current user account.
Optimizing Virtual Machine Performance
Once you’ve installed the virtual machine software, you can start running your Ubuntu Linux virtual machine. To ensure optimal performance, consider these tips:
- Allocate sufficient resources:Virtual machines require resources like CPU, memory, and storage space. Ensure you allocate enough resources to your virtual machine to avoid performance issues. This might involve adjusting the virtual machine settings to allocate more CPU cores, RAM, or disk space.
- Enable hardware acceleration:Hardware acceleration allows the virtual machine to use your Mac’s hardware resources more efficiently, improving performance. Check if hardware acceleration is enabled in the virtual machine settings.
- Use a fast storage device:The storage device you use for your virtual machine can impact performance. Consider using a fast SSD or NVMe drive to store your virtual machine files.
- Close unnecessary applications:When running a virtual machine, close any unnecessary applications on your Mac to free up resources and improve performance.
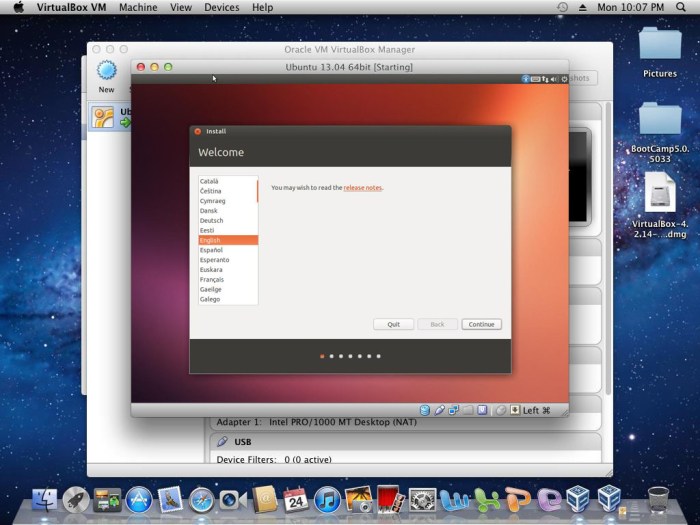
Installing Ubuntu Linux in a Virtual Machine
Installing Ubuntu Linux in a virtual machine provides a safe and controlled environment to explore the operating system without affecting your Mac’s primary system. This approach allows you to experiment with Ubuntu Linux, test software, and learn about its features without any risk to your existing setup.
Installing Ubuntu Linux in a Virtual Machine
To install Ubuntu Linux in a virtual machine, follow these steps:
- Download a Virtual Machine Software:Choose a virtual machine software like Parallels Desktop, VMware Fusion, or Oracle VirtualBox. Each software has its own strengths and weaknesses, so consider your specific needs and preferences when selecting.
- Download the Ubuntu Linux ISO Image:Go to the official Ubuntu website and download the latest version of the Ubuntu Linux ISO image. This file contains the necessary installation files for Ubuntu Linux.
- Create a Virtual Machine:Open your chosen virtual machine software and create a new virtual machine. You’ll need to specify the name of the virtual machine, the amount of RAM to allocate, and the hard disk size. Ensure you select Ubuntu Linux as the operating system type.
- Mount the ISO Image:In the virtual machine software settings, locate the option to mount the ISO image. Select the Ubuntu Linux ISO image you downloaded in step 2.
- Start the Virtual Machine:Start the virtual machine. The Ubuntu Linux installation process will begin automatically.
- Follow the Installation Instructions:The Ubuntu Linux installer will guide you through the installation process. Choose your language, keyboard layout, and other preferences. You’ll also need to partition the virtual hard drive and create a user account.
- Complete the Installation:After the installation process is complete, you can start using Ubuntu Linux within the virtual machine.
System Requirements for Running Ubuntu Linux in a Virtual Machine
Running Ubuntu Linux within a virtual machine requires specific system resources. The following table Artikels the minimum system requirements for running Ubuntu Linux in a virtual machine:
| Requirement | Minimum | Recommended |
|---|---|---|
| Processor | Dual-core processor | Quad-core processor or better |
| RAM | 4 GB | 8 GB or more |
| Hard Disk Space | 20 GB | 40 GB or more |
| Graphics Card | Integrated graphics card | Dedicated graphics card |
Configuring Network Settings and Shared Folders
Once Ubuntu Linux is installed in the virtual machine, you’ll need to configure network settings and shared folders. This enables communication between your Mac and the virtual machine.
Network Settings
- Network Settings in Virtual Machine Software:Access the network settings within your chosen virtual machine software. Select the appropriate network adapter type, such as NAT or Bridged Networking, based on your needs.
- Network Settings in Ubuntu Linux:Within the Ubuntu Linux virtual machine, open the Network settings and configure the network connection. You may need to assign a static IP address or configure a DHCP client.
Shared Folders
- Shared Folders in Virtual Machine Software:In the virtual machine software settings, locate the option to create shared folders. Select the folders on your Mac that you want to share with the Ubuntu Linux virtual machine.
- Accessing Shared Folders in Ubuntu Linux:Once the shared folders are configured, you can access them from within the Ubuntu Linux virtual machine. The shared folders will appear as mounted drives in the Ubuntu Linux file system.
Trying Ubuntu Linux Live

Before diving into the installation process, you can experience Ubuntu Linux without making any permanent changes to your Mac. This is possible through a live session, which lets you try Ubuntu Linux directly from a bootable USB drive. This way, you can explore the operating system, try out different applications, and see if it suits your needs before committing to installation.
Creating a Bootable USB Drive
To create a bootable USB drive with Ubuntu Linux, you’ll need the Ubuntu Linux ISO image file and a USB drive with at least 8 GB of free space. You can download the Ubuntu Linux ISO image file from the official Ubuntu website.
Once you have both, follow these steps:
- Insert the USB drive into your Mac.
- Open the Disk Utility application (found in Applications > Utilities).
- Select the USB drive in the sidebar.
- Click on the “Erase” tab.
- Select “Mac OS Extended (Journaled)” as the format.
- Click on the “Erase” button.
- Once the USB drive is erased, download and install a tool like Balena Etcheror Rufusto create a bootable USB drive. These tools simplify the process of creating bootable drives.
- Open the tool and select the Ubuntu Linux ISO image file and the USB drive.
- Click on the “Flash” or “Write” button to start the process. This will write the Ubuntu Linux ISO image file to the USB drive.
- Wait for the process to complete, and then you’ll have a bootable USB drive with Ubuntu Linux.
Booting into the Live Session
Once you have a bootable USB drive, you can boot your Mac into the live session. This allows you to explore Ubuntu Linux without installing it on your Mac. Here’s how:
- Restart your Mac and hold down the Optionkey.
- Select the USB drive from the list of bootable devices.
- The Ubuntu Linux live session will start loading. This might take a few minutes.
- Once the live session is loaded, you’ll be greeted with the Ubuntu Linux desktop. You can now explore the operating system and try out different applications.
Exploring Ubuntu Linux
The live session provides a complete Ubuntu Linux experience, allowing you to:
- Browse the internet using the Firefox web browser.
- Use the LibreOffice suite for document editing and spreadsheets.
- Explore the file manager and navigate the system.
- Try out various applications from the Ubuntu Software Center.
You can use the live session to familiarize yourself with the Ubuntu Linux interface, test out applications, and see if it meets your needs. Keep in mind that any changes you make in the live session will not be saved after restarting your Mac.
Exploring Ubuntu Linux: How To Try Ubuntu Linux Without Risking Your Mac
You’ve successfully installed Ubuntu Linux, either in a virtual machine or as a live environment. Now it’s time to dive in and explore what this powerful operating system has to offer.
Key Applications and Features
Ubuntu Linux comes with a suite of pre-installed applications designed to meet the needs of most users. Here are some key applications and features to explore:
- GNOME Desktop Environment:The default desktop environment in Ubuntu, GNOME provides a user-friendly interface with a focus on simplicity and ease of use. You’ll find a taskbar, system tray, and a menu that provides access to all the applications installed on your system.
- Firefox Web Browser:A popular open-source web browser that’s known for its speed, security, and privacy features.
- LibreOffice:A powerful and versatile office suite that includes applications for word processing, spreadsheets, presentations, and more. It’s a great alternative to Microsoft Office.
- GIMP:A free and open-source image editor that’s a powerful alternative to Adobe Photoshop.
- VLC Media Player:A versatile media player that can play a wide range of audio and video formats.
- Terminal:A command-line interface that gives you more control over your system.
- Software Center:A central location where you can find and install new applications.
Navigating the Ubuntu Desktop Environment
Ubuntu’s desktop environment is designed to be intuitive and easy to use. Here are some tips for navigating it:
- Taskbar:The taskbar is located at the bottom of the screen and provides quick access to open applications, the system menu, and the time and date.
- System Menu:The system menu, accessed by clicking the Ubuntu logo in the top-left corner, provides access to system settings, applications, and other system tools.
- File Manager:The file manager, known as “Files,” allows you to browse your computer’s file system, manage files and folders, and create new files and directories.
- Keyboard Shortcuts:Ubuntu uses many keyboard shortcuts to make navigating the desktop faster and easier. For example, Ctrl+Alt+T opens the terminal, and Ctrl+C copies selected text.
Accessing the Command Line, How to try Ubuntu Linux without risking your Mac
The command line, also known as the terminal, provides a powerful way to interact with your system. It allows you to execute commands, manage files, and perform other system tasks. Here’s how to access the command line:
- Open the Terminal:You can open the terminal by searching for “Terminal” in the system menu or by using the keyboard shortcut Ctrl+Alt+T.
- Basic Commands:Here are some basic commands you can use in the terminal:
- ls:Lists the files and directories in the current directory.
- cd:Changes the current directory. For example,
cd /home/user/Documentswould change the current directory to the “Documents” folder within the “user” directory. - mkdir:Creates a new directory. For example,
mkdir new_directorywould create a new directory called “new_directory” in the current directory. - rm:Removes files or directories. Be careful with this command, as it can permanently delete files.
- man:Displays the manual page for a command. For example,
man lswould display the manual page for the “ls” command.
Evaluating Ubuntu Linux
So, you’ve taken a spin around Ubuntu Linux and are probably wondering if it’s worth making the switch. Let’s dive into the pros and cons of using Ubuntu Linux on a Mac and see if it’s the right fit for you.
Want to give Ubuntu Linux a spin without messing with your Mac’s setup? Virtual machines are your best bet! Just make sure you’re also taking steps to protect your privacy. If you’re concerned about your iPhone, you can check for Pegasus spyware by following these steps: How to check for Pegasus spyware on iPhone.
Once you’ve got your security in check, you’re good to go with Ubuntu – it’s a great way to explore the world of Linux without committing.
Potential Compatibility Issues and Workarounds
It’s important to acknowledge that not everything will work flawlessly when you run Ubuntu Linux on a Mac. Some software might not be compatible, and you might encounter issues with certain hardware components. Let’s explore some common compatibility issues and their workarounds:
- Hardware Drivers:While most essential hardware components like your keyboard, mouse, and display should work without a hitch, you might encounter issues with specific peripherals like printers, webcams, or graphics cards. This is because Ubuntu Linux relies on open-source drivers, which might not be as comprehensive as proprietary drivers for Mac hardware.
You might need to manually install drivers or use a workaround to get these peripherals working correctly.
- Software Compatibility:Some Mac-specific software, like Final Cut Pro or Logic Pro, won’t work in Ubuntu Linux. You’ll need to find alternatives within the Ubuntu Linux ecosystem or use a virtual machine to run these applications. Fortunately, there are many free and open-source alternatives for most Mac applications, such as LibreOffice for Microsoft Office, GIMP for Photoshop, and Audacity for GarageBand.
- Touch Bar and Touch ID:The Touch Bar and Touch ID features on newer MacBook models might not be fully supported in Ubuntu Linux. This is because these features are heavily integrated with macOS and require specific drivers that are not available for Ubuntu Linux.
You might be able to find workarounds, but full functionality is unlikely.
Troubleshooting Common Issues
Running Ubuntu Linux on a Mac within a virtual machine can sometimes present challenges. It’s essential to understand common problems and their solutions to ensure a smooth experience.
Common Problems and Solutions
Here’s a table outlining common issues encountered while running Ubuntu Linux on a Mac, along with their solutions and workarounds:
| Problem | Solution |
|---|---|
| Slow performance |
|
| Network connectivity issues |
|
| Display problems |
|
| Software compatibility issues |
|
| Input device issues |
|
Troubleshooting Tips
Here are some general tips for troubleshooting and debugging Ubuntu Linux within a virtual machine:
- Check the virtual machine’s logsfor error messages or clues about the problem.
- Search online for solutionsrelated to the specific issue you’re experiencing.
- Try restarting the virtual machineto see if that resolves the problem.
- Update the virtual machine’s softwareto the latest version.
- Contact the virtual machine software’s support teamif you need further assistance.
Additional Resources

You’ve explored the basics of trying Ubuntu Linux on your Mac, but there’s a whole world of information out there to help you delve deeper. Here are some resources to continue your journey:
Official Ubuntu Linux Documentation
The official Ubuntu Linux documentation is an invaluable resource for everything related to the operating system. It covers a wide range of topics, from basic installation and configuration to advanced system administration.
- Ubuntu Documentation:This comprehensive resource provides detailed information on all aspects of Ubuntu Linux. You can find guides, tutorials, and reference materials on everything from installing software to managing users and permissions.
- Ubuntu Community Hub:This is the official forum for Ubuntu users. You can find answers to your questions, share your experiences, and connect with other Ubuntu enthusiasts.
Recommended Resources
There are numerous resources available online and in print to help you learn more about Ubuntu Linux. Here are a few recommendations:
- Books:
- “Ubuntu Linux: The Complete Reference”by James Lee: This book provides a comprehensive guide to Ubuntu Linux, covering everything from basic concepts to advanced administration. It is a great resource for both beginners and experienced users.
- “Ubuntu Unleashed”by Bruce Byfield and Matt Helm: This book is a comprehensive guide to Ubuntu Linux, covering everything from basic concepts to advanced administration. It is a great resource for both beginners and experienced users.
- Articles:
- “Ubuntu Linux: A Beginner’s Guide”by TechRepublic: This article provides a comprehensive overview of Ubuntu Linux for beginners. It covers the basics of the operating system, how to install it, and how to use it.
- “Ubuntu Linux: 10 Reasons to Try It”by MakeUseOf: This article explores the benefits of using Ubuntu Linux. It highlights the operating system’s stability, security, and user-friendliness.
- Online Tutorials:
- “Ubuntu Linux Tutorial”by Linux Tutorials: This website provides a comprehensive guide to Ubuntu Linux, covering everything from basic installation to advanced administration.
- “Ubuntu Linux for Beginners”by Udemy: This online course provides a step-by-step guide to using Ubuntu Linux. It covers the basics of the operating system, how to install it, and how to use it.
Finding Answers and Resolving Issues
When you encounter a problem, there are a few reliable places to turn for help.
- Ubuntu Forums:The Ubuntu forums are a great place to ask questions and get help from other Ubuntu users.
- Google Search:Google is a powerful tool for finding answers to technical questions. Try searching for your specific problem, including relevant s like “Ubuntu” and “error message.”
- Stack Overflow:Stack Overflow is a popular question-and-answer website for programmers. You can find answers to a wide range of technical questions, including those related to Ubuntu Linux.
Closing Summary
By following these steps, you can dive into the world of Ubuntu Linux and discover its potential without any risk to your Mac. Whether you’re a seasoned techie or just curious about Linux, this guide provides a safe and accessible way to explore this powerful operating system.
So, what are you waiting for? Let’s get started!
User Queries
Can I run Ubuntu Linux on my Mac without a virtual machine?
Yes, you can install Ubuntu Linux directly on your Mac using a dual boot setup. However, this will require partitioning your hard drive and may affect your existing macOS installation. We recommend using a virtual machine for a safer and more flexible experience.
Is there a free virtual machine software for Mac?
Yes, VirtualBox is a popular and free open-source virtual machine software available for Mac, Windows, and Linux.
What are the minimum system requirements for running Ubuntu Linux on a Mac?
The minimum system requirements for running Ubuntu Linux in a virtual machine depend on the specific virtual machine software you choose. However, generally, you’ll need at least 4GB of RAM, 20GB of free hard drive space, and a modern Intel or AMD processor.
How do I access files on my Mac from within Ubuntu Linux?
Most virtual machine software allows you to share folders between your Mac and the virtual machine. This enables you to access files on your Mac from within Ubuntu Linux and vice versa.