How To Mark All Imessages As Read On Your Iphone
How to mark all iMessages as read on your iPhone – Ever feel overwhelmed by a sea of blue notification bubbles on your iPhone? We’ve all been there. Trying to navigate through a backlog of unread messages can feel like a never-ending task. But don’t worry, there’s a way to clear the clutter and start fresh.
This guide will walk you through the simple steps to mark all your iMessages as read on your iPhone, so you can finally reclaim your notification peace of mind.
From the classic “Mark as Read” feature to the convenient “Clear All Notifications” option, we’ll explore all the methods available to help you get back on top of your iMessage game. Whether you’re a seasoned iPhone user or a newbie, this guide has got you covered.
So, let’s dive in and conquer those pesky unread messages!
Understanding iMessage Notifications
iMessage notifications are an essential part of the iPhone experience, informing you about new messages and keeping you connected. These notifications help you stay updated on conversations and ensure you don’t miss important messages.
iMessage Notifications: How They Work
iMessage notifications appear on your iPhone’s lock screen, notification center, and within the Messages app. They provide a quick glimpse of the message’s content, including the sender’s name and a snippet of the message. The notification sound and appearance can be customized in your iPhone’s settings.
Unread vs. Read Messages
In iMessage, a message is considered “unread” when it has not been opened and viewed by the recipient. Once a message is opened and viewed, it is marked as “read.” The difference between unread and read messages is important for maintaining a clear understanding of which messages have been acknowledged and which require attention.
Impact on User Experience
iMessage notifications significantly impact the user experience by providing timely updates and allowing for efficient communication. When a notification appears, it alerts you to a new message, allowing you to respond promptly. The notification’s content provides context, giving you an idea of the message’s importance and urgency.
This allows you to prioritize your responses and maintain a smooth communication flow.
Methods for Marking iMessages as Read

You can mark all your iMessages as read using several methods on your iPhone. This is especially helpful when you have a lot of unread messages and want to clear your notifications. Let’s explore the different ways to achieve this.
Using the “Mark All as Read” Feature
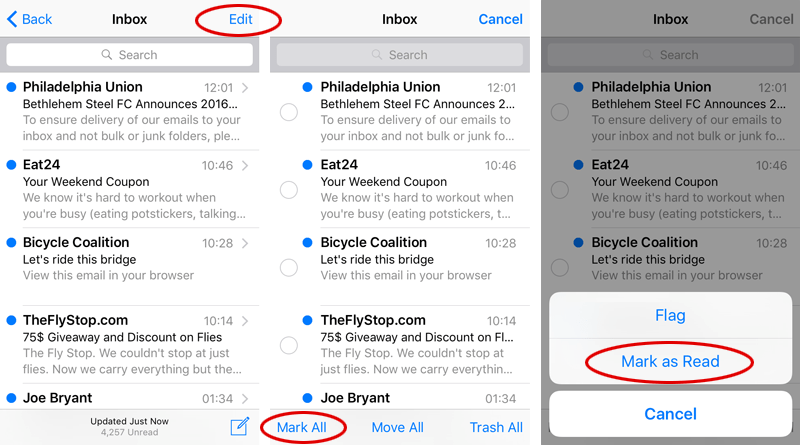
This is the simplest and most straightforward way to mark all your iMessages as read. Here’s how:
- Open the Messages app on your iPhone.
- Tap on the “Edit” button located in the top-left corner of the screen.
- Select “Mark All as Read” from the options that appear.
This will instantly mark all your iMessages as read, clearing your notifications and giving you a fresh start.
Clearing Notifications from the Notification Center
Another method involves directly clearing the notifications from the Notification Center. This is a quick and easy way to clear unread iMessages, but it won’t mark them as read within the Messages app.
- Swipe down from the top of your iPhone screen to access the Notification Center.
- Locate the iMessage notifications.
- Swipe left on the notification and tap on the “Clear” button.
This will remove the notification from your screen, but the messages will remain unread within the Messages app.
Manually Marking Messages as Read
If you want to selectively mark messages as read, you can do so manually. This method allows you to control which messages are marked as read, offering more flexibility than the “Mark All as Read” feature.
- Open the Messages app and navigate to the conversation you want to mark as read.
- Tap on the message bubble to open it.
- The message will be marked as read automatically.
You can repeat this process for each message you want to mark as read.
Comparing Methods
| Method | Efficiency | Ease of Use |
|---|---|---|
| Mark All as Read | Highly efficient | Very easy |
| Clearing Notifications | Less efficient | Moderately easy |
| Manually Marking | Least efficient | Moderately easy |
The “Mark All as Read” feature is the most efficient and easiest way to mark all your iMessages as read. Clearing notifications from the Notification Center is a quick alternative but less efficient. Manually marking messages as read is the least efficient method but offers more flexibility.
Using the “Mark as Read” Feature
The “Mark as Read” feature is a handy tool within the iMessage app that lets you quickly mark individual messages as read, even if you haven’t actually read them. This can be useful for managing notifications and keeping your inbox organized.
You can access this feature by tapping on the “Mark as Read” button located in the upper right corner of the message thread. This button is represented by a small circle with a checkmark inside. When you tap on it, all the messages within that specific thread will be marked as read.
Marking all your iMessages as read can be a lifesaver, especially when you’re trying to catch up on a ton of conversations. To make things even easier, you can also use FaceTime to chat with friends and family, and it’s a breeze to set up a group call.
If you’re not sure how, check out this article on How to make Group FaceTime calls on iPhone, iPad or Mac. Once you’re done with your group call, you can get back to clearing out your iMessage notifications and finally feel like you’re caught up.
Marking Individual Messages as Read
To mark individual messages as read, you can simply swipe left on the message you want to mark as read and then tap on the “Mark as Read” button that appears. This action will mark that specific message as read, without affecting the other messages in the thread.
Benefits and Drawbacks of Using the “Mark as Read” Feature
While the “Mark as Read” feature can be useful for managing notifications and keeping your inbox organized, there are some potential drawbacks to consider.
- One potential drawback is that marking messages as read may give the sender the impression that you have actually read them, even if you haven’t. This could lead to misunderstandings or misinterpretations.
- Another potential drawback is that marking messages as read can make it more difficult to keep track of which messages you have actually read. If you have a lot of messages, it can be easy to lose track of which ones you have read and which ones you haven’t.
Marking all your iMessages as read is a breeze on your iPhone, but sometimes you need to delve deeper into the world of network file sharing. If you’re looking to set up a Samba server on your Mac OS X Lion, you can check out How to Install Samba Into Mac OS X Lion?
for a step-by-step guide. Once you’ve got that up and running, you can get back to clearing out those unread iMessages with a few simple taps.
Marking All Messages as Read

Sometimes you just want to clear your notification center and start fresh. Luckily, there’s a way to mark all your iMessages as read on your iPhone.
Marking All Messages as Read
You can quickly mark all your iMessages as read by following these steps:
- Open the Messages app on your iPhone.
- Tap on the “Edit” button in the top left corner of the screen.
- Select “Mark All As Read” from the menu that appears.
This method is the fastest and most effective way to mark all your messages as read. It clears all notifications and provides a clean slate for new messages.
Utilizing the “Clear All Notifications” Option
The “Clear All Notifications” option is a quick way to clear all your pending notifications, including those from iMessage. This is a useful tool if you want to start fresh and focus on your current tasks without the distractions of past notifications.
Accessing and Using the “Clear All Notifications” Option
To access this option, follow these steps:
1. Open the Notification Center
Swipe down from the top of your iPhone screen to reveal the Notification Center.
2. Locate the “Clear All” Button
You’ll find the “Clear All” button in the upper right corner of the Notification Center. It’s a small circle with a line through it.
3. Tap the “Clear All” Button
Tapping this button will immediately clear all notifications, including those from iMessage.
Impact of Using the “Clear All Notifications” Option on Notifications, How to mark all iMessages as read on your iPhone
Using the “Clear All Notifications” option will mark all notifications as read, including those from iMessage. This will clear your Notification Center and prevent the notifications from reappearing until you receive new messages. However, it’s important to note that clearing all notifications doesn’t necessarily mean that you’ve read all the messages.
If you have unread messages in your iMessage app, they will still be available to read.
Using the “Clear All” Button in the iMessage App

The “Clear All” button within the iMessage app offers a quick and convenient way to mark all your messages as read, effectively clearing all notifications from your iPhone’s lock screen and notification center. This button can be particularly useful if you have a large backlog of unread messages and want to get a clean slate.
Using the “Clear All” Button to Mark All Messages as Read
The “Clear All” button is easily accessible within the iMessage app. It is located at the top right corner of the screen, next to the “Compose” button. When you tap this button, all your unread messages will be marked as read, instantly clearing your notification count.
To use the “Clear All” button, simply open the iMessage app and tap the “Clear All” button located at the top right corner of the screen.
The “Read” Status in iMessage
The “Read” status in iMessage is a feature that lets you know when someone has seen your message. It’s displayed as a small circle with a checkmark inside, and it appears next to the message in the conversation thread. While this feature can be helpful for knowing when someone has read your message, it can also be a source of anxiety or frustration.
Some people may feel pressured to respond immediately after seeing the “Read” status, while others may find it intrusive or even disrespectful.
Marking all your iMessages as read on your iPhone is a quick way to clear your notifications, but did you know there are hidden menu bar actions on your Mac? Hold down the Option key to unlock Mac’s hidden menu bar actions – it’s like a secret menu for your Mac! Just like marking all your iMessages as read can give you a clean slate, these hidden actions can help you streamline your workflow on your Mac.
Factors Influencing the “Read” Status
The “Read” status in iMessage is determined by a few factors.
- iMessage Enabled:The “Read” status is only displayed if both the sender and receiver have iMessage enabled. If the receiver has iMessage disabled, the “Read” status will not appear, even if the message is delivered.
- Device Activity:The “Read” status is also dependent on the receiver’s device activity. If the receiver has their device locked or is not actively using the Messages app, the “Read” status may not appear immediately. The status may appear later when the receiver unlocks their device or opens the Messages app.
- Notifications:The “Read” status is only displayed when the receiver has received a notification for the message. If the receiver has turned off notifications for iMessage, the “Read” status may not appear.
Managing the “Read” Status for Privacy
If you’re concerned about the “Read” status in iMessage, there are a few things you can do to manage it and maintain your privacy.
- Disable Read Receipts:You can disable “Read Receipts” in your iMessage settings. This will prevent the “Read” status from being displayed to other iMessage users when you read their messages. To disable read receipts, go to Settings > Messages > and turn off the “Send Read Receipts” option.
- Turn Off Notifications:If you don’t want to receive notifications for new messages, you can turn them off in your iMessage settings. This will prevent the “Read” status from appearing when you receive a message, as notifications are required for the status to be displayed.
- Use Other Messaging Apps:If you’re concerned about privacy, you can use other messaging apps that don’t have “Read” status features. Some popular alternatives include WhatsApp, Telegram, and Signal.
Alternative Methods for Marking Messages as Read
Sometimes, the built-in features of iMessage might not be enough to satisfy your need for complete control over your notifications. If you’re looking for more granular options or want to explore different approaches to managing your iMessage notifications, third-party apps can provide a fresh perspective.Third-party apps offer alternative methods for marking iMessages as read, providing features that go beyond the standard “Mark as Read” option.
These apps can offer a more tailored experience, allowing you to manage notifications based on your preferences and needs.
Third-Party Apps for Managing iMessage Notifications
Here are some examples of popular third-party apps that can help you manage your iMessage notifications:
- Notifications: These apps offer a comprehensive approach to managing notifications from all your apps, including iMessage. You can customize how notifications appear, set priority levels, and even schedule quiet hours to minimize distractions.
- Focus Modes: Apple’s built-in Focus Modes provide a powerful way to manage notifications based on your current activity. For example, you can activate a “Work” focus mode to silence all non-work-related notifications, including iMessages from friends and family.
- Read Receipts Managers: These apps specialize in controlling read receipts for iMessage. They allow you to selectively disable read receipts for specific contacts or even for entire groups. This can be useful for maintaining privacy or avoiding unnecessary pressure to respond immediately.
Troubleshooting Common Issues

While marking iMessages as read is generally straightforward, you might encounter some issues. Here’s a breakdown of common problems and how to solve them.
Messages Not Marking as Read
Sometimes, messages may not mark as read even after you’ve interacted with them. This could be due to a few factors.
- Network Connectivity:A weak or unstable internet connection can interfere with message delivery and read receipts. Ensure you have a strong Wi-Fi or cellular data connection.
- iMessage Settings:Double-check your iMessage settings to ensure “Read Receipts” are enabled. Go to Settings > Messagesand toggle the “Read Receipts” switch to the ON position.
- Device Restart:A simple device restart can often resolve temporary glitches. Turn your iPhone off and back on to refresh the system.
- App Update:An outdated iMessage app could be the culprit. Update the app from the App Store to the latest version.
- Background App Refresh:Ensure background app refresh is enabled for the Messages app. Go to Settings > General > Background App Refreshand enable the switch for Messages.
Issues with “Mark All as Read”
The “Mark All as Read” feature might not always work as expected.
- Large Number of Messages:If you have a massive backlog of unread messages, the “Mark All as Read” function may take longer to process. Be patient and allow the system to complete the task.
- Group Messages:In group conversations, the “Mark All as Read” function might only mark the messages from the last sender as read, not all messages in the group.
- iMessage Glitches:Occasionally, the “Mark All as Read” feature can encounter temporary glitches. Try restarting your iPhone or updating the iMessage app to resolve the issue.
Tips for Preventing Issues
- Regularly Check for Updates:Keep your iPhone’s operating system and the Messages app updated to ensure compatibility and avoid potential bugs.
- Manage Notifications:Adjust notification settings to receive only important alerts. This reduces clutter and makes it easier to manage messages.
- Avoid Large Unread Message Backlogs:Regularly mark messages as read to avoid overwhelming your notification center and potential issues with “Mark All as Read.”
Tips for Managing iMessage Notifications
Notifications can be helpful, but they can also be a major distraction. If you find yourself constantly checking your phone for new messages, it might be time to adjust your iMessage notification settings.
Customizing Notification Settings for Individual Contacts
One of the best ways to manage iMessage notifications is to customize the settings for individual contacts. This allows you to prioritize important messages while minimizing distractions from less urgent ones.
- Set different notification sounds:Assign a unique sound to important contacts so you can quickly identify their messages without even looking at your phone. For example, you might use a specific sound for your boss or a family member.
- Enable or disable banners:Banners are the pop-up notifications that appear at the top of your screen. If you find these distracting, you can disable them for specific contacts. You can also choose to have banners appear only for important contacts.
- Adjust notification previews:You can control how much information appears in your notification previews. For example, you can choose to show only the sender’s name or the entire message. This can help you quickly assess the importance of a message without having to open it.
Strategies for Reducing Notification Overload
It’s important to find a balance between staying connected and avoiding notification overload. Here are some strategies to help you achieve this:
- Use “Do Not Disturb” mode:This mode allows you to silence all notifications, including iMessages, for a set period of time. You can customize Do Not Disturb mode to allow calls and messages from specific contacts.
- Schedule “notification-free” times:Designate certain times of the day when you will not check your phone or respond to messages. This could be during meals, meetings, or while you are working on a task that requires your full attention.
- Turn off notifications for less important apps:If you’re receiving too many notifications from apps that you don’t use frequently, consider turning off notifications for those apps. This will help reduce the overall number of notifications you receive.
- Use a notification management app:There are several apps available that can help you manage your notifications more effectively. These apps allow you to customize notification settings, schedule notification-free times, and even block notifications from specific apps.
Final Summary: How To Mark All IMessages As Read On Your IPhone
Mastering the art of marking all your iMessages as read is a game-changer for anyone who wants to maintain a clean and organized notification center. By taking advantage of the various features built into your iPhone, you can effortlessly manage your messages and stay on top of your communication flow.
So, ditch the notification anxiety and embrace a clutter-free iMessage experience. Happy messaging!
Essential Questionnaire
What if I accidentally mark all my messages as read, and I haven’t actually read them?
Don’t worry! You can always go back and re-read any messages you’ve marked as read. Just open the conversation and scroll through the messages as usual.
Will marking all messages as read affect my notification settings?
No, marking messages as read only affects the current notification status. Your notification settings will remain unchanged, and you’ll still receive notifications for new messages.