How To Back Up Your Iphone Or Ipad To An External Drive
How to back up your iPhone or iPad to an external drive is a question many of us have, especially when we’re dealing with precious photos, contacts, and messages. It’s like having a safety net for your digital life.
Think of it as a backup plan for your backup plan – in case something happens to your iCloud or your phone itself. But with so many different options, it can be tricky to figure out which method is best for you.
Let’s break down the process and explore the ins and outs of backing up your iPhone or iPad to an external drive.
We’ll cover everything from choosing the right external drive to using iTunes or Finder, and even how to manage your backup space. You’ll learn how to make sure your data is safe and sound, and you’ll be able to rest easy knowing that your important stuff is always protected.
So grab your external drive and let’s dive in!
Understanding iPhone and iPad Backups
Regularly backing up your iPhone or iPad is crucial for safeguarding your valuable data. This ensures that you can recover your apps, photos, contacts, messages, and other essential information in case of device loss, damage, or software issues.
Backup Methods
There are several ways to back up your iPhone or iPad. Each method has its own advantages and disadvantages, and the best option for you will depend on your specific needs and preferences.
- iCloud: iCloud is Apple’s cloud storage service, and it offers a convenient way to back up your device wirelessly. When you enable iCloud backups, your device’s data, including apps, settings, and photos, is automatically uploaded to Apple’s servers.
- Advantages: iCloud backups are simple to set up and manage.
Backing up your iPhone or iPad to an external drive is a great way to keep your data safe, especially if you have a ton of photos and videos. But before you start backing up, you might want to check out How to enable iPhone Photos extensions to make sure you’re capturing all the best moments.
Once you’ve got your extensions set up, you’re ready to connect your external drive and create a backup. Just remember to keep your backup up-to-date so you don’t lose any important memories.
They are automatically performed over Wi-Fi, so you don’t have to manually connect your device to a computer. iCloud backups are also encrypted, which helps protect your data from unauthorized access.
- Disadvantages: iCloud backups can take up a lot of storage space, especially if you have a lot of photos and videos. iCloud storage plans are limited, and you may need to upgrade your plan if you run out of space.
Also, restoring from an iCloud backup can take a significant amount of time, especially if you have a large amount of data.
- Advantages: iCloud backups are simple to set up and manage.
- iTunes: iTunes is Apple’s desktop software for managing and syncing iOS devices. You can use iTunes to create a backup of your iPhone or iPad to your computer.
- Advantages: iTunes backups are typically faster than iCloud backups, and you can choose to back up only specific data, such as photos or music.
iTunes backups are also more secure than iCloud backups because they are stored locally on your computer.
- Disadvantages: iTunes backups require you to connect your device to a computer, which can be inconvenient. iTunes backups can also be large, taking up a significant amount of space on your computer’s hard drive.
- Advantages: iTunes backups are typically faster than iCloud backups, and you can choose to back up only specific data, such as photos or music.
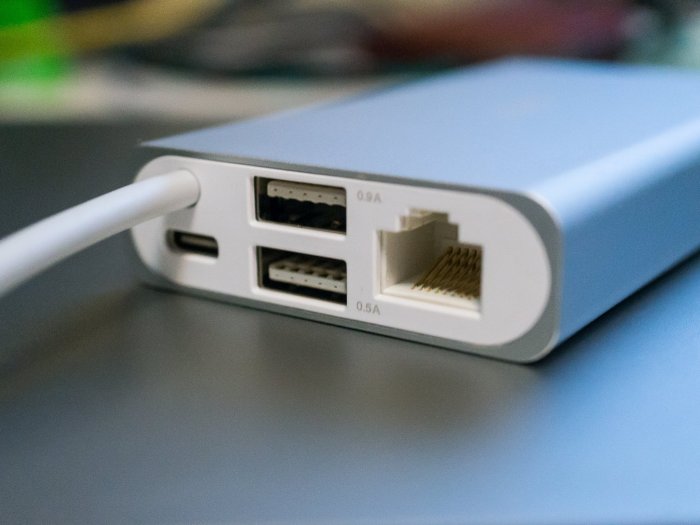
- External Drive: You can also back up your iPhone or iPad to an external hard drive. This is a good option if you have a lot of data and want to keep your backups separate from your computer.
- Advantages: External drive backups offer more storage space than iCloud or iTunes backups.
They are also more secure because they are stored locally on your device.
- Disadvantages: External drive backups require you to manually connect your device to the external drive. They can also be more time-consuming than iCloud or iTunes backups.
- Advantages: External drive backups offer more storage space than iCloud or iTunes backups.
Preparing Your External Drive

Before you can back up your iPhone or iPad to an external drive, you need to make sure the drive meets the necessary requirements and is properly formatted. This section will guide you through the process of preparing your external drive for seamless backups.
External Drive Requirements
To ensure successful backups, your external drive must meet certain criteria:* Compatibility:It should be compatible with iOS devices. Most modern external drives, particularly those formatted as exFAT or NTFS, work well.
Storage Capacity
The drive’s capacity should be sufficient to accommodate your data. Consider the size of your iPhone or iPad’s data, including apps, photos, videos, and other files.
Connection Type
The drive should connect to your iPhone or iPad via a compatible interface. This could be a USB-C, Lightning, or USB-A connection, depending on your device.
Power Source
Some external drives require an external power source, such as a USB power adapter. Ensure the drive is powered on and ready for use during the backup process.
Formatting Your External Drive
To make your external drive compatible with iOS devices, you need to format it using the exFAT file system. Here’s how:
1. Connect the Drive
Connect your external drive to your computer using a USB cable.
2. Open Disk Utility
On a Mac, open Disk Utility (located in Applications > Utilities). On a Windows PC, open File Explorer and right-click on the drive. Select “Format” from the context menu.
3. Select Format
Choose exFAT as the format for your drive.
4. Erase and Format
Click on “Erase” or “Format” to initiate the formatting process.
5. Confirm
Confirm the formatting by clicking on “Erase” or “Format” again.
Connecting Your External Drive
Once your external drive is formatted, you can connect it to your iPhone or iPad. Here are the typical methods:* USB-C:If your iPhone or iPad has a USB-C port, you can directly connect the drive using a USB-C cable.
Lightning Adapter
For older iPhones and iPads with a Lightning connector, you can use a Lightning to USB adapter and connect the drive via a USB-A cable.
Camera Connection Kit
Apple’s Camera Connection Kit (CCK) provides a Lightning port to SD card slot adapter. If your external drive is compatible with SD cards, you can use this kit to connect it.
Using iTunes for Backups
iTunes is a powerful tool for managing your iPhone or iPad, including creating backups. It allows you to create full backups of your device, including data like apps, photos, music, and settings. These backups can be restored to your device if you need to reset it or switch to a new one.
Creating a Backup with iTunes
iTunes backups are a comprehensive way to preserve your iPhone or iPad data. Here’s how to create one:
- Connect your iPhone or iPad to your computer using a USB cable.
- Open iTunes on your computer. You’ll see your device listed in the iTunes window.
- Click on your device icon in the iTunes window.
- Under the “Summary” tab, you’ll find the “Backups” section.
- Click on the “This Computer” option to create a backup on your computer.
- Click on the “Back Up Now” button to start the backup process.
iTunes will begin backing up your device, and the progress bar will show you how far along it is. The backup process may take some time, depending on the size of your data.
Selecting Data to Include in a Backup
You can choose which data you want to include in your iTunes backup. This allows you to create a smaller, faster backup if you don’t need to back up everything.
- Connect your iPhone or iPad to your computer using a USB cable.
- Open iTunes on your computer. You’ll see your device listed in the iTunes window.
- Click on your device icon in the iTunes window.
- Under the “Summary” tab, you’ll find the “Backups” section.
- Click on the “Encrypt iPhone Backup” checkbox. This allows you to encrypt your backup with a password, which is recommended for added security.
- Click on the “Back Up Now” button to start the backup process.
By encrypting your backup, you can ensure that only someone with the password can access the data.
Restoring from an iTunes Backup
Restoring your iPhone or iPad from an iTunes backup is a straightforward process. This can be helpful if you need to reset your device or if you’re switching to a new one.
- Connect your iPhone or iPad to your computer using a USB cable.
- Open iTunes on your computer. You’ll see your device listed in the iTunes window.
- Click on your device icon in the iTunes window.
- Under the “Summary” tab, you’ll find the “Backups” section.
- Click on the “Restore Backup” button. iTunes will display a list of available backups for your device.
- Select the backup you want to restore and click on the “Restore” button.
iTunes will begin restoring your device from the backup. The restoration process may take some time, depending on the size of the backup. Once the restoration is complete, your iPhone or iPad will be restored to the state it was in when the backup was created.
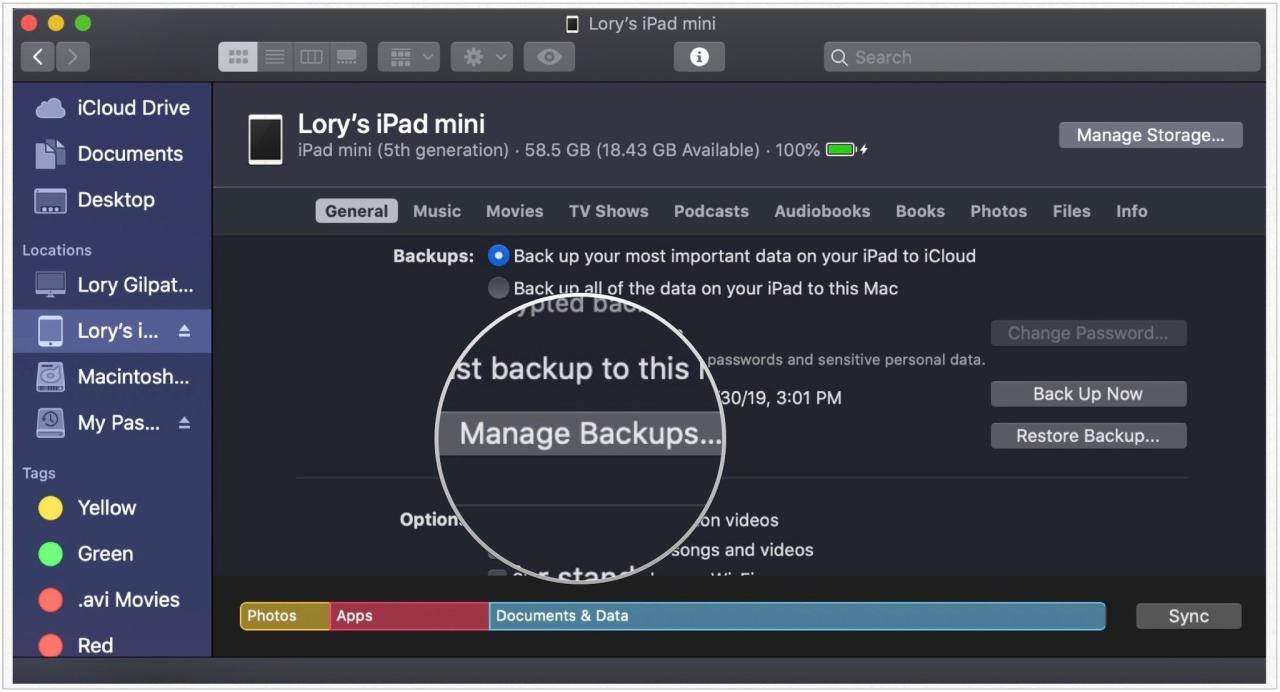
Using Finder for Backups (macOS)
Finder on macOS provides an alternative method to iTunes for backing up your iPhone or iPad. This method offers more granular control over the data you choose to back up, allowing you to select specific categories like photos, videos, or messages.
Selecting Specific Data for Backup
Finder allows you to selectively back up specific data categories from your iPhone or iPad. This can be helpful if you want to save space or only need to back up certain types of data.
- Connect your iPhone or iPad to your Mac using a USB cable.
- Open Finder on your Mac.
- Your iPhone or iPad should appear in the sidebar under Locations.
- Click on your device to view its contents.
- Select the “General” tab.
- Under “Backups,” you’ll see a list of backup options.
- Check the boxes next to the data categories you want to back up.
- Click “Back Up Now” to start the backup process.
Restoring a Backup from Finder
Restoring a backup from Finder is straightforward. You can restore your entire device or just specific data categories.
- Connect your iPhone or iPad to your Mac using a USB cable.
- Open Finder on your Mac.
- Your iPhone or iPad should appear in the sidebar under Locations.
- Click on your device to view its contents.
- Select the “General” tab.
- Under “Backups,” you’ll see a list of available backups.
- Select the backup you want to restore from.
- Click “Restore Backup” to begin the restoration process.
Troubleshooting Backup Issues

Okay, so you’ve set up your external drive and are ready to back up your iPhone or iPad. But what happens if things don’t go as planned? Don’t worry, it’s not uncommon to run into a few hiccups along the way.
This section will walk you through some common backup problems and how to fix them.
Identifying Common Backup Issues
You’ll know something’s not right if your backup process gets interrupted or fails altogether. Here are some common issues you might encounter:
- Backup Not Starting:The backup process might not even begin, leaving you wondering why.
- Backup Stuck:The backup might get stuck at a certain percentage, leaving you frustrated and wondering if it’s ever going to finish.
- Backup Error Messages:iTunes or Finder might throw up error messages, giving you a cryptic clue about what’s going wrong.
- Incomplete Backup:Even if the backup seems to complete, it might be missing some data, leaving you with an incomplete backup.
- Backup Fails to Restore:The backup you created might not be able to restore properly to your device, leading to data loss.
Troubleshooting Backup Errors
Let’s dive into the solutions for these common backup issues:
- Backup Not Starting:
- Check Your Connection:Make sure your iPhone or iPad is connected to your computer using a reliable USB cable.
- Verify Device Trust:Ensure your device trusts the computer. If you see a prompt on your iPhone or iPad asking if you trust the computer, tap “Trust” to proceed.
- Restart Devices:Sometimes a simple restart can fix the issue. Restart your iPhone or iPad and your computer, then try backing up again.
- Update Software:Make sure your iPhone, iPad, and computer are running the latest software versions. Outdated software can cause compatibility issues.
- Check for Disk Space:Ensure you have enough free space on your external drive. If it’s full, the backup might not start.
- Backup Stuck:
- Patience is Key:Backups can take a while, especially if you have a lot of data. Give it time and see if it completes.
- Check for Errors:Look for any error messages on your computer or device. These might give you clues about the problem.
- Restart Backup:If the backup is stuck for an extended period, try restarting the backup process.
- Check for Disk Space:Make sure there’s enough free space on your external drive.
- Try a Different USB Port:Try plugging your iPhone or iPad into a different USB port on your computer.
- Backup Error Messages:
- Read the Error Message:The error message itself often provides hints about the problem. For example, an error message mentioning “disk space” means you need to free up space on your external drive.
- Google the Error:If the error message is unclear, try searching for it online. You might find solutions from other users who have encountered the same issue.
- Contact Apple Support:If you can’t resolve the issue on your own, contact Apple Support for assistance.
- Incomplete Backup:
- Check Backup Size:Compare the size of your backup with the amount of data you expect to be backed up. If the size is significantly smaller, your backup might be incomplete.
- Try Backing Up Again:Attempt to back up your iPhone or iPad again. This might resolve the issue and ensure a complete backup.
- Verify Data:After the backup is complete, check your backup for the specific data you need to ensure it’s included.
- Backup Fails to Restore:
- Check Backup Integrity:Make sure your backup is not corrupted. You can try restoring it to a different device to check its integrity.
- Try a Different Backup:If you have multiple backups, try restoring from a different one.
- Update Software:Ensure your iPhone, iPad, and computer are running the latest software versions.
- Contact Apple Support:If you’re still unable to restore your backup, contact Apple Support for assistance.
Checking the Integrity of Your Backups
It’s essential to make sure your backups are reliable. Here’s how to check the integrity of your backups:
- Restore to a Different Device:If you have an older iPhone or iPad, try restoring your backup to that device. If the restore process completes successfully, your backup is likely intact.
- Check Backup Size:Compare the size of your backup with the amount of data you expect to be backed up. If the size is significantly smaller, your backup might be incomplete or corrupted.
- Check Backup Contents:If you have the time and patience, you can browse through your backup files to see if all your data is present. This is a more time-consuming method but provides a more thorough check.
Backup Security and Privacy
Your iPhone or iPad backups contain sensitive personal information, including photos, messages, contacts, and passwords. It’s crucial to secure these backups to protect your data from unauthorized access or loss. Encrypting your backups is the most effective way to safeguard your privacy and ensure the security of your data.
Encrypting Your Backups
Encrypting your backups adds an extra layer of security by scrambling your data, making it unreadable without the correct password. This prevents unauthorized access to your data, even if your external drive is lost or stolen.
- Using iTunes:When backing up your iPhone or iPad using iTunes, you can enable encryption by checking the “Encrypt iPhone backup” box in the “Backups” tab. You’ll be prompted to create a password that you’ll need to enter every time you restore your device from this backup.
- Using Finder:On macOS, when backing up your iPhone or iPad using Finder, you can enable encryption by checking the “Encrypt iPhone backup” box in the “General” tab. Similar to iTunes, you’ll need to create a password that you’ll need to enter when restoring your device from this backup.
Securing Your External Drive
While encrypting your backups is essential, it’s also crucial to secure the external drive itself.
- Password Protect Your Drive:Many external drives offer built-in password protection. Enable this feature to prevent unauthorized access to the drive, even if it’s physically stolen.
- Use a Strong Password:When setting a password for your drive, choose a strong and unique password that includes a combination of uppercase and lowercase letters, numbers, and symbols. Avoid using common words or phrases.
- Physical Security:Store your external drive in a secure location, away from prying eyes. Consider using a lockable safe or a secure storage container.
Managing Backup Space

Over time, your external drive can fill up with backups. It’s important to manage your backup space to ensure you have enough room for future backups and to avoid potential issues. Here’s how to keep your backups organized and your drive healthy.
Deleting Old Backups
If you’re running low on space, you can delete older backups to free up room. However, before you delete anything, make sure you have a recent backup that you’re comfortable using in case you need to restore your device. Here’s how to delete backups:
- Using iTunes:Open iTunes, select your device, and click on “Backups.” You can then choose which backups you want to delete.
- Using Finder:Open Finder, select your device, and click on “Backups.” You can then choose which backups you want to delete.
Optimizing Backup Space
You can also optimize your backup space by changing your backup settings. Here are some tips:
- Back up only what you need:If you have a lot of apps and data that you don’t use regularly, you can choose to back up only the data that’s important to you. You can do this by going to Settings > iCloud > iCloud Backup and turning off the backups for apps you don’t need.
Backing up your iPhone or iPad to an external drive is a good idea, especially if you’re worried about losing data. You can use a computer or a cloud service, but if you’re looking for a more secure option, an external drive is a great choice.
It’s also helpful to know how to connect your AirPods Max to non-Apple devices, How to connect AirPods Max to non-Apple devices , since they can be used with a variety of devices. Once you’ve got your backup plan sorted, you can relax knowing your data is safe and sound.
- Use a larger external drive:If you have a lot of data to back up, you might want to consider using a larger external drive. This will give you more space to work with and ensure that you have enough room for future backups.
- Compress your backups:You can compress your backups to save space. This will make your backups smaller, but it will take longer to restore them if you need to.
Storing Backups Efficiently
To ensure your backups are stored efficiently and safely, consider these strategies:
- Use a cloud storage service:Cloud storage services like iCloud or Google Drive can be a great way to store your backups. They’re secure and easy to access from any device. Just make sure you have enough storage space in your cloud account.
- Use a backup rotation system:Create a backup rotation system to ensure that you have multiple backups of your data. For example, you could back up your device daily, weekly, and monthly. This way, you’ll have a backup of your data from different points in time.
- Store your backups in a safe place:It’s important to store your backups in a safe place, such as a fireproof safe or a secure off-site location. This will help protect your data in case of a disaster.
Using Third-Party Backup Solutions: How To Back Up Your IPhone Or IPad To An External Drive
While iTunes and Finder offer solid backup options, some users prefer third-party solutions for additional features or flexibility. These solutions can provide more granular control, cloud storage, or even cross-platform compatibility.
Popular Third-Party Backup Solutions
There are many third-party backup solutions available for iPhone and iPad. Here are some of the most popular options:
- iCloud Drive:Apple’s own cloud storage service, iCloud Drive, can be used to back up your iPhone or iPad data, including photos, videos, documents, and more. iCloud Drive offers seamless integration with Apple devices and is a convenient option for backing up smaller amounts of data.
- Google Drive:A popular cloud storage service, Google Drive, can be used to back up your iPhone or iPad data. It’s particularly useful for users who rely heavily on Google services, like Gmail and Google Photos.
- Dropbox:Dropbox is a cloud storage service known for its user-friendly interface and cross-platform compatibility. You can use Dropbox to back up your iPhone or iPad data, including photos, videos, and documents.
- OneDrive:Microsoft’s cloud storage service, OneDrive, offers integration with Microsoft Office apps and can be used to back up your iPhone or iPad data. It’s a good option for users who are heavily invested in the Microsoft ecosystem.
- pCloud:pCloud is a cloud storage service that emphasizes privacy and security. It offers end-to-end encryption and various features for protecting your data.
- Mega:Mega is a cloud storage service that focuses on privacy and security. It offers end-to-end encryption and large storage capacities.
- Sync.com:Sync.com is a cloud storage service known for its robust security features, including zero-knowledge encryption.
- SpiderOak.com:SpiderOak.com is a cloud storage service that focuses on privacy and security. It offers end-to-end encryption and a focus on data ownership.
Comparing Third-Party Backup Solutions, How to back up your iPhone or iPad to an external drive
Each third-party backup solution offers unique features and benefits. Here’s a comparison of some key factors:
| Feature | iCloud Drive | Google Drive | Dropbox | OneDrive | pCloud | Mega | Sync.com | SpiderOak.com |
|---|---|---|---|---|---|---|---|---|
| Storage Space | 5GB free, paid plans available | 15GB free, paid plans available | 2GB free, paid plans available | 5GB free, paid plans available | 10GB free, paid plans available | 50GB free, paid plans available | 5GB free, paid plans available | Free plan with limited storage, paid plans available |
| Encryption | End-to-end encryption for some data | End-to-end encryption for some data | End-to-end encryption for some data | End-to-end encryption for some data | End-to-end encryption for all data | End-to-end encryption for all data | End-to-end encryption for all data | End-to-end encryption for all data |
| Cross-Platform Compatibility | Apple devices only | All major platforms | All major platforms | All major platforms | All major platforms | All major platforms | All major platforms | All major platforms |
| Price | Starts at $0.99/month | Starts at $1.99/month | Starts at $11.99/month | Starts at $1.99/month | Starts at $4.99/month | Starts at $4.99/month | Starts at $8/month | Starts at $6/month |
Advantages of Third-Party Backup Solutions
Third-party backup solutions offer several advantages over using iTunes or Finder:
- More Control:Some third-party backup solutions allow you to choose specific files or folders to back up, giving you more granular control over your data.
- Cloud Storage:Many third-party backup solutions offer cloud storage, making it easy to access your data from any device with an internet connection.
- Cross-Platform Compatibility:Some third-party backup solutions are compatible with multiple platforms, allowing you to back up your iPhone or iPad data to a computer running Windows or Linux.
- Additional Features:Some third-party backup solutions offer additional features, such as versioning, file sharing, and data encryption.
Disadvantages of Third-Party Backup Solutions
While third-party backup solutions offer advantages, they also have some potential disadvantages:
- Cost:Some third-party backup solutions require a subscription fee for access to their services.
- Security Concerns:It’s important to choose a reputable third-party backup solution with strong security measures to protect your data.
- Complexity:Some third-party backup solutions can be more complex to set up and use than iTunes or Finder.
- Data Limits:Some third-party backup solutions have data limits, which can be a concern if you have a large amount of data to back up.
Advanced Backup Techniques
Sometimes, the standard backup methods might not be enough, especially when dealing with large amounts of data or specific needs. Let’s explore some advanced techniques to optimize your iPhone or iPad backups.
Differential Backups
Differential backups save only the changes made since the last full backup. This approach can be significantly faster than a full backup, especially when only a few files have been modified.
A differential backup stores the changes made to your data since the last full backup, effectively creating an incremental update.
For instance, if you have a full backup of your iPhone on January 1st and then perform a differential backup on January 15th, the backup will only include the files that were changed or added between those two dates. This method is particularly useful for saving time and storage space, especially when dealing with frequent updates.
Encrypted Backups
You can protect your backups with an extra layer of security by using encryption. This feature ensures that only you can access the data in your backup, even if someone else gains access to your external drive.
Encrypted backups safeguard your data by adding an extra layer of protection with a password.
To enable encrypted backups, you’ll need to set a password during the backup process. This password acts as a key to unlock your data, making it inaccessible to anyone who doesn’t know the password. It’s important to choose a strong password that you can remember but is difficult for others to guess.
Managing Backups Across Multiple Devices
If you have multiple iPhones or iPads, managing backups can become complex. You can use a combination of strategies to efficiently handle backups across different devices.
Backing up your iPhone or iPad to an external drive is a great way to protect your data, but sometimes you just want to move specific files. If you’re looking to transfer all your pictures to an external drive, check out this guide: How to transfer every picture from your iPhone to an external drive.
Once you’ve got your pictures backed up, you can rest easy knowing they’re safe and sound. Then you can go back to backing up your entire iPhone or iPad, just in case.
Consider using a dedicated external drive for each device or organizing backups based on device type and date.
Here are some approaches to consider:
- Dedicated External Drive:Assign a separate external drive to each iPhone or iPad. This ensures that backups are organized and easy to identify.
- Device-Specific Folders:Create folders on your external drive to store backups based on device type (e.g., “iPhone Backups,” “iPad Backups”). You can further organize these folders by date (e.g., “iPhone Backups – 2023”).
- Backup Rotation:Implement a system for rotating backups. For example, keep the latest full backup and two or three differential backups to ensure you have recent versions of your data.
Final Review
Backing up your iPhone or iPad to an external drive is a smart move, giving you peace of mind and a secure way to protect your data. Whether you’re using iTunes, Finder, or a third-party solution, there’s a method that fits your needs.
Remember, it’s all about finding the right balance between convenience and security. So go ahead, create those backups, and keep your digital life safe and sound.
Frequently Asked Questions
What kind of external drive do I need?
You’ll want a drive that’s compatible with your iPhone or iPad. Most external hard drives will work, but it’s best to choose one that’s formatted as FAT32 or exFAT for compatibility.
How do I format my external drive for backups?
You can format your drive using Disk Utility on macOS or Disk Management on Windows. Make sure to choose a format that’s compatible with iOS devices.
Can I back up specific data instead of everything?
Yes, you can select specific data to back up, such as photos, contacts, or messages. This is helpful if you only want to back up certain types of data or if you’re short on space.
How often should I back up my iPhone or iPad?
It’s best to back up your device regularly, especially after making significant changes or downloading new apps. A good rule of thumb is to back up at least once a week.
What if I can’t access my backup?
If you’re having trouble accessing your backup, try restarting your computer or device. You can also check the connection between your device and the external drive. If the problem persists, you may need to contact Apple support.