How To Access Apfs Volumes On Older Versions Of Macos
How to access APFS volumes on older versions of macOS is a common question for Mac users who’ve upgraded their operating system. Apple’s APFS (Apple File System) is the latest file system used in macOS, but older versions of macOS don’t natively support it.
This can be a problem if you need to access data stored on an APFS volume from an older Mac.
Luckily, there are several ways to access APFS volumes on older macOS versions. This guide will cover various methods, from using third-party tools to utilizing Time Machine backups and Migration Assistant. We’ll also explore the use of external drives, Boot Camp, and Windows, as well as discuss data recovery and security considerations.
Understanding APFS and Older macOS Versions
APFS, or Apple File System, is the default file system for macOS. It’s a modern file system designed to be more efficient, reliable, and secure than older file systems like HFS+ (Hierarchical File System Plus). However, older versions of macOS do not natively support APFS.
This can lead to compatibility issues when trying to access APFS volumes on older systems.
Compatibility Issues with APFS and Older macOS Versions
APFS volumes formatted on newer macOS versions cannot be mounted and accessed directly on older macOS versions. This is because older macOS versions lack the necessary drivers and support for APFS. Attempting to mount an APFS volume on an older macOS version will result in an error message.
macOS Versions with Native APFS Support
Here is a list of macOS versions that natively support APFS:
- macOS High Sierra (10.13)
- macOS Mojave (10.14)
- macOS Catalina (10.15)
- macOS Big Sur (11)
- macOS Monterey (12)
- macOS Ventura (13)
Using Third-Party Tools

If you’re facing compatibility issues with APFS volumes on older macOS versions, third-party tools can offer a solution. These tools provide alternative methods for mounting and accessing APFS volumes, often with features that address specific needs.
Advantages and Disadvantages
Using third-party tools for APFS access on older macOS versions has its own set of pros and cons.
- Advantages:
- Increased Compatibility:Third-party tools can bridge the gap between APFS and older macOS versions, allowing you to access volumes that wouldn’t otherwise be recognized.
- Additional Features:Some tools offer advanced features like data recovery, disk cloning, and file system repair, which can be invaluable in certain situations.
- Flexibility:Third-party tools often provide more flexibility in how you interact with APFS volumes, offering options like read-only access or selective file transfers.
- Disadvantages:
- Potential for Data Loss:Using unfamiliar tools can carry risks, especially when dealing with sensitive data. Always back up your data before using any third-party tool.
- Compatibility Issues:Not all third-party tools are compatible with all macOS versions or APFS configurations. It’s crucial to research and choose tools that are known to work with your specific setup.
- Cost:Some third-party tools are free, while others require a paid license. The cost can vary depending on the features and capabilities of the tool.
Recommended Third-Party Tools
Several third-party tools are available for accessing APFS volumes on older macOS versions. Here are some notable examples:
- Paragon NTFS for Mac:Paragon NTFS for Mac is a popular tool that offers read/write access to NTFS volumes, including those formatted with APFS. It’s known for its reliability and compatibility with various macOS versions. Features include:
- Mounts APFS volumes on older macOS versions.
Figuring out how to access APFS volumes on older macOS versions can be a real head-scratcher, especially if you’re used to the newer features. But hey, at least you can enjoy your favorite shows on Apple TV without disturbing anyone.
Check out this article on Don’t wake the baby! Use Bluetooth headphones with Apple TV for some peaceful entertainment. Once you’ve got that figured out, you can tackle the APFS issue – maybe with a fresh cup of coffee.
- Provides read/write access to APFS volumes.
- Offers data transfer and file management options.
- Mounts APFS volumes on older macOS versions.
- Tuxera NTFS for Mac:Tuxera NTFS for Mac is another reputable tool that provides access to NTFS volumes, including APFS. It’s known for its user-friendly interface and performance optimization. Features include:
- Supports mounting APFS volumes on older macOS versions.
- Offers read/write access to APFS volumes.
- Includes data recovery and file system repair features.
- Disk Drill:Disk Drill is a data recovery tool that can also be used to access and manage APFS volumes on older macOS versions. It’s known for its powerful data recovery capabilities and user-friendly interface. Features include:
- Provides access to APFS volumes on older macOS versions.
- Offers data recovery options for lost or deleted files.
- Includes disk cloning and imaging capabilities.
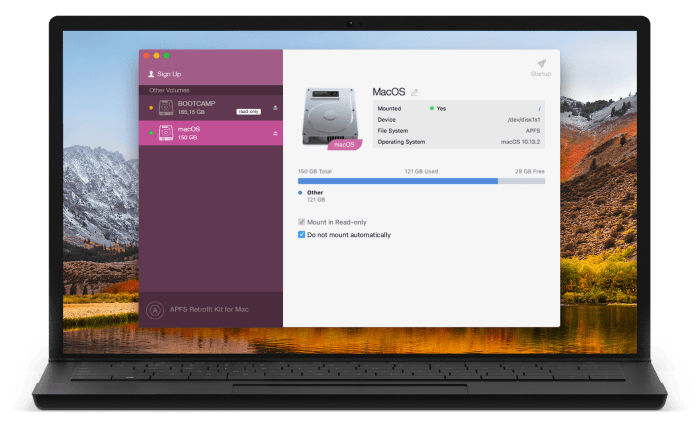
Using Third-Party Tools to Access APFS Volumes
To use a third-party tool to access an APFS volume on an older macOS version, you’ll typically follow these steps:
- Install the Tool:Download and install the chosen third-party tool on your macOS system. Make sure it’s compatible with your macOS version.
- Connect the Volume:Connect the APFS volume to your Mac, either via an external drive or network share.
- Mount the Volume:Launch the third-party tool and use its interface to mount the APFS volume. You may need to select the volume and choose a mounting option.
- Access the Files:Once the volume is mounted, you should be able to access its files and folders using your Mac’s Finder or other file management tools.
The Time Machine Approach

If you’ve got a Time Machine backup of your APFS volume from a newer macOS version, you can use it to access the data on an older macOS version. This method offers a potential workaround, allowing you to access your files even if your older macOS system doesn’t natively support APFS.
Restoring a Time Machine Backup
Restoring a Time Machine backup to an older macOS version involves a straightforward process.
- Connect your Time Machine backup drive to your older macOS system.
- Open Time Machine by going to the “System Preferences” and selecting “Time Machine.”
- Select the backup you want to restore from and choose the “Restore” option.
- Follow the on-screen instructions to complete the restore process.
Limitations of the Time Machine Approach
While restoring a Time Machine backup is a viable solution, it’s essential to be aware of its limitations.
- Data Loss:Restoring a Time Machine backup to an older macOS version may result in data loss if the backup was created on a newer macOS version that includes features not supported by the older version. For instance, if your backup includes a file format introduced in a later macOS release, the older system might not be able to read it.
- Data Corruption:There’s a risk of data corruption during the restoration process. If the backup is damaged or incomplete, the restored data may be corrupted or inaccessible.
- Performance Impact:Restoring a Time Machine backup can be a time-consuming process, especially if the backup is large. It might also significantly impact your system’s performance during the restoration process.
Migration Assistant
Migration Assistant is a built-in macOS tool that simplifies the process of transferring data from one Mac to another. It can be used to move data from a newer macOS version with APFS to an older macOS version, but it’s important to be aware of potential compatibility issues.
Compatibility Issues During Migration
Migration Assistant can transfer most files and settings between macOS versions, but some features and applications may not be fully compatible. The older macOS version might not be able to read or use certain file formats or applications that were introduced in newer macOS versions.
For example, you might not be able to access APFS-specific features like Time Machine snapshots or encrypted volumes on an older macOS version.
Steps to Use Migration Assistant
Migration Assistant is a straightforward tool to use. Here’s a step-by-step guide:
1. Connect Both Macs
Connect the newer Mac with APFS to the older Mac using a Thunderbolt cable or an Ethernet connection.
2. Launch Migration Assistant
On the older Mac, open Migration Assistant by navigating to Applications > Utilities > Migration Assistant.
Figuring out how to access APFS volumes on older macOS versions can be a bit of a head-scratcher, especially since Apple’s newer file system wasn’t designed for those older systems. If you’re looking for a way to access your APFS data on an older Mac, you’ll need to find a workaround.
But hey, if you’re looking to upgrade your iPhone, you might want to check out Everything you need to know about iOS 13 , which might be a better use of your time. Back to APFS volumes, you can try using a third-party tool or converting the APFS volume to a compatible format, like HFS+.
3. Choose Migration Source
Select “From a Mac, Time Machine backup, or startup disk” and click “Continue”.
4. Select Source Mac
Select the newer Mac with APFS as the source.
5. Choose Data to Transfer
Choose the specific data you want to transfer, such as applications, user accounts, documents, and settings.
6. Initiate Transfer
Click “Continue” to begin the migration process. Limitations:* Data Loss:Some data might not be transferable, depending on the specific files and applications.
Compatibility Issues
Certain applications or features might not function properly on the older macOS version.
Time Required
The migration process can take a considerable amount of time, especially for large amounts of data.
Disk Space
Ensure that the older Mac has enough disk space to accommodate the transferred data.
Boot Camp and Windows
Boot Camp is a utility that lets you install Windows on your Mac. This is a great option if you need to run Windows applications that aren’t available for macOS. However, there are some things to keep in mind when using Boot Camp with an APFS volume.
Windows Compatibility with APFS Volumes
Windows doesn’t natively support APFS volumes. This means you can’t directly access or write to an APFS volume from within Windows. There are a few ways to work around this limitation.
- Use a separate partition:The most common solution is to create a separate partition for Windows using the standard FAT32 or NTFS file system. This is the recommended approach as it ensures compatibility and avoids potential issues. You can then install Windows on this partition and access your APFS volume from macOS.
- Use third-party tools:There are some third-party tools that claim to provide access to APFS volumes from within Windows. However, these tools are not officially supported and may not be reliable or compatible with all versions of Windows or APFS.
Accessing the APFS Volume from Windows
If you have a separate partition for Windows, you can access your APFS volume from within the Windows environment using the following methods:
- Shared Folders:You can share your APFS volume from macOS and access it as a network drive from Windows. This is a simple and convenient way to access files, but it may be slower than direct access.
- Third-party tools:If you’re using a third-party tool to access your APFS volume, follow the instructions provided by the software developer. This might involve installing drivers or configuring the tool to recognize your APFS volume.
External Drives and Compatibility
Using an external drive can be a clever workaround for accessing APFS volumes on older macOS versions. Think of it as a temporary bridge between the newer file system and the older operating system. While this method has its limitations, it can be a lifesaver when you need to access data on an APFS-formatted drive.
Figuring out how to access APFS volumes on older versions of macOS can be a real head-scratcher, especially if you’re used to the newer systems. You might find yourself wishing for a way to easily toggle between different workspaces or environments, like you can with the Focus Modes in iOS 16.
But don’t worry, there are still ways to manage your files and apps effectively on older macOS versions, even without the bells and whistles of APFS.
Performance and Compatibility Considerations
External drives come in different flavors, each with its own set of performance characteristics and compatibility quirks. To ensure smooth sailing, you’ll want to choose a drive that’s optimized for your needs. Here’s what you should keep in mind:
- Drive Type:Solid-state drives (SSDs) are generally faster than hard disk drives (HDDs), especially for transferring large files. For best results, consider an SSD with a USB 3.0 or Thunderbolt interface for faster data transfer rates.
- Connection Speed:The speed of your external drive’s connection can impact performance. USB 3.0 and Thunderbolt are faster than USB 2.0, so choose a drive with a compatible interface.
- File System Compatibility:While your older macOS version might not natively support APFS, it likely supports older file systems like HFS+ or FAT32. Consider formatting the external drive in a compatible file system before using it to access the APFS volume. This ensures that your older macOS version can read and write to the drive without encountering any compatibility issues.
- Drive Capacity:Choose a drive with enough capacity to hold the data you need to access. Remember, if you’re transferring large files, you’ll need a drive with sufficient space.
Data Recovery Considerations
Recovering data from APFS volumes on older macOS versions can be a challenge due to the inherent differences between APFS and older file systems like HFS+ and its lack of backward compatibility. This can make traditional data recovery methods less effective.
Specialized Data Recovery Tools
When dealing with APFS volumes on older macOS versions, specialized data recovery tools are essential. These tools are designed to understand the structure of APFS volumes and can often recover data that traditional methods might miss.
Preventing Data Loss
Data loss prevention is critical when working with APFS volumes on older macOS versions. Here are some key tips:
- Regular Backups:Maintain regular backups of your APFS volumes using Time Machine or other backup solutions. Backups provide a safety net in case of data loss.
- Data Integrity:Regularly check your APFS volumes for errors using Disk Utility. This helps identify potential problems early on.
- Avoid Unnecessary Modifications:If you’re experiencing data loss issues, avoid making any changes to the affected APFS volume until you’ve consulted with a data recovery professional.
- Secure Storage:Store your APFS volumes on reliable external drives or cloud storage services to minimize the risk of physical damage or accidental deletion.
Security and Privacy

Accessing APFS volumes on older macOS versions introduces potential security risks. It’s crucial to use secure methods and tools to safeguard your data and maintain privacy. This section explores the security implications and offers tips for protecting your information.
Security Implications, How to access APFS volumes on older versions of macOS
When accessing APFS volumes on older macOS versions, you’re essentially working with a file system designed for a newer operating system. This can lead to potential vulnerabilities and security risks. Older macOS versions might lack the necessary security features and updates to fully protect APFS volumes.
This means that data stored on these volumes could be more susceptible to unauthorized access, malware attacks, or data corruption.
Secure Access Methods
To minimize security risks, it’s essential to use secure methods and tools for accessing APFS volumes on older macOS versions. Here are some recommended practices:
- Use a trusted third-party tool:Employ reputable and well-regarded tools specifically designed for accessing APFS volumes on older macOS versions. These tools often include built-in security features and encryption capabilities.
- Avoid using outdated or unsupported software:Ensure that the tools you use are up-to-date and compatible with the APFS file system. Outdated software might contain vulnerabilities that could compromise your data.
- Enable strong passwords and authentication:When using any tools or methods to access APFS volumes, always set strong passwords and enable multi-factor authentication if available. This helps protect your data from unauthorized access.
- Limit user access:If possible, restrict access to APFS volumes to authorized users only. This can help prevent unauthorized modifications or data breaches.
Data Protection Tips
Protecting your data is paramount when working with APFS volumes on older macOS versions. Here are some essential tips:
- Keep your operating system and software updated:Regularly update your macOS version and any relevant software to ensure you have the latest security patches and fixes. This helps protect against known vulnerabilities and malware threats.
- Use strong passwords and enable two-factor authentication:For any accounts or services related to your APFS volumes, use strong passwords and enable two-factor authentication whenever possible. This adds an extra layer of security and makes it much harder for unauthorized individuals to access your data.
- Back up your data regularly:Regularly back up your data to a separate location, such as an external hard drive or cloud storage service. This ensures that you have a copy of your data in case of accidental deletion or system failure.
- Be cautious of suspicious emails and links:Avoid opening emails or clicking on links from unknown sources, as they could contain malware that could harm your system or compromise your data.
- Scan your system for malware:Regularly scan your system for malware using reputable antivirus software. This helps identify and remove any malicious software that could be lurking on your computer.
Troubleshooting and Best Practices
While accessing APFS volumes on older macOS versions can be challenging, understanding potential issues and adopting best practices can significantly improve your chances of success and protect your data. This section provides troubleshooting tips and best practices to guide you through the process.
Troubleshooting Steps
Troubleshooting APFS volume access on older macOS versions often involves identifying and addressing potential issues that could hinder the process. Here are some common steps to consider:
- Verify Compatibility:Ensure that your macOS version supports APFS volumes. Refer to Apple’s documentation for compatibility information. Older macOS versions might not fully support APFS, leading to issues.
- Check Disk Permissions:Accessing APFS volumes might require specific permissions. Verify that your user account has the necessary permissions to read and write to the volume.
- Run Disk Utility:Use Disk Utility to check for errors on the APFS volume. Run the “First Aid” function to repair any potential issues that might be preventing access.
- Restart Your Mac:A simple restart can often resolve minor software glitches or conflicts that might be interfering with APFS volume access.
- Update macOS:Ensure that your macOS version is up-to-date with the latest patches and security updates. These updates can address compatibility issues and enhance APFS support.
Best Practices for Compatibility and Data Loss Prevention
Adopting best practices can help ensure compatibility and prevent data loss when accessing APFS volumes on older macOS versions.
- Backup Your Data:Before attempting any operations with APFS volumes on older macOS versions, create a complete backup of your data. This precaution safeguards your information in case of unforeseen issues.
- Use External Drives:For compatibility, consider using external drives formatted with HFS+ or other file systems supported by older macOS versions. This can help avoid potential issues with APFS volumes.
- Avoid Modifying APFS Volumes:On older macOS versions, avoid modifying or deleting files directly on APFS volumes. These actions might lead to data loss or corruption.
- Keep Software and Drivers Updated:Regularly update your macOS version, third-party software, and drivers to ensure optimal performance and security. These updates often address compatibility issues and enhance APFS support.
Software and Driver Updates
Maintaining up-to-date software and drivers is crucial for seamless APFS volume access and overall system stability.
- macOS Updates:Apple regularly releases macOS updates to address bugs, improve security, and enhance compatibility. Regularly updating your macOS version ensures that your system is equipped with the latest APFS support and bug fixes.
- Third-Party Software:Third-party applications that interact with APFS volumes might require updates to maintain compatibility. Check for updates for software that you use to access or manage APFS volumes.
- Drivers:Drivers for external devices, such as hard drives or USB adapters, should be updated to ensure proper functionality and compatibility with APFS volumes. Outdated drivers can lead to access issues or data loss.
Summary: How To Access APFS Volumes On Older Versions Of MacOS
Whether you’re working with a Time Machine backup, migrating data, or utilizing external drives, accessing APFS volumes on older macOS versions can be accomplished with the right tools and knowledge. Remember to prioritize data security and backup your data regularly to avoid any potential data loss.
By understanding the methods and limitations involved, you can effectively manage your data across different macOS versions and ensure seamless access to your files.
Detailed FAQs
What is APFS?
APFS stands for Apple File System. It’s the latest file system used in macOS, offering advantages like improved performance, encryption, and space management.
Can I upgrade an older macOS version to support APFS?
No, older macOS versions cannot be upgraded to directly support APFS. You’ll need to use the methods Artikeld in this guide to access APFS volumes.
Are there any risks involved in accessing APFS volumes on older macOS versions?
While there are risks associated with accessing APFS volumes on older macOS versions, using the methods Artikeld in this guide can minimize those risks. It’s always a good practice to have backups and use reputable tools.