How To Make Your Regular Camera Photos Show Up On A Map
How to make your regular camera photos show up on a map is a question that pops up when you want to turn your travel snaps into a visual journey. Maybe you’re planning a trip and want to revisit your favorite spots, or maybe you just want to show off your amazing vacation photos.
Whatever the reason, there are ways to embed location data in your photos so they can be viewed on a map, turning them into interactive memories.
You can achieve this through a few different methods, from utilizing your camera’s built-in geolocation features to using apps and software. We’ll explore the ins and outs of adding location data to your photos, including the pros and cons of each method, as well as some helpful tips for sharing your geolocated photos with the world.
Understanding Geolocation Data
To make your photos show up on a map, you need to understand how geolocation data is embedded in images. This data, known as EXIF data, provides information about the camera settings and conditions under which a photo was taken, including its location.
EXIF Data and Geolocation
EXIF (Exchangeable Image File Format) data is a standard that stores metadata within digital images. This metadata includes information about the camera, the date and time the photo was taken, and the location where it was captured. This location data is crucial for mapping your photos, as it allows applications to pinpoint the exact spot where the image was taken.
Types of Geolocation Data
There are two main ways geolocation data can be embedded in photos:
- GPS Coordinates:This is the most common method. GPS coordinates, expressed in latitude and longitude, are directly embedded in the EXIF data. These coordinates can be easily interpreted by mapping applications to pinpoint the exact location of the photo.
- Location Names:Some cameras and smartphones may embed location names instead of coordinates. This could be the name of a city, town, or even a specific landmark. While less precise than GPS coordinates, this data can still be helpful for mapping photos.
Common EXIF Tags for Location Information
Here are some common EXIF tags that store location information:
- GPS Latitude:Represents the photo’s latitude coordinate, indicating its position north or south of the equator.
- GPS Longitude:Represents the photo’s longitude coordinate, indicating its position east or west of the prime meridian.
- GPS Altitude:Represents the photo’s altitude above sea level.
- GPS Date Stamp:Records the date and time when the photo was taken.
- GPS Processing Method:Indicates the method used to determine the GPS coordinates.
Camera Settings for Geolocation
Geolocation tagging, also known as geotagging, is the process of adding location information to your photos. This information can be used to see where a photo was taken, map your travel routes, or even find nearby points of interest. Most modern cameras, including DSLRs, mirrorless cameras, and smartphones, have built-in geolocation capabilities.Enabling geolocation tagging on your camera is a simple process, and it can add a whole new dimension to your photography.
DSLR Cameras
DSLR cameras typically rely on external GPS receivers to obtain location data. These receivers can be connected to the camera via a USB cable or wirelessly using Bluetooth. Here’s how to activate geolocation tagging on DSLR cameras:
- Connect the GPS receiver to your camera.Make sure the receiver is turned on and connected to the camera.
- Enable the GPS function in your camera’s settings.The exact location of this setting may vary depending on your camera model. Refer to your camera’s user manual for specific instructions.
- Wait for the GPS receiver to acquire a signal.This may take a few minutes, especially if you are in an area with poor satellite reception.
Mirrorless Cameras
Mirrorless cameras often have built-in GPS receivers, eliminating the need for external devices. However, some models may still require an external GPS receiver.To activate geolocation tagging on a mirrorless camera:
- Check if your camera has a built-in GPS receiver.This information can be found in your camera’s user manual.
- If your camera has a built-in GPS receiver, enable the GPS function in your camera’s settings.The exact location of this setting may vary depending on your camera model.
- If your camera does not have a built-in GPS receiver, you can connect an external GPS receiver.Follow the instructions provided in the previous section for DSLR cameras.
Smartphone Cameras
Smartphone cameras typically have built-in GPS receivers that are automatically enabled. However, you can check and adjust your phone’s location settings if needed.To ensure geolocation tagging is active on your smartphone camera:
- Open your phone’s settings app.
- Go to the “Location” or “Privacy” settings.
- Make sure location services are enabled.
- Check if the camera app has permission to access your location.You may need to grant permission to the camera app to use location services.
Accuracy of Geolocation Data
The accuracy of geolocation data varies depending on the camera model, the strength of the GPS signal, and the environment.
GPS accuracy can be affected by factors such as weather conditions, obstructions (like buildings or trees), and the number of satellites in view.
In general, smartphone cameras tend to have more accurate geolocation data than DSLR or mirrorless cameras. This is because smartphones are designed to be used in a variety of environments, while DSLRs and mirrorless cameras are often used in more controlled settings.However, newer DSLR and mirrorless cameras with built-in GPS receivers can provide accurate geolocation data.
External GPS receivers can also improve the accuracy of geolocation data, especially in areas with weak satellite reception.
Using Geolocation Apps
Geolocation apps are powerful tools for adding location data to your photos. These apps use GPS data from your phone or camera to pinpoint the exact location where a photo was taken. This information can then be embedded into the photo’s metadata, allowing you to view your photos on a map later.
Popular Geolocation Apps for Photo Tagging
The following table compares some popular geolocation apps, outlining their key features, advantages, and drawbacks:
| App Name | Features | Pros | Cons |
|---|---|---|---|
| Google Photos | Automatic location tagging, map view, photo sharing, cloud storage | User-friendly interface, integrates seamlessly with other Google services, free for basic features | Privacy concerns with location data collection, limited customization options for map display |
| ExifTool | Batch processing, detailed metadata editing, supports various file formats | Powerful and versatile, allows for precise control over location data, free and open-source | Steeper learning curve, command-line interface may be intimidating for some users |
| PhotoPills | Location scouting, planning tools, augmented reality visualization | Excellent for photographers, provides detailed location information and planning tools, advanced features | Subscription-based, can be complex for casual users |
Adding Location Data to Existing Photos
Using a geolocation app to add location data to existing photos is relatively straightforward. Most apps provide intuitive interfaces that guide you through the process. For example, with Google Photos, you can simply select a photo and tap the “Add location” button.
Then, you can either manually enter the location or use the map to pinpoint the exact spot.
Want to turn your regular camera photos into a visual map of your adventures? There are some cool apps that can do that, but if you’re really worried about privacy, you might want to check out How to make Safari Private Browsing much more private first.
That way, you can be sure your location data isn’t being tracked when you’re searching for those map-making apps.
Advantages and Limitations of Using Geolocation Apps
Using geolocation apps offers several benefits for photo tagging:
- Enhanced Photo Organization:Location data helps you easily organize and find your photos based on where they were taken. Imagine searching for all your photos from a specific trip or a particular city.
- Storytelling and Context:Geolocation adds context to your photos, allowing you to tell a more compelling story. Imagine viewing a photo of a landmark and instantly knowing where it is located.
- Sharing and Collaboration:Sharing photos with location data allows others to understand where you’ve been and explore your travels virtually.
However, there are also some limitations to consider:
- Privacy Concerns:Sharing photos with location data raises privacy concerns, as it reveals your whereabouts to others. You should always be mindful of the potential risks and consider using privacy settings to control who can see your location data.
- Accuracy and Reliability:Geolocation data can be inaccurate, especially in areas with poor GPS reception or when using older devices. It’s crucial to double-check the location data and make any necessary adjustments.
- Limited Features:Some geolocation apps have limited features, especially for free versions. You may need to upgrade to a paid subscription to access advanced functionalities.
Manually Adding Location Data: How To Make Your Regular Camera Photos Show Up On A Map
Sometimes, you might have photos taken before geolocation data was readily available or photos taken with cameras that don’t support geolocation. In these cases, you can manually add location data to your photos using photo editing software.
Using Photo Editing Software
Most photo editing software, like Adobe Photoshop, GIMP, or even basic editing apps on your phone, allow you to add location data to photos. This is usually done through a “metadata” or “properties” panel.
- Open your photo in the editing software.
- Find the metadata panel (often labeled “Properties” or “Details”).
- Look for fields related to location, such as “GPS Coordinates” or “Location.”
- Enter the latitude and longitude coordinates of the location where the photo was taken. You can find these coordinates using online mapping services like Google Maps or by using a GPS device.
- Save your photo with the updated metadata.
Using Google Maps to Find Coordinates
- Open Google Maps and zoom in to the location where your photo was taken.
- Right-click on the location and select “What’s here?” or “Get Directions” (depending on the version of Google Maps).
- The latitude and longitude coordinates will be displayed in the search bar or in the information panel.
Accuracy of Manually Added Location Data
Manually adding location data is less accurate than automatically embedded data because it relies on your ability to accurately pinpoint the location. While using online mapping services can help, it’s still possible to be off by a few meters or even more, depending on the accuracy of your estimation and the quality of the map data.
Automatically embedded location data is typically more accurate, especially if the camera or device has a high-quality GPS sensor.
Displaying Photos on Maps
Once you’ve equipped your photos with geolocation data, the fun part begins: showcasing them on a map! This allows you to visualize your travel adventures, relive past memories, or even create compelling narratives using your photos.
Using Online Map Services
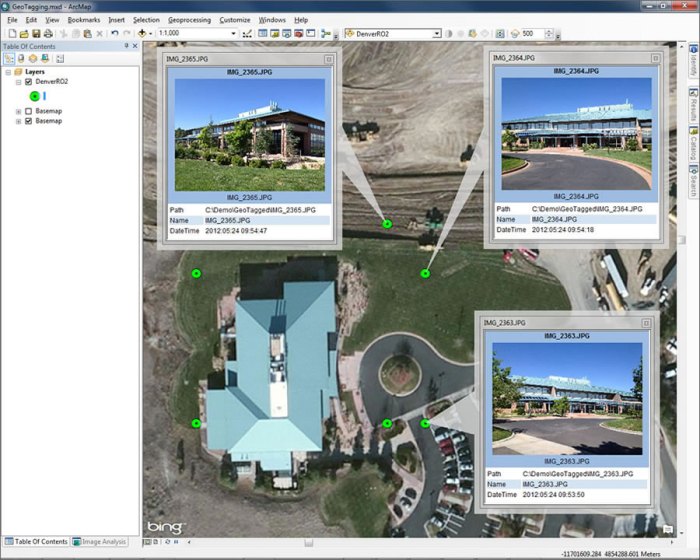
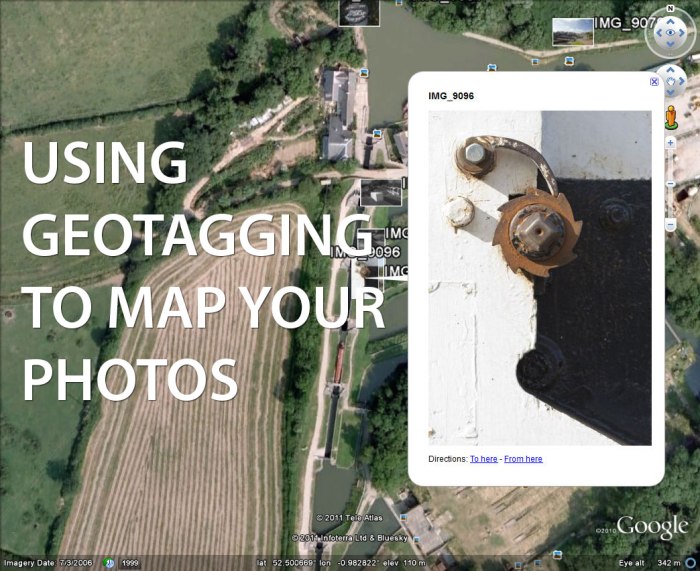
Online map services like Google Maps provide a powerful platform for displaying location-tagged photos. These services offer a user-friendly interface, allowing you to easily embed your photos onto a map, creating a visual timeline of your journey. Here’s how to use Google Maps to display your photos:* Upload your photos:Google Photos seamlessly integrates with Google Maps.
Simply upload your photos to Google Photos, and those with geolocation data will automatically appear on a map.
Create a photo tour
Google Maps allows you to create a “Photo Tour” by selecting multiple photos and arranging them in a specific order. This allows you to create a guided tour of your journey, showcasing key locations and experiences.
Customize your map
Google Maps offers customization options for your photo map. You can add titles, descriptions, and even change the map style to enhance the visual appeal.
Creating Photo Tours and Slideshows
Photo tours and slideshows are effective ways to tell stories and share experiences using location-tagged photos. These presentations offer a dynamic way to showcase your journey, engaging viewers with visual storytelling.* Photo tours:Photo tours allow you to guide viewers through your journey, showcasing specific locations and experiences in a sequential manner.
Imagine showcasing a hiking trail, highlighting key viewpoints and landmarks along the way.
Slideshows
Slideshows provide a more fluid experience, transitioning smoothly between photos. This format works well for capturing the essence of a particular event or trip, allowing viewers to immerse themselves in your journey.
Benefits of Displaying Photos on Maps
Displaying photos on maps offers several benefits, making it a valuable tool for storytelling and sharing experiences:* Enhanced storytelling:Maps provide a visual context for your photos, enriching the narrative and helping viewers understand the location and significance of each image.
Shared experiences
Photo maps allow you to share your adventures with others, enabling them to explore your journey and experience your memories firsthand.
Ever taken a photo and wished you could see where it was taken on a map? It’s actually super easy to do! You can use apps like Google Photos or even some dedicated mapping software to add location data to your pics.
And while you’re at it, make sure your Mac isn’t sucking up all the power with How to Saving Energy With Your Mac. Once you’ve got your photos geotagged, you can even create fun travel maps or relive your adventures with a visual timeline.
Visual exploration
Photo maps offer a unique way to explore locations, providing a visual guide to points of interest and landmarks.
Memories preserved
Maps act as a visual timeline of your journey, preserving memories and offering a tangible record of your experiences.
Sharing Geolocated Photos
Now that you’ve mastered adding location data to your photos, it’s time to share them with the world! But before you post that breathtaking sunset shot from your recent vacation, it’s important to consider the privacy implications of sharing geolocated photos online.
Privacy Implications of Sharing Geolocated Photos
Sharing geolocated photos can reveal a lot about your whereabouts, potentially compromising your privacy. Imagine a stranger seeing a picture of your home, knowing exactly where you live. This could make you vulnerable to unwanted attention or even harassment.
Sharing photos of your daily commute could also make it easier for someone to track your movements.
Tips for Securely Sharing Geolocated Photos
While sharing geolocated photos can be risky, there are ways to do it safely. Here are some tips:
- Use Privacy Settings: Most social media platforms and photo-sharing websites offer privacy settings that allow you to control who can see your photos. You can choose to share your photos with only your friends, or even keep them private entirely.
- Remove Location Data Before Sharing: If you’re not comfortable sharing your exact location, you can remove the location data from your photos before posting them. Most photo editing software allows you to remove EXIF data, which includes geolocation information.
- Be Mindful of Your Audience: Think carefully about who you’re sharing your photos with. If you’re posting on a public platform, be aware that anyone can see your photos. Consider using a private photo-sharing service for sensitive images.
- Use Location Blurring: Some platforms, like Google Photos, offer location blurring, which obscures the precise location of your photos while still providing a general idea of where they were taken.
- Use Location Tags Sparingly: If you do choose to share geolocated photos, consider using location tags sparingly. For example, you could tag your photos with the name of the city or region, rather than the exact street address.
Best Platforms for Sharing Geolocated Photos
There are many platforms where you can share geolocated photos, each with its own privacy settings and features. Here are some popular options:
- Instagram: Instagram allows you to tag your photos with a specific location, which is visible to anyone who views your post. You can also choose to disable location tagging for individual posts.
- Facebook: Facebook also allows you to tag your photos with a location, and you can choose to share your photos with friends, family, or the public. Facebook offers privacy settings that allow you to control who can see your photos.
- Google Photos: Google Photos automatically geolocates your photos and displays them on a map. You can choose to blur the location of your photos or disable location tagging altogether.
- Flickr: Flickr is a popular photo-sharing website that allows you to share geolocated photos with the world. Flickr offers various privacy settings, including the option to make your photos private or only visible to specific users.
Troubleshooting Geolocation Issues
You’ve set up your camera and apps to tag your photos with location data, but sometimes things don’t go as planned. It’s common to encounter issues like inaccurate location data or missing tags. Let’s explore some common problems and their solutions.
Identifying Common Geolocation Problems
There are a few common problems you might encounter when working with geolocation tagging:
- Inaccurate Location Data:Your photos might be tagged with the wrong location, often due to GPS signal issues or inaccurate location services on your device.
- Missing Location Tags:Your photos might not have any location data at all, which can happen if your camera’s geolocation settings are off, or if the location services on your device are disabled.
- Geolocation Data Not Available:Sometimes, you might be in an area where GPS signals are weak or nonexistent, like indoors or in remote areas, making it difficult to obtain accurate location data.
Troubleshooting Steps for Geolocation Issues
If you’re experiencing problems with geolocation tagging, here are some steps you can take to troubleshoot:
- Check Your Camera Settings:Ensure that the geolocation settings on your camera are enabled. This usually involves a setting like “GPS,” “Location,” or “Geotag.”
- Enable Location Services:Make sure that location services are enabled on your device. You can typically find this setting in your device’s settings menu.
- Verify GPS Signal Strength:Ensure you have a strong GPS signal. Move to an open area with clear skies if you’re in a location with limited signal strength.
- Restart Your Device:Sometimes, a simple restart can fix issues with location services.
- Update Your Device and Apps:Make sure your device and any geolocation apps are up-to-date, as updates often include bug fixes and improvements to location services.
Correcting Inaccurate Location Data
If you find that your photos are tagged with the wrong location, you can try to correct the data manually:
- Use Geolocation Editing Software:There are dedicated software programs and online tools that allow you to edit the location data of your photos. Some popular options include Google Photos, Adobe Lightroom, and GeoSetter.
- Manually Adjust Location Data:Some photo editing programs and online map services allow you to manually adjust the location data of your photos by dragging a marker to the correct location on a map.
Beyond Basic Geolocation
While simply geotagging your photos with your location is a great start, you can unlock even more creative possibilities by delving into advanced geolocation techniques. These techniques allow you to add more specific and detailed information to your photos, transforming them into powerful storytelling tools.
Geotagging with Specific Addresses or Landmarks
Beyond simply placing your photos on a map, you can pinpoint their exact locations with greater precision. Many photo editing programs and online tools allow you to add specific addresses or landmarks to your photos. This can be particularly useful for documenting your travels, remembering the exact location of a memorable event, or providing viewers with a more detailed understanding of your photos.
For example, you could geotagg a photo taken in front of the Eiffel Tower with the address of the tower, or a photo taken at a specific restaurant with the restaurant’s address.
Location-Based Filters and Overlays
Location-based filters and overlays can enhance the visual appeal and storytelling capabilities of your photos. These tools can be applied to your photos to highlight specific geographic features, add contextual information, or create unique artistic effects.
Ever wish you could see where you took that epic sunset pic? You can actually make your regular camera photos show up on a map by using location services. If you’re on an iPhone, make sure to check out this guide on how to use Wi-Fi and Instant Hotspot in iOS 13 to make sure you’re connected to the internet for the best results.
Once you’ve got the location services turned on, you’ll be able to see your photos mapped out in a cool timeline view, perfect for reminiscing about your adventures!
- Geographic Filters:These filters can be used to highlight specific geographic features, such as mountains, rivers, or coastlines, within your photos. This can enhance the visual impact of your photos and emphasize the natural beauty of your surroundings.
- Historical Overlays:Historical overlays can be used to add historical context to your photos. For example, you could overlay a map of a city from a past era onto a modern photo, showcasing the city’s evolution over time.
- Artistic Overlays:Artistic overlays can be used to create unique and visually striking effects. These overlays can range from simple geometric patterns to complex illustrations, adding an extra layer of creativity to your photos.
Creative Uses of Geolocation Data for Photo Storytelling
Geolocation data can be used in creative ways to enhance your photo storytelling abilities. By combining your photos with location information, you can create engaging narratives that transport viewers to the places where your photos were taken.
- Visualizing Travel Journeys:You can create visual timelines or maps that showcase your travel journeys, connecting your photos with the places you visited. This can help viewers understand the context of your photos and follow your travels in a more engaging way.
- Creating Interactive Photo Albums:You can use geolocation data to create interactive photo albums that allow viewers to explore your photos in a more immersive way. Viewers can click on individual photos to see their location on a map, access additional information about the place, or even view nearby points of interest.
- Documenting Personal History:Geolocation data can be used to document personal history, creating visual timelines of significant events in your life. By mapping out your photos, you can create a powerful visual representation of your past, connecting memories with places and times.
Ethical Considerations
Sharing photos with geolocation data can be a powerful tool for storytelling and connecting with others, but it also raises important ethical concerns. It’s crucial to be mindful of the potential implications of sharing location-tagged photos, especially in sensitive locations.
Privacy Concerns
Sharing location-tagged photos can inadvertently reveal personal information about yourself and others. For example, a photo tagged at your home address could expose your location to strangers, potentially increasing your risk of unwanted attention or even crime. It’s important to be aware of who might see your photos and how that information could be used.
Safety Considerations
Sharing location-tagged photos can also compromise your safety. If you’re traveling or in a remote location, sharing your exact location could make you a target for criminals or other individuals who might exploit your vulnerability. It’s best to exercise caution and avoid sharing location-tagged photos in situations where your safety might be at risk.
Respect for Others, How to make your regular camera photos show up on a map
Sharing location-tagged photos of other people without their consent can be a violation of their privacy. It’s essential to obtain permission before sharing photos that include other individuals, especially if they are in sensitive locations or engaged in private activities.
Best Practices for Responsible Use of Geolocation Data
- Be mindful of the potential risks:Consider the consequences of sharing location-tagged photos before posting them online.
- Obtain consent:Ask for permission before sharing photos that include other individuals.
- Use privacy settings:Configure your social media accounts to restrict who can see your location-tagged photos.
- Remove sensitive data:Consider removing geolocation data from photos before sharing them, especially if they depict sensitive locations or individuals.
- Think before you post:Ask yourself if you’re comfortable with the potential consequences of sharing a location-tagged photo.
Final Wrap-Up
So, whether you’re a seasoned photographer or just starting out, there are simple ways to make your photos come alive on a map. You can share your adventures, relive memories, and even create a unique photo journal that captures your journeys.
By learning how to add location data to your photos, you’re opening up a world of possibilities for sharing and enjoying your photography.
Question Bank
Can I add location data to photos I’ve already taken?
Yes, you can add location data to photos you’ve already taken using geolocation apps or photo editing software.
Is it safe to share photos with location data?
Sharing photos with location data can be risky, as it reveals your whereabouts. Be mindful of the privacy implications and consider disabling geolocation tagging if you’re concerned about privacy.
What if my camera doesn’t have geolocation?
If your camera doesn’t have geolocation, you can use a geolocation app to add location data to your photos after you’ve taken them.

