How To Easily Take Screenshots In Mac Os X
How To Easily Take Screenshots In Mac OS X is a must-know skill for any Mac user, whether you’re a seasoned pro or just starting out. From capturing a quick snapshot of a website to documenting a problem for tech support, mastering the art of taking screenshots is a valuable tool.
Mac OS X offers a variety of methods for taking screenshots, from simple keyboard shortcuts to advanced tools that let you customize your captures. This guide will walk you through the different ways to take screenshots on your Mac, helping you choose the best method for your needs.
Whether you prefer the speed of keyboard shortcuts or the flexibility of the Screenshot tool, this guide will empower you to capture any part of your screen with ease. We’ll cover everything from basic techniques to advanced tips and tricks, ensuring you have all the knowledge you need to become a screenshot master.
Introduction
Taking screenshots is a fundamental part of using a Mac. Whether you’re capturing a webpage for reference, documenting a software issue, or sharing a funny meme, knowing how to take screenshots effectively is essential. Mac OS X offers a variety of methods for capturing your screen, ranging from simple keyboard shortcuts to advanced tools for customizing your screenshots.
Taking screenshots on a Mac is super easy, just hit Command + Shift + 3 to capture the whole screen. But before you sell those AirPods, remember to check out Why you should turn off Activation Lock when selling your AirPods.
You can even capture a specific window by pressing Command + Shift + 4 and then clicking on the window you want. It’s a good idea to screenshot anything you need for documentation or to share with others.
Screenshot Methods, How To Easily Take Screenshots In Mac OS X
Mac OS X offers several ways to capture your screen. Each method has its own advantages and is suited for different scenarios.
- Keyboard Shortcuts: This is the most common and convenient method for taking basic screenshots. The keyboard shortcuts are intuitive and easy to remember.
- Screenshot Tool: The Screenshot Tool provides more control over your screenshots, allowing you to select specific areas, delay the capture, and even capture a video of your screen.
- Preview App: This versatile app can be used to take screenshots, edit them, and share them with others.
- Third-Party Apps: Numerous third-party apps offer advanced features for taking screenshots, such as annotating, editing, and scheduling.
Using the Keyboard Shortcuts
Taking screenshots on a Mac is a breeze, and using keyboard shortcuts makes it even faster. You can capture the entire screen, a specific window, or a selected portion, all with a few keystrokes.
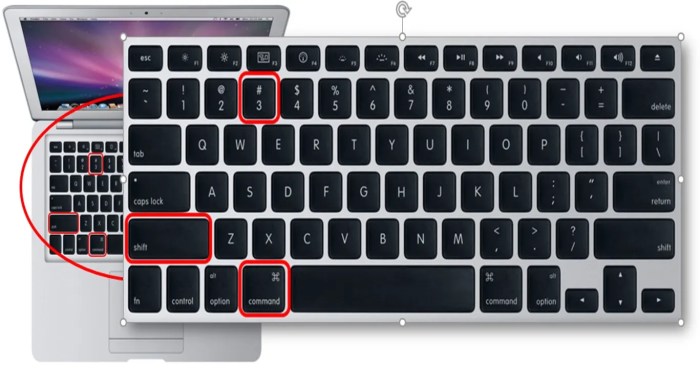
Capturing the Entire Screen
To take a screenshot of your entire screen, simply press Command + Shift + 3. This will immediately save a screenshot of your entire desktop to your desktop as a PNG file. You’ll hear a camera shutter sound to confirm the capture.
Taking screenshots on a Mac is super easy, just hit Command + Shift + 3 to capture the whole screen or Command + Shift + 4 to select a specific area. If you’re using an Apple Pencil, you might want to check out how to change your Apple Pencil tip if it’s getting worn down.
Once you’ve got your screenshot, you can easily edit it and share it with your friends or classmates.
Capturing a Specific Window
If you only need to capture a specific window, such as a web browser or a document, you can use the shortcut Command + Shift + 4, followed by pressing the Spacebar. Your cursor will change to a camera icon. Now, click on the window you want to capture.
This will save a screenshot of the window as a PNG file on your desktop.
Capturing a Selected Portion of the Screen
For capturing a specific part of your screen, you’ll use the shortcut Command + Shift + 4, but instead of pressing the Spacebar, you’ll click and drag your cursor to select the area you want to capture. Once you release the mouse button, the selected area will be saved as a PNG file on your desktop.
Using the Screenshot Tool

The Screenshot tool is a built-in utility on Mac OS X that allows you to capture images of your screen, specific windows, or selected areas. It provides a user-friendly interface and a range of options for capturing screenshots, making it a versatile tool for documentation, sharing, and more.
Accessing the Screenshot Tool
You can access the Screenshot tool in a few ways:
- From the Menu Bar:Click on the Apple icon in the top-left corner of your screen, then select “System Preferences.” Go to “Keyboard” and click on the “Shortcuts” tab. Select “Screenshots” from the left-hand menu. Here, you can customize the keyboard shortcuts for taking screenshots.
- Using Spotlight:Press Command + Spacebar to open Spotlight Search, then type “Screenshot” and press Enter. This will launch the Screenshot tool.
Screenshot Tool Options
The Screenshot tool offers several options for capturing your screen:
- Capture the Entire Screen:This option captures the entire screen, including all windows and menus.
- Select an Area:This option allows you to select a specific area of your screen to capture. You can drag your cursor to define the area you want to capture.
- Capture a Window:This option captures a single window, including its title bar and borders. You can select the window you want to capture by clicking on it.
Using the “Delay” Option
The “Delay” option allows you to set a timer before the screenshot is taken. This is useful for capturing dynamic content, such as a webpage that is loading or an animation. To use the delay option, select the “Delay” checkbox and enter the desired time in seconds.
The screenshot will be taken after the specified delay.
For example, if you want to capture a website that is still loading, you can set a delay of 5 seconds. This will allow the website to fully load before the screenshot is taken.
Saving and Sharing Screenshots

Your screenshots are automatically saved to a specific location on your Mac. Knowing where they’re stored makes it easier to find them later. You can also change the default location to suit your preferences.
Default Save Location
By default, screenshots are saved to your Desktop. This is a convenient location as it’s easily accessible.
Changing the Default Save Location
You can modify the default save location for screenshots by following these steps:
- Open System Preferences.
- Select Screenshots.
- Click the Save todropdown menu.
- Choose your desired location, such as Documents, Downloads, or a specific folder.
Sharing Screenshots
Sharing screenshots is simple with various methods available:
- AirDrop:AirDrop lets you wirelessly transfer files between nearby Apple devices. To share a screenshot via AirDrop, select the screenshot, click the Sharebutton, and choose the recipient’s device.
- Email:Attach the screenshot to an email and send it to your intended recipient.
- Messages:Open the Messages app, select the conversation, and drag and drop the screenshot into the message field.
- Social Media:Upload your screenshot directly to platforms like Twitter, Facebook, or Instagram.
- Other Apps:Many apps, including Slack, Discord, and Zoom, have built-in screenshot sharing features.
Troubleshooting and Tips: How To Easily Take Screenshots In Mac OS X

Taking screenshots in macOS is generally a smooth process, but sometimes you might encounter minor issues or want to optimize your screenshot experience. Here’s a guide to help you troubleshoot common problems and discover tips for better screenshot results.
Common Issues and Solutions
- Screenshot Not Saving:This can occur due to insufficient disk space or a corrupted screenshot file. To resolve this, check your disk space, restart your Mac, and try taking the screenshot again. If the problem persists, you might need to delete old screenshot files or contact Apple support for further assistance.
- Screenshot Not Capturing the Entire Screen:This usually happens when a window or app is covering a portion of the screen. To fix this, close any overlapping windows or apps before taking the screenshot. Alternatively, use the “Select area” option in the Screenshot tool to capture only the desired portion of the screen.
Taking screenshots on a Mac is super easy, just press Command + Shift + 3 to capture the whole screen or Command + Shift + 4 to select a specific area. If you’re looking to streamline your iPhone experience, check out How to autofill passwords, email addresses and more on iPhone to save time and effort.
Once you’re done taking screenshots, you can easily edit them with Preview, the built-in Mac app.
- Screenshot Taking Too Long:If you experience delays in capturing screenshots, it could be due to high CPU usage by other applications or a slow hard drive. To improve performance, close unnecessary apps, check for background processes consuming resources, and ensure your hard drive is not fragmented.
Optimizing Screenshot Quality and Efficiency
- Choose the Right Format:For high-quality screenshots, select “PNG” as the format. PNG supports transparency, making it ideal for capturing elements with transparent backgrounds. For smaller file sizes, use “JPEG,” but note that it doesn’t support transparency.
- Adjust Screenshot Size:To control the size of your screenshots, use the “Select area” option in the Screenshot tool to capture only the desired portion of the screen. This can be particularly useful for capturing specific windows or sections of web pages.
- Utilize Keyboard Shortcuts:Mastering keyboard shortcuts can significantly speed up your screenshot workflow. For instance, “Command + Shift + 3” captures the entire screen, while “Command + Shift + 4” allows you to select a specific area.
Best Practices for Using Screenshots
- Clearly Label Screenshots:Always label your screenshots with a descriptive name that indicates the content or purpose of the image. This makes it easier to find and identify the screenshot later.
- Use Screenshots Strategically:Screenshots are most effective when used to highlight specific information or demonstrate a particular process. Avoid using them for general documentation or lengthy explanations.
- Edit and Annotate:Utilize built-in tools like Preview or third-party editing software to annotate your screenshots with arrows, circles, or text boxes to emphasize important details or provide additional context.
Outcome Summary
Taking screenshots on a Mac is a breeze, and with the various methods and options available, you can capture exactly what you need in a way that suits your workflow. Whether you’re a student, a professional, or simply someone who likes to share their screen experiences, mastering the art of screenshots is a valuable skill.
So, go ahead and explore the different methods, experiment with the options, and unlock the full potential of screenshotting on your Mac.
Essential FAQs
Can I take screenshots of a specific area of my screen?
Yes! You can use the “Command + Shift + 4” shortcut to select a specific area of your screen and capture it. Just click and drag your mouse over the desired region.
How do I take a screenshot of a specific window?
To capture a specific window, use the “Command + Shift + 4” shortcut followed by a spacebar. Then, click on the window you want to capture.
What are the default save locations for screenshots?
Screenshots are typically saved to your Desktop by default. You can change the default location in the Screenshot tool settings.