How To Stop Your Photos Library From Taking Over Your Mac
How to stop your Photos library from taking over your Mac? It’s a question many Mac users face as their photo collection grows. Your once-spacious hard drive can quickly become a victim of gigabytes upon gigabytes of precious memories.
But don’t worry, you’re not alone! We’ll explore ways to tame your Photos library and reclaim some valuable storage space.
The Photos app, while incredibly convenient, can be a storage hog. If you’re seeing your Mac’s performance slow down or you’re constantly running out of disk space, your Photos library might be the culprit. We’ll dive into strategies to analyze your library, optimize its size, and manage your storage settings effectively.
Whether you’re a casual photographer or a seasoned pro, we’ll equip you with the knowledge to keep your Photos library in check.
Assessing Your Photos Library
Before you start deleting photos or moving them to external drives, it’s crucial to understand the size and composition of your Photos library. Knowing this information will help you make informed decisions about what to keep, what to delete, and how to manage your storage space.
Determining Your Library’s Size
The first step is to determine the total size of your Photos library. Here’s how:
- Open the Photos app:Locate the Photos icon in your Applications folder or in your Dock.
- Go to the Photos menu:Click on “Photos” in the menu bar at the top of your screen.
- Select “About Photos”:Choose “About Photos” from the dropdown menu.
- Check the Library Size:The “Library Size” field will display the total size of your Photos library in gigabytes (GB).
Identifying Large Files and Folders
Once you know the overall size of your library, it’s helpful to identify the largest files and folders within it. This will give you a better idea of what’s consuming the most space.
- Use the Photos Library Browser:Within the Photos app, you can browse your library by clicking on “Library” in the sidebar.
- Sort by File Size:Click on the “File Size” column header to sort your photos by their size.
- Examine Large Files:Scroll through the list and look for any photos or videos that are exceptionally large. These are likely to be high-resolution images or videos that are taking up a significant amount of space.
Using Disk Utility
Disk Utility is a built-in tool on macOS that provides detailed information about your storage usage. You can use it to analyze your Photos library’s storage footprint.
- Open Disk Utility:Search for “Disk Utility” in Spotlight.
- Select Your Drive:In the left sidebar, select your primary hard drive (usually labeled “Macintosh HD”).
- Click on “Storage”:Click on the “Storage” tab at the top of the Disk Utility window.
- View Storage Breakdown:The “Storage” tab will display a detailed breakdown of your storage usage, including the space occupied by your Photos library.
Optimizing Your Photos Library
You’ve assessed the size of your Photos library and identified potential culprits for its bulk. Now, it’s time to put those insights into action and shrink that library down to a manageable size. Let’s explore various strategies to optimize your Photos library and reclaim precious storage space on your Mac.
Trying to keep your Photos library from eating up all your Mac’s storage? You’re not alone! One thing that can help is making sure you’re only storing the photos you actually need, and that’s where a good storage strategy comes in.
It’s kind of like picking the right size for your Apple Watch Solo Loop band – you want it to fit comfortably, but not be too loose or too tight. Once you’ve got your storage strategy dialed in, you’ll be able to manage your Photos library like a pro, freeing up space and keeping your Mac running smoothly.
Methods for Reducing Photos Library Size
There are several approaches you can take to reduce the size of your Photos library. Here’s a table outlining the key methods and their respective benefits and drawbacks:
| Method | Benefits | Drawbacks |
|---|---|---|
| Delete Unused Photos and Videos | Frees up significant storage space, particularly for large files like videos. | Can be time-consuming, especially if you have a large library. Requires careful selection to avoid accidentally deleting valuable content. |
| Optimize Storage Using iCloud Photos | Keeps your entire photo library accessible across all your Apple devices, while only storing high-resolution originals in iCloud. Lower-resolution versions are stored locally on your Mac, saving space. | Requires a reliable internet connection to access photos and videos. Storage space used in iCloud will be deducted from your iCloud storage plan. |
| Reduce File Size Using Compression Techniques | Reduces the size of individual photos and videos without sacrificing quality. | Can be time-consuming, especially for large libraries. Requires third-party software or online tools. |
| Export Photos and Videos to External Storage | Offloads photos and videos from your Mac’s hard drive to an external drive, freeing up space. | Requires an external drive with sufficient storage capacity. Requires careful management to ensure backups are kept up-to-date. |
Optimizing Storage Using iCloud Photos
iCloud Photos is a powerful tool for managing your photo library and keeping it accessible across all your Apple devices. Here’s how you can leverage iCloud Photos to optimize storage on your Mac:
- Enable iCloud Photos:Go to System Preferences > Apple ID > iCloud > Photos and select “iCloud Photos”.
- Optimize Mac Storage:This option allows you to download lower-resolution versions of your photos and videos to your Mac, while storing the original high-resolution files in iCloud. This can significantly reduce the amount of storage space your Photos library occupies on your Mac.
To enable this, go to System Preferences > Apple ID > iCloud > Photos and select “Optimize Mac Storage”.
- Download Originals:If you need to access the original high-resolution files on your Mac, you can download them from iCloud. To do this, right-click on a photo or video in your Photos library and select “Download Original”.
By implementing these strategies, you can effectively optimize your Photos library, reclaim valuable storage space on your Mac, and keep your photo memories accessible across all your devices.
Deleting or Archiving Photos
Before you start deleting or archiving photos, it’s crucial to back up your library. This safeguards your memories in case something goes wrong. You can use an external hard drive, cloud storage, or even a time machine backup.
Deleting Photos from Your Library
Deleting photos from your Photos library is a permanent action. Once you delete them, they are gone forever. To avoid accidentally deleting precious memories, here are the steps:
- Open your Photos app and select the photos you want to delete.
- Click the “Delete” button in the toolbar.
- Confirm your choice by clicking “Delete” in the pop-up window.
Archiving Photos to External Drives or Cloud Storage
Archiving photos allows you to free up space on your Mac while keeping your memories safe. You can archive photos to an external hard drive or cloud storage.
If you’re trying to free up some space on your Mac, you might want to take a look at your Photos library. It can get pretty massive, especially if you’re a photography enthusiast. If you’re looking for a way to expand your options for customizing your iOS device, you might want to check out how to Add More Sources To Cydia , which can give you access to a ton of new tweaks and apps.
But once you’ve tackled your Photos library, you’ll be able to enjoy all that extra space and maybe even download a few new things.
- Archiving to an external drive:
- Connect your external drive to your Mac.
- Open your Photos app and select the photos you want to archive.
- Click “File” > “Export” > “Export Photos…”
- Choose your external drive as the destination and click “Export.”
- Archiving to cloud storage:
- Open your Photos app and select the photos you want to archive.
- Click “File” > “Export” > “Export Photos…”
- Choose your cloud storage service as the destination and click “Export.”
Optimizing Photo File Sizes
You can significantly reduce the size of your Photos library by optimizing the file sizes of your photos. This will free up valuable storage space on your Mac and make it easier to manage your photos.
Using Different File Formats
The file format you choose for your photos can significantly impact their size. JPEG is the most common file format for photos, offering a good balance of quality and compression. However, newer formats like HEIC (High Efficiency Image Container) offer even better compression, resulting in smaller file sizes without sacrificing quality.
- JPEG:A popular choice for its versatility and balance between quality and compression. JPEG uses a lossy compression algorithm, meaning some information is discarded during the compression process. This can lead to a slight loss of quality, but the file size is significantly reduced.
- HEIC:A newer format developed by Apple that offers even better compression than JPEG. HEIC uses a lossy compression algorithm similar to JPEG, but it can achieve higher compression ratios, resulting in smaller file sizes while maintaining excellent image quality. HEIC is particularly effective for photos with a lot of detail and vibrant colors.
Okay, so you’re trying to figure out how to stop your Photos library from taking over your Mac’s storage. You’re not alone! It’s a common struggle. But before you start deleting pics, maybe you should think about upgrading your storage, or better yet, check out this awesome guide on How to get started with HomeKit home automation – it’ll make your life easier in the long run! You can always get back to your Photos library later.
Adjusting Photo Settings
You can also reduce photo file sizes by adjusting their settings, such as resolution and compression.
- Resolution:The resolution of a photo refers to the number of pixels it contains. Higher resolutions result in larger file sizes. You can reduce the resolution of your photos without sacrificing quality if you plan to use them for online sharing or printing at smaller sizes.
- Compression:Compression refers to the amount of data removed from a photo to reduce its file size. Higher compression levels result in smaller file sizes, but they can also lead to a loss of quality. You can adjust the compression level of your photos based on your needs.
For example, if you are sharing photos online, you can use a higher compression level to reduce file size without significantly affecting quality.
Using External Storage
Offloading your Photos library to an external drive is a fantastic way to reclaim valuable space on your Mac and ensure your precious memories are safely stored. External hard drives and SSDs provide a cost-effective and reliable solution for storing large photo libraries.
Advantages of External Storage, How to stop your Photos library from taking over your Mac
External storage offers numerous advantages for managing your Photos library:
- Free Up Mac Storage:By moving your Photos library to an external drive, you can free up significant space on your Mac, improving its overall performance and preventing storage-related issues.
- Enhanced Backup Solution:External drives provide an additional layer of backup for your photos. Regularly backing up your Photos library to an external drive ensures that you have a copy of your photos in case of a hard drive failure or other unforeseen events.
- Increased Storage Capacity:External drives are available in various storage capacities, allowing you to store a massive amount of photos without worrying about running out of space.
- Portability:External drives are portable, allowing you to easily take your photos with you wherever you go. This is especially useful for sharing photos with friends and family or accessing them on different devices.
Choosing the Right External Storage
Selecting the right external storage device is crucial for ensuring optimal performance and reliability:
- Storage Capacity:Determine the amount of storage space you need based on the size of your Photos library and your future storage needs. Consider future growth and the potential for adding more photos over time.
- Speed:For optimal performance, choose an external drive with fast read and write speeds. SSDs offer significantly faster speeds than traditional hard drives, but they are generally more expensive. For large photo libraries, an SSD is recommended for faster processing and editing.
- Interface:External drives can connect to your Mac via USB, Thunderbolt, or other interfaces. Ensure the drive you choose is compatible with your Mac and offers the desired speed and data transfer rates.
- Reliability:Look for drives from reputable brands with a history of reliability. Consider features like shock resistance and data encryption for added protection.
Connecting and Managing External Storage
Connecting and managing your Photos library on an external drive is straightforward:
- Connect the Drive:Connect the external drive to your Mac using the appropriate cable. Your Mac should automatically recognize the drive and mount it on your desktop.
- Move Your Photos Library:Open Photos and go to Preferences (Photos > Preferences). In the General tab, click “Library” and then click “Change.” Select the external drive as the location for your Photos library and click “Choose.” Your Photos library will be moved to the external drive, and all future photos will be saved there.
- Manage Your Photos:Once your Photos library is on the external drive, you can manage it just like you would on your Mac’s internal drive. You can edit photos, create albums, share photos, and perform other tasks as usual.
Advanced Techniques: How To Stop Your Photos Library From Taking Over Your Mac
For those who want to take their photo library management to the next level, there are a number of advanced techniques that can help you achieve greater efficiency and control. These techniques involve leveraging third-party applications, utilizing powerful photo editing software, and implementing automation tools.
Using Third-Party Applications
Third-party applications can offer a range of features that go beyond the capabilities of macOS Photos. These applications often provide more granular control over your photo library, advanced organization tools, and integration with other services.
- Adobe Lightroom:This popular application offers professional-grade photo editing, organization, and management features. It allows you to create catalogs, apply metadata to your photos, and manage large libraries efficiently.
- Capture One:Capture One is another powerful photo editing and management application that is known for its exceptional image quality and advanced features. It provides extensive tools for color correction, tone mapping, and other image adjustments.
- ACDSee Photo Studio:ACDSee offers a comprehensive suite of photo editing and management tools. It features a fast and efficient browsing interface, advanced editing capabilities, and robust organization features.
- Photo Mechanic:Photo Mechanic is designed for professional photographers and focuses on efficient photo ingestion, organization, and editing. It allows you to quickly import and manage large volumes of photos, apply metadata, and perform basic editing tasks.
Leveraging Photo Editing Software
Photo editing software can play a crucial role in optimizing your photo library. By using editing tools, you can reduce file sizes, enhance the quality of your photos, and apply consistent edits to multiple images.
- Reduce File Sizes:Photo editing software like Adobe Photoshop or GIMP can be used to reduce file sizes without compromising image quality. You can achieve this by optimizing image settings, compressing files, and removing unnecessary data.
- Enhance Image Quality:Advanced photo editing tools can be used to improve the overall quality of your photos. These tools allow you to correct color imbalances, adjust brightness and contrast, sharpen images, and remove noise.
- Apply Batch Edits:Photo editing software often allows you to apply the same edits to multiple photos simultaneously. This can save you a significant amount of time when you need to make consistent adjustments across your library.
Using Automation Tools
Automation tools can significantly streamline your photo management process. These tools can help you automate repetitive tasks, such as importing photos, applying metadata, and organizing your library.
- AppleScript:AppleScript is a scripting language that allows you to automate tasks in macOS. You can use AppleScript to create scripts that import photos, apply s, and organize your library based on specific criteria.
- Automator:Automator is a built-in macOS application that provides a visual interface for creating workflows. You can use Automator to create workflows that automate tasks like renaming photos, applying filters, and converting image formats.
- Third-Party Automation Tools:There are a number of third-party automation tools available that can be used to manage your photo library. These tools often provide more advanced features and customization options compared to AppleScript and Automator.
Troubleshooting and Support
Even after optimizing your Photos library, you might still encounter storage issues. This section will cover common troubleshooting steps and guide you on seeking support from Apple or other resources.
Common Troubleshooting Steps
Here are some steps you can take to troubleshoot storage issues related to your Photos library:
- Check Disk Space:Start by checking your Mac’s available disk space. You can do this by going to About This Mac > Storage. If you’re running low on space, you may need to free up some by deleting unnecessary files or moving data to an external drive.
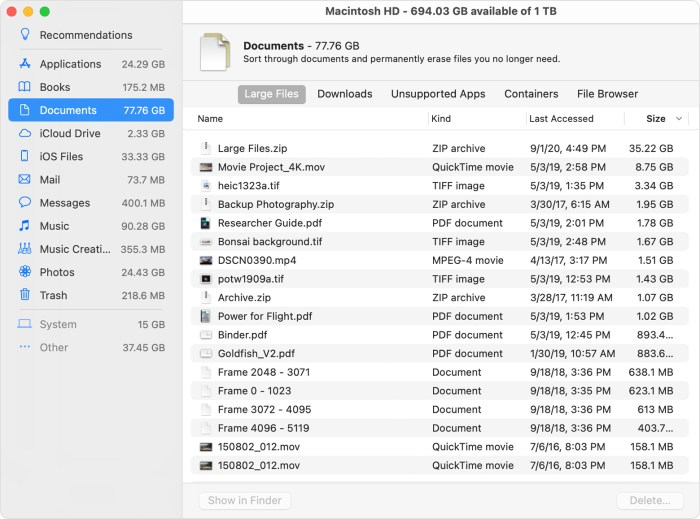
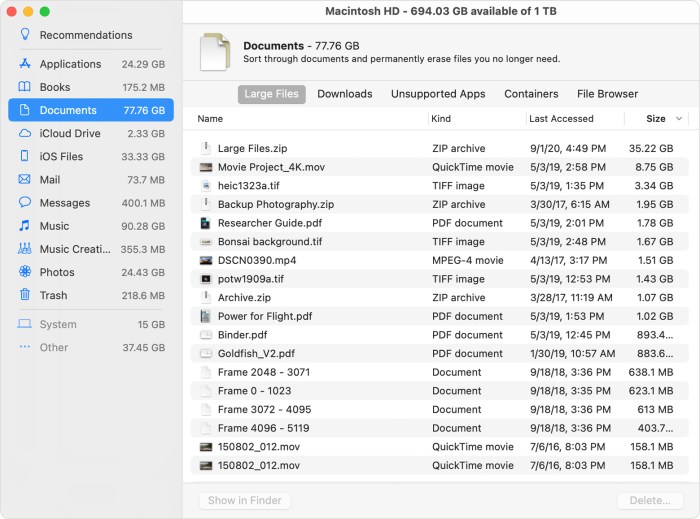
- Identify Large Files:Use the storage management tool in macOS to identify large files that are taking up space. You can find this tool by going to About This Mac > Storage > Manage. This will show you a breakdown of your storage usage and allow you to identify and potentially delete large files.
- Empty Trash:Make sure you’ve emptied your Trash bin. Files in the Trash still take up space on your hard drive.
- Restart Your Mac:Sometimes, a simple restart can resolve minor glitches that might be affecting your Photos library’s storage usage.
- Run Disk Utility:If you suspect a problem with your hard drive, run Disk Utility to check for errors and repair them if necessary. You can find Disk Utility in Applications > Utilities.
Seeking Support
If troubleshooting steps don’t resolve the issue, you can seek support from Apple or other resources:
- Apple Support:Apple offers various support options, including online documentation, phone support, and in-store Genius Bar appointments. You can find more information on Apple’s support website.
- Online Forums and Communities:There are numerous online forums and communities dedicated to Apple products and software, including Photos. These forums can be a valuable resource for finding solutions to specific problems and getting help from other users.
- Third-Party Software:Several third-party applications can help manage and optimize your Photos library. These apps often offer advanced features and tools that might not be available in the standard Photos app. However, be sure to research and choose reputable software from trusted sources.
Specific Error Messages and Problems
Here are some common error messages or problems you might encounter and potential solutions:
- “Photos Library Is Full”:This error message indicates that your Photos library has reached its storage limit. The solution is to free up space by deleting photos, optimizing your library, or using external storage.
- “Photos Library Is Damaged”:If your Photos library is damaged, you might see errors when trying to open or access it. Apple provides a tool to repair damaged Photos libraries. You can find instructions on Apple’s support website. If the library can’t be repaired, you might need to restore from a backup or create a new library.
- Slow Performance:If your Photos library is slow to load or process photos, it might be due to a large library size, insufficient disk space, or a slow hard drive. Consider optimizing your library, upgrading your storage, or using an external drive.
Alternative Photo Management Solutions
Sometimes, even after optimizing your Photos library, you might find yourself needing a more robust or specialized photo management solution. Luckily, there are a variety of apps and services available that offer different features and benefits. These alternatives can help you manage, organize, edit, and share your photos more efficiently, often with greater control and flexibility than the built-in Photos app.
Examples of Alternative Photo Management Apps and Services
Let’s explore some popular alternatives to Apple’s Photos app.
- Adobe Lightroom:Lightroom is a powerful photo editing and management software known for its advanced editing tools, organizational features, and cloud storage capabilities. You can create catalogs, organize your photos into collections, and apply edits with precision. Lightroom also offers a mobile app for on-the-go editing and syncing.
- Capture One:Capture One is a professional-grade photo management and editing software favored by many photographers. It boasts a comprehensive set of editing tools, advanced color management, and RAW processing capabilities. Capture One also provides excellent tethered shooting features, allowing you to directly control your camera from your computer.
- Luminar AI:Luminar AI is an AI-powered photo editor that simplifies photo editing with intelligent tools and presets. It offers a user-friendly interface and a wide range of creative filters and effects. Luminar AI is a good choice for photographers who want to enhance their photos quickly and easily.
- Google Photos:Google Photos is a free cloud-based photo storage and sharing service that offers unlimited storage for photos at a reduced resolution. It automatically backs up your photos, allows for easy sharing, and provides features like facial recognition and object recognition for organization.
- Flickr:Flickr is a popular online photo sharing platform that allows you to store, share, and organize your photos. It offers a variety of features, including photo editing tools, groups, and the ability to sell your photos.
Comparing Features and Benefits
When choosing an alternative photo management solution, it’s essential to consider your needs and priorities. Here’s a comparison of some key features and benefits:
| Feature | Adobe Lightroom | Capture One | Luminar AI | Google Photos | Flickr |
|---|---|---|---|---|---|
| Editing Tools | Extensive and professional | Advanced and professional | AI-powered and user-friendly | Basic editing tools | Limited editing tools |
| Organization | Catalogs, collections, s | Smart Albums, s, ratings | AI-powered organization | Facial recognition, object recognition | Folders, tags, sets |
| Storage | Cloud storage (subscription required) | Local storage (cloud storage available) | Local storage | Unlimited storage (reduced resolution) | Limited free storage |
| Sharing | Web galleries, social media | Web galleries, social media | Social media sharing | Easy sharing with links, albums | Sharing with links, groups |
| Price | Subscription-based | Subscription-based | One-time purchase | Free (limited storage) | Free (limited storage) |
Migrating Photos Between Different Platforms
If you decide to switch to a new photo management solution, you’ll need to migrate your photos. The process can vary depending on the platforms involved, but generally involves exporting your photos from the original platform and importing them into the new one.
Final Conclusion
By taking control of your Photos library, you can ensure your Mac stays responsive and your photos remain accessible. With the techniques we’ve covered, you’ll be able to keep your Photos library in check, optimize storage, and prevent future storage woes.
So, go ahead, capture those memories without worrying about your Mac’s storage limits!
Clarifying Questions
What if I delete photos from my library, will they be gone forever?
No, deleting photos from your library doesn’t mean they’re gone forever. If you’re using iCloud Photos, deleted photos are moved to the Recently Deleted album for 30 days. You can recover them within that time frame. If you’re not using iCloud Photos, you can still recover deleted photos from your Mac’s trash folder.
How do I know if my Photos library is causing performance issues?
If you notice your Mac running slowly, especially when opening or editing photos, your Photos library might be contributing to the problem. You can also check your Activity Monitor to see if the Photos app is using a significant amount of resources.
Can I use external storage for my Photos library?
Yes, you can! External hard drives or SSDs are a great option for storing your photos, especially if you have a large library. You can even connect external storage to your Mac and use it as your primary Photos library location.

