Rotate, Skew And Crop Photos On Iphone
Rotate, skew and crop photos on iPhone are essential tools for any mobile photographer looking to enhance their images. Whether you’re trying to straighten a crooked horizon, adjust the perspective of a building, or focus on a specific subject, these editing features offer a surprising level of control.
The iPhone’s built-in Photos app provides a user-friendly interface for basic adjustments, but if you’re looking for more advanced options, there are plenty of third-party apps available.
This guide will walk you through the process of rotating, skewing, and cropping photos on your iPhone, covering everything from the basics to advanced techniques. We’ll explore the different tools available, discuss best practices for editing, and showcase examples of how these features can be used to transform your photos.
Understanding Basic Editing Functions
The iPhone’s Photos app offers a suite of simple yet powerful editing tools that allow you to refine your images. Among these tools are rotate, skew, and crop, each serving a distinct purpose in enhancing the visual appeal and composition of your photos.
Rotating Photos
Rotating photos is a fundamental editing function that allows you to correct the orientation of an image. This is particularly useful when a photo has been taken at an angle, resulting in a tilted horizon or an off-kilter subject. Here’s how to rotate a photo in the Photos app:
- Open the Photos app and select the image you want to edit.
- Tap the “Edit” button in the top right corner of the screen.
- In the editing toolbar, tap the “Rotate” icon (represented by a curved arrow).
- Tap the “Rotate” icon repeatedly to rotate the image 90 degrees clockwise each time until the image is oriented correctly.
Rotating photos can be helpful in situations like:
- Correcting a tilted horizon in a landscape photograph.
- Adjusting the orientation of a portrait photo that was taken sideways.
- Rotating a group photo to ensure everyone is facing the camera.
Skewing Photos
Skewing photos allows you to adjust the perspective of an image, making it appear as if the subject is closer or further away. This can be used to create a more dynamic composition or to correct distortion caused by wide-angle lenses.
Here’s how to skew a photo in the Photos app:
- Open the Photos app and select the image you want to edit.
- Tap the “Edit” button in the top right corner of the screen.
- In the editing toolbar, tap the “Crop” icon (represented by a square with four dots).
- Tap the “Skew” icon (represented by a curved arrow with a diagonal line) at the bottom of the screen.
- Drag the handles on the sides of the image to adjust the perspective.
Skewing can be particularly useful for:
- Correcting distortion in wide-angle photographs, such as those taken with a fisheye lens.
- Creating a more dynamic composition by making a subject appear closer or further away.
- Adjusting the perspective of an image to make it more visually appealing.
Cropping Photos
Cropping photos allows you to remove unwanted portions of an image, focusing on the most important elements. This can be used to improve the composition of a photo, remove distractions, or change the aspect ratio. Here’s how to crop a photo in the Photos app:
- Open the Photos app and select the image you want to edit.
- Tap the “Edit” button in the top right corner of the screen.
- In the editing toolbar, tap the “Crop” icon (represented by a square with four dots).
- Drag the handles on the sides of the image to select the desired area to keep.
- Tap the “Done” button in the top right corner of the screen to apply the crop.
Cropping can be used in various scenarios, including:
- Removing unwanted elements from the background of a photo, such as a distracting object or a busy street.
- Focusing on a specific subject within a photo, making it more prominent.
- Changing the aspect ratio of a photo to fit a specific format, such as a square for Instagram or a widescreen for a movie poster.
Rotating Photos

Rotating a photo on your iPhone is a breeze, allowing you to quickly correct tilted images or achieve creative effects. Let’s explore the simple yet powerful methods available.
Rotating Photos Using the Rotate Icon
The rotate icon is a convenient tool for quick rotations. It’s located within the editing tools, providing a straightforward way to adjust your image.
The rotate icon is usually depicted as a curved arrow, suggesting a circular movement.
When you tap the rotate icon, the image rotates by 90 degrees clockwise. Each tap rotates the photo further in the same direction. This makes it easy to align your image to the desired orientation.
Rotating Photos Using Two Fingers
For more precise control, you can rotate photos using two fingers directly on the image. This technique allows you to rotate the image freely to any angle you prefer.
Simply place two fingers on the image, then rotate them in a circular motion.
As you rotate your fingers, the image follows your movement, giving you precise control over the rotation angle. This method is particularly useful for fine-tuning the rotation or achieving specific angles that the 90-degree increments might not allow.
Fine-Tuning Rotation Angles, Rotate, skew and crop photos on iPhone
Sometimes, you need to rotate your photo by an angle that’s not a multiple of 90 degrees. In these situations, you can fine-tune the rotation angle for precise adjustments.
The fine-tuning option usually appears as a slider or a numerical input field.
The slider allows you to adjust the rotation angle by dragging it left or right. The numerical input field lets you enter the exact angle you desire. This feature enables you to rotate your photo to any degree, giving you complete control over the final orientation.
Visual Impact of Rotation Angles
The rotation angle significantly impacts the visual appeal of your photo. Here’s a table showcasing the visual impact of different rotation angles:| Rotation Angle | Visual Impact ||—|—|| 0 degrees | Original orientation || 90 degrees | Rotated by a quarter turn || 180 degrees | Flipped horizontally || 270 degrees | Rotated by three-quarters turn || 360 degrees | Returns to the original orientation |These examples illustrate how rotating your photo by different angles can create various visual effects.
By understanding the visual impact of rotation angles, you can use this feature creatively to enhance your photos.
Skewing Photos

Skewing photos, also known as perspective correction, is a powerful tool for adjusting the perspective of an image. It’s especially useful for straightening tilted buildings, correcting distorted horizons, or making objects appear more realistic. While it’s not a feature directly labeled as “skewing” in the Photos app, you can achieve this effect using the built-in tools.
Perspective Correction Using Skewing
The Photos app offers a powerful feature called “Perspective Correction” that allows you to manipulate the perspective of your photos. Here’s how to use it:
- Open the photo you want to edit in the Photos app.
- Tap “Edit” in the top right corner of the screen.
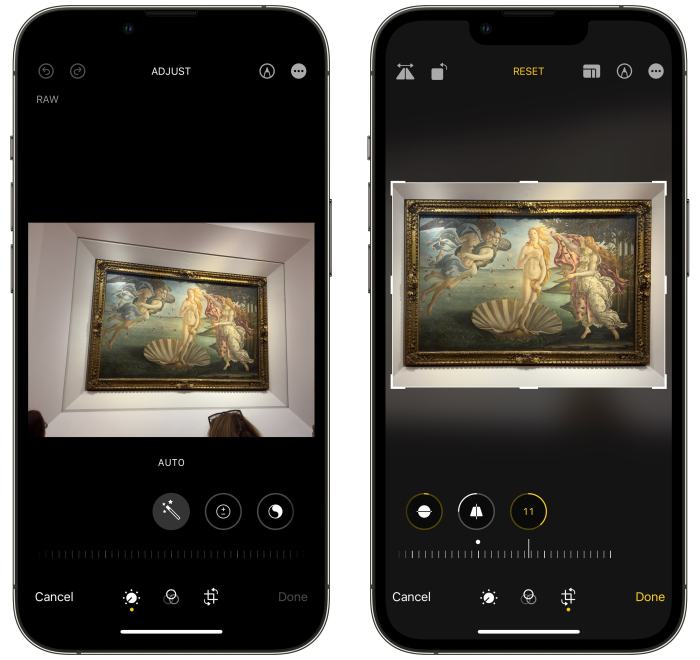
- Tap the “Crop” icon, which looks like a square with four arrows.
- Tap the “Perspective” icon, which looks like a grid with four squares.
- You’ll see a grid overlay on your photo. Tap and drag the corners of the grid to adjust the perspective. The grid will help you visualize the changes you’re making. You can move each corner individually, or drag multiple corners at once.
- Once you’re happy with the adjustments, tap “Done” to save your changes.
Examples of Skewing Photos
- Architectural Photos:Imagine a picture of a tall building with a slightly tilted horizon. Using the Perspective Correction tool, you can straighten the building, making it appear more balanced and aesthetically pleasing. The before-and-after effect would showcase a noticeable improvement in the building’s appearance, making it appear more symmetrical and less distorted.
- Product Photos:For product photos, skewing can be used to correct perspective distortion that often occurs when photographing objects at an angle. This can make the product appear more natural and less distorted, especially for items with straight lines, like furniture or electronics.
Imagine a picture of a smartphone where the edges are slightly warped. Skewing the image can rectify this distortion, making the smartphone appear more rectangular and less distorted.
- Landscape Photos:Skewing can also be used to enhance landscape photos by correcting the perspective of elements like mountains or buildings. Imagine a picture of a mountain range where the peaks appear to be leaning inwards. Skewing can adjust the perspective, making the mountain range appear more natural and less distorted.
This can make the photo appear more balanced and realistic, enhancing the overall composition.
Cropping Photos
Cropping is an essential photo editing technique that allows you to remove unwanted portions of an image and focus on the desired subject. The iPhone’s built-in photo editor provides a versatile cropping tool with various aspect ratios to enhance your photos.
Cropping Aspect Ratios
The iPhone’s cropping tool offers a range of aspect ratios, allowing you to adjust the dimensions of your photo to fit different formats. Here’s a look at some common aspect ratios and their uses:
- Original:This option maintains the original aspect ratio of your photo, preserving its proportions.
- Square:This ratio, with equal width and height, is ideal for social media platforms like Instagram.
- 3:2:This ratio is commonly used in traditional photography and is well-suited for landscape and portrait photos.
- 16:9:This ratio is widely used in widescreen video formats and is a good choice for panoramic photos.
- 4:3:This ratio was prevalent in older cameras and is a versatile option for various types of photos.
- Freeform:This option allows you to crop your photo to any desired shape, providing maximum flexibility.
Using the Cropping Tool
The iPhone’s cropping tool is intuitive and easy to use. Here’s how to remove unwanted elements from your photo:
- Open the photo in the Photos app:Tap on the photo you want to edit.
- Select “Edit”:Tap on the “Edit” button in the top right corner.
- Choose the “Crop” tool:Tap on the “Crop” icon, which resembles a square with a diagonal line.
- Select an aspect ratio:Choose the desired aspect ratio from the options at the bottom of the screen.
- Adjust the crop area:Drag the corners or edges of the crop area to adjust its size and position.
- Rotate the image:Tap the “Rotate” button, which looks like a curved arrow, to rotate the image if needed.
- Confirm the crop:Tap on “Done” to apply the crop.
Focusing on a Specific Subject
The cropping tool can be used to draw attention to a particular subject within your photo. To focus on a specific subject:
- Open the photo and select “Edit”:Follow steps 1 and 2 from the previous section.
- Choose the “Crop” tool:Follow step 3 from the previous section.
- Adjust the crop area:Drag the crop area to encompass the subject you want to highlight.
- Fine-tune the crop:Use the handles to adjust the crop area to achieve the desired framing.
- Confirm the crop:Follow step 7 from the previous section.
Using Third-Party Apps: Rotate, Skew And Crop Photos On IPhone
So far, we’ve explored the built-in photo editing tools on your iPhone. But what if you want more control and advanced features? That’s where third-party apps come in! These apps offer a wider range of editing options, allowing you to fine-tune your photos to perfection.
Let’s delve into the advantages and disadvantages of using these apps, along with some popular choices and their unique features.
Advantages and Disadvantages of Third-Party Apps
Third-party photo editing apps provide a significant advantage over the native iPhone app by offering a wider array of tools and customization options. However, it’s crucial to weigh the pros and cons before making a decision.
- Advantages:
- Advanced Features:Third-party apps often provide more sophisticated editing tools, such as selective adjustments, layer-based editing, and advanced filters.
- Customization:You have more control over the editing process, with fine-grained adjustments and a wider range of presets and effects.
- Special Effects:Many apps offer unique effects and filters that are not available in the native iPhone app, allowing you to create more creative and personalized images.
- Non-Destructive Editing:Most third-party apps allow you to edit your photos without permanently altering the original file, ensuring you can always revert back to the original.
- Disadvantages:
- Learning Curve:Some apps can have a steep learning curve, especially for beginners.
- Cost:Many apps offer a free version with limited features, requiring a subscription or in-app purchase to access advanced tools.
- Storage:Some apps can take up significant storage space on your device, especially if you download large libraries of presets or filters.
- Compatibility:Not all apps are compatible with all iPhone models or iOS versions.
Popular Third-Party Apps
With a plethora of photo editing apps available, choosing the right one can be overwhelming. Here’s a list of some popular third-party apps known for their advanced photo editing capabilities:
- Adobe Photoshop Express:A powerful yet user-friendly app offering a wide range of editing tools, including rotate, skew, crop, and advanced filters. It’s a great option for both beginners and experienced users.
- Snapseed:This app boasts a user-friendly interface and a variety of advanced editing features, including selective adjustments, healing tools, and a wide range of filters. It’s particularly known for its intuitive controls and non-destructive editing.
- VSCO:VSCO is popular for its artistic filters and presets, giving your photos a unique and stylized look. It also offers basic editing tools, including rotate, skew, and crop.
- PicsArt:This app is a versatile option, offering a wide range of editing tools, including advanced filters, effects, and collage features. It’s known for its creativity-focused features, allowing you to create artistic and expressive images.
- Affinity Photo:For users seeking professional-grade editing tools, Affinity Photo is a powerful option. It offers a comprehensive set of features, including layer-based editing, advanced selection tools, and a wide range of filters and effects. It’s a more advanced app, requiring a one-time purchase.
Unique Features of Third-Party Apps
Beyond the basic editing functions, third-party apps often offer unique features that can elevate your photo editing skills.
- Selective Adjustments:Apps like Snapseed allow you to selectively adjust specific areas of your photo, such as brightening a subject while keeping the background untouched.
- Layer-Based Editing:Apps like Affinity Photo and Photoshop Express offer layer-based editing, allowing you to work with multiple layers of images and effects, providing greater control over the final image.
- Artificial Intelligence (AI):Some apps utilize AI to automatically enhance your photos, such as removing unwanted objects or improving the lighting.
- RAW Editing:Apps like Lightroom Mobile allow you to edit RAW images, giving you greater control over the final image and preserving more detail.
- Custom Presets:Many apps allow you to create and save your own custom presets, allowing you to apply your favorite editing styles with just a few clicks.
Advanced Editing Techniques
Now that you’ve mastered the basics of rotating, skewing, and cropping, let’s dive into some more advanced techniques to elevate your iPhone photography. These techniques will help you refine your compositions and enhance the overall look of your photos.
Editing photos on your iPhone is super easy! You can rotate, skew, and crop them right in the Photos app. Once you’re done, you might want to transfer those edited pics to your Mac for safekeeping or to share them with friends.
Check out this guide on How to transfer your iPhone media to Mac for some quick and easy tips. Then you can show off your awesome photo editing skills on your Mac!
Using Grids and Guides for Composition
Grids and guides are invaluable tools for improving composition when cropping. They help you align elements within your photo and create a visually appealing balance.
- Rule of Thirds:This classic compositional guideline divides the image into nine equal squares. The key is to place points of interest along the intersecting lines or at the points where the lines intersect. This creates a more dynamic and engaging composition than centering the subject.
Imagine your photo is divided into a tic-tac-toe board, and you want to position your subject along one of the lines or at one of the intersections.
- Golden Ratio:This mathematical concept, also known as the Fibonacci sequence, is based on the idea that aesthetically pleasing proportions exist in nature. The Golden Ratio can be used to create a more balanced and harmonious composition. It’s represented by a spiral shape that can be overlaid on your photo.
You can position key elements along the spiral to create a more visually appealing composition.
Applying Filters and Adjustments
After you’ve rotated, skewed, or cropped your photo, you can use filters and adjustments to enhance the overall look and feel. Think of these as the finishing touches that can really make your photo pop.
- Filters:Filters are pre-set adjustments that can instantly change the mood and tone of your photo. They can add warmth, coolness, or a vintage feel. Experiment with different filters to see what works best for your photo.
- Brightness and Contrast:Adjusting the brightness and contrast can help you bring out the details in your photo and create a more dynamic range of light and shadow. Increasing the brightness can lighten the overall image, while increasing the contrast will make the dark areas darker and the light areas lighter.
- Saturation and Vibrance:Saturation controls the intensity of colors, while vibrance selectively boosts the saturation of less saturated colors. Increasing saturation can make your photo more vibrant, while decreasing it can create a more muted or vintage look.
- Sharpness:Sharpening can help enhance the details in your photo and make it look more crisp. However, be careful not to over-sharpen, as this can lead to unwanted artifacts.
Visual Guide: Editing Techniques in Action
Imagine a photo of a sunset over a calm ocean.
- Original Photo:The original photo is a beautiful sunset, but the horizon line is slightly crooked. The sky is a bit too bright, and the ocean is a bit too dark. The composition could be improved.
- Rotating:By rotating the photo slightly, you can straighten the horizon line. This creates a more balanced and visually appealing composition.
- Cropping:You can use the rule of thirds to crop the photo, placing the sunset along the top third of the image. This creates a more dynamic and engaging composition.
- Filters:Applying a warm filter can enhance the sunset colors and create a more romantic feel. A cool filter could be used to create a more dramatic or moody look.
- Brightness and Contrast:Adjusting the brightness and contrast can help you balance the light and shadow in the photo. You can increase the brightness of the ocean to make it more visible and decrease the brightness of the sky to create a more balanced exposure.
Saving and Sharing Edited Photos
You’ve transformed your photos into masterpieces, but now it’s time to share your creations with the world! Let’s explore how to save and share your edited photos on your iPhone.Saving your edited photos gives you the flexibility to share them later or keep a copy of the original for future editing.
You can also adjust the resolution and file size to optimize for different sharing platforms.
Saving Edited Photos
You have two main options for saving your edited photos:
- Saving as a New Copy:This option preserves your original photo while creating a new copy of the edited version. It’s ideal for experimentation or when you want to keep both the original and edited photos.
- Replacing the Original:This option overwrites the original photo with the edited version. It’s useful when you’re happy with the edits and want to replace the original with the edited version.
To save your edited photo, follow these steps:
- Open the Photosapp on your iPhone.
- Select the edited photo you want to save.
- Tap the Sharebutton (the square with an arrow pointing up) in the bottom left corner of the screen.
- Select Save Imageto save a new copy of the edited photo.
- If you want to replace the original, tap the “Replace Original”option.
Sharing Edited Photos
Sharing your edited photos is easy with the iPhone’s built-in sharing options. You can share photos through various platforms, including:
- Social Media:Share your photos on platforms like Instagram, Facebook, Twitter, and more.
- Messaging Apps:Share photos with friends and family through messaging apps like WhatsApp, iMessage, and Telegram.
- Email:Attach photos to emails and send them to anyone.
To share your edited photo, follow these steps:
- Open the Photosapp on your iPhone.
- Select the edited photo you want to share.
- Tap the Sharebutton (the square with an arrow pointing up) in the bottom left corner of the screen.
- Select the platform you want to share your photo on (e.g., Instagram, Facebook, WhatsApp, Email).
- Follow the prompts to share your photo.
Adjusting Resolution and File Size
The resolution and file size of your edited photos can impact how they look and how quickly they upload or download. You can adjust these settings before sharing:
- High Resolution:This option provides the highest quality image, but it may take longer to upload or download.
- Medium Resolution:This option offers a good balance between quality and file size. It’s a good choice for sharing on social media.
- Low Resolution:This option reduces the file size significantly, making it ideal for sharing quickly or when storage space is limited.
To adjust the resolution and file size of your edited photo, follow these steps:
- Open the Photosapp on your iPhone.
- Select the edited photo you want to adjust.
- Tap the Sharebutton (the square with an arrow pointing up) in the bottom left corner of the screen.
- Scroll down and tap “More”.
- Select the desired resolution and file size option.
Troubleshooting Common Issues

While editing photos on your iPhone is usually a breeze, you might encounter some hiccups along the way. Don’t worry, most issues are easily resolved with a few simple steps.
Common Issues and Solutions
Sometimes, your editing app might act up. This could be due to a temporary glitch or a more serious problem. Here’s what to do:
- Force Quit the App:Double-tap the Home button (or swipe up from the bottom of the screen on newer iPhones) to access the app switcher. Then, swipe up on the editing app’s preview to force quit it. This will close the app completely and might resolve the issue.
- Restart Your iPhone:Sometimes a simple restart can fix a lot of problems. To restart your iPhone, press and hold the power button (or the side button on newer models) and then slide the power off slider to turn off your phone. Once it’s off, press and hold the power button again to turn it back on.
Editing photos on your iPhone is a breeze, with features like rotating, skewing, and cropping. You can even adjust the lighting and colors to make your pics pop. But if you’re looking for a more advanced way to tweak your audio experience, you might want to check out Apple seeds first AirPods Pro beta firmware — here’s how to get it.
After you’ve got your photos looking perfect, you can easily share them with friends and family through your favorite social media platforms.
- Check for App Updates:Outdated apps can cause problems. Open the App Store, tap on your profile icon in the top right corner, and then tap on “Updates.” If an update is available for your editing app, download and install it.
- Reinstall the App:If nothing else works, try reinstalling the app. To do this, long-press the app icon on your home screen, tap on “Remove App,” and then tap on “Delete App.” Once it’s deleted, go to the App Store and reinstall the app.
Avoiding Common Mistakes
It’s always better to prevent problems than to fix them later. Here are some tips to avoid common editing mistakes:
- Save Edits as Copies:Always save your edits as a copy of the original photo. This way, you can always go back to the original if you’re not happy with your edits.
- Use Undo and Redo:Don’t be afraid to experiment with different edits, but remember that you can always undo or redo your changes by tapping the “Undo” or “Redo” buttons in the editing interface.
- Don’t Overdo It:It’s easy to get carried away with editing, but remember that less is often more. Try to keep your edits subtle and natural.
Photo Editing Best Practices
Photo editing on your iPhone can be a fun and creative way to enhance your pictures, but it’s important to approach it thoughtfully. Just like any artistic endeavor, there are certain principles and guidelines that can help you achieve the best results.
Considering the Context and Purpose
The most crucial aspect of photo editing is understanding the context and purpose of the photo. What are you trying to achieve with your edits? Are you aiming for a natural look, a more dramatic effect, or something in between?
The answer to these questions will guide your editing decisions and ensure that your edits enhance the photo without compromising its authenticity. For example, if you’re editing a portrait photo for a professional profile, you might focus on subtle adjustments to skin tone and lighting to create a polished and professional look.
However, if you’re editing a snapshot of a funny moment with friends, you might embrace more playful and creative edits, like adding filters or text.
Examples of Edited Photos
Now that we’ve covered the basics of rotating, skewing, and cropping photos on your iPhone, let’s look at some real-world examples of how these techniques can be used to improve your photos. We’ll explore how these simple edits can transform your images and enhance their visual appeal.
Rotating Photos
Rotating photos is a simple yet powerful editing technique that can correct a tilted horizon or adjust the orientation of a subject. This is especially useful for landscape photos where a tilted horizon can be distracting and ruin the overall composition.
Rotating photos is essential for correcting tilted horizons, ensuring a balanced and aesthetically pleasing composition.
Here’s an example:* Original Photo:Imagine a photo of a beautiful sunset over a vast ocean, but the horizon is slightly tilted to the right.
Edited Photo
You can easily rotate, skew, and crop photos on your iPhone using the built-in editing tools. But what if the photo is so big it’s causing problems with email? You can use MailDrop, a feature from Apple that allows you to send large files without clogging up your inbox.
How to email huge attachments with MailDrop explains how to use it, so you can share your perfectly edited photos without any hassle. Once you’ve mastered MailDrop, you’ll be a pro at sending your iPhone photos anywhere!
By rotating the photo slightly to the left, the horizon becomes perfectly straight, making the image more balanced and visually appealing.
Skewing Photos
Skewing photos is a more advanced editing technique that can be used to create a sense of depth or perspective. This technique is often used to make objects appear closer or farther away, or to create a more dynamic composition.
Skewing photos is a creative tool for adding depth, perspective, and a dynamic feel to your images.
Here’s an example:* Original Photo:Imagine a photo of a tall building against a clear blue sky. The building appears flat and lacks depth.
Edited Photo
By skewing the photo slightly, the building appears to lean forward, creating a sense of depth and perspective. The effect makes the building look taller and more imposing.
Cropping Photos
Cropping photos is a versatile editing technique that can be used to remove unwanted elements, improve composition, and focus attention on the subject. This technique can also be used to change the aspect ratio of a photo, making it suitable for different platforms.
Cropping photos is a versatile technique for removing distractions, enhancing composition, and focusing attention on the subject.
Here’s an example:* Original Photo:Imagine a photo of a group of friends enjoying a picnic in a park. The photo includes a lot of background elements that are distracting from the main subject.
Edited Photo
By cropping the photo to focus on the group of friends, the background distractions are removed, and the focus is shifted to the main subject. This creates a more intimate and impactful image.
Concluding Remarks
Mastering the art of rotating, skewing, and cropping photos on your iPhone can elevate your mobile photography game. From simple adjustments to more intricate edits, these tools give you the power to transform your images and express your creativity.
So grab your iPhone, explore the editing options, and unleash your inner photo editor!
FAQ Resource
What are the best third-party photo editing apps for iPhone?
Some popular third-party photo editing apps for iPhone include Adobe Lightroom Mobile, Snapseed, VSCO, and PicsArt. These apps offer advanced features like selective editing, layers, and a wide range of filters and effects.
How do I undo an edit in the iPhone Photos app?
To undo an edit, tap the “Undo” button in the top left corner of the screen. You can also shake your phone to undo the last action.
Can I save my edits as a new copy of the original photo?
Yes, you can choose to save your edits as a new copy of the original photo. This allows you to keep the original untouched while experimenting with different edits.