Reapply Thermal Paste to Enhance Graphics Card Performance
How to Reapply Thermal Paste on Your Graphics Card to Improve Performance – Discover how reapplying thermal paste to your graphics card can unleash its full potential, boosting performance and cooling it down. Dive into this comprehensive guide to learn the why, how, and benefits of this essential maintenance task.
Get ready to witness a significant transformation in your graphics card’s performance. Reapplying thermal paste is a simple yet effective way to improve its cooling capabilities, ensuring optimal performance and extending its lifespan. In this guide, we’ll provide step-by-step instructions, safety tips, and troubleshooting advice to help you master this essential maintenance task.
Introduction
Reapplying thermal paste on a graphics card is an important maintenance task that can improve performance and extend the life of your card.
Thermal paste is a substance that is applied between the graphics card’s GPU and the heatsink. It helps to transfer heat away from the GPU and into the heatsink, where it can be dissipated.
If your graphics card is running hot, reapplying thermal paste can significantly improve its performance. It’s a simple process that can be done in a few minutes. Just be sure to disable and restrict Xbox Game Bar background activity in Windows 10 and 11 before you start.
Here’s how to do it. Once you’ve disabled Game Bar, you can reapply thermal paste to your graphics card and enjoy improved performance.
Benefits of Reapplying Thermal Paste
There are several benefits to reapplying thermal paste on your graphics card, including:
- Improved performance: Reapplying thermal paste can help to improve the performance of your graphics card by reducing operating temperatures. This can lead to higher frame rates and smoother gameplay.
- Reduced operating temperatures: Reapplying thermal paste can help to reduce the operating temperatures of your graphics card. This can help to extend the life of the card and prevent it from overheating.
- Quieter operation: Reapplying thermal paste can help to reduce the noise level of your graphics card. This is because the card will not have to work as hard to cool itself down.
Materials Required

To ensure a successful thermal paste reapplication, gather the necessary materials:
- Thermal paste: Choose a high-quality thermal paste designed for use with graphics cards.
- Isopropyl alcohol (90% or higher): This is used to clean the GPU and heatsink surfaces before applying a new thermal paste.
- Cotton swabs: Use these to apply the isopropyl alcohol and remove any excess thermal paste.
- Lint-free cloth: Use this to wipe away any remaining residue after cleaning.
Safety Precautions
Before handling any electronic components, it is crucial to follow proper safety precautions to prevent accidents and damage to the equipment.
When working with thermal paste, it is essential to handle and store it safely to avoid potential hazards.
Handling Thermal Paste
- Avoid direct skin contact with thermal paste, as it may cause skin irritation.
- Use disposable gloves and eye protection when applying thermal paste.
- Do not ingest thermal paste under any circumstances.
Storing Thermal Paste
- Store thermal paste in a cool, dry place, away from direct sunlight.
- Keep the thermal paste container tightly sealed to prevent drying out.
- Dispose of used thermal paste according to local regulations.
Disassembly of Graphics Card

Disassembling a graphics card is a delicate procedure that requires careful handling to prevent damage to the card. Before beginning, ensure you have a clean and well-lit workspace.
Locate the screws securing the graphics card to the motherboard and remove them. Gently lift the card from the PCIe slot, taking care not to bend or break the card. Once the card is removed, place it on an anti-static surface.
Removing the Heatsink
Most graphics cards have a heatsink attached to the GPU. To remove the heatsink, locate the screws securing it to the card and remove them. Carefully lift the heatsink straight up, avoiding any side-to-side motion. The old thermal paste will be visible on the surface of the GPU and the heatsink.
Reapplying thermal paste on your graphics card can significantly enhance its performance. The process involves replacing the old, dried-out paste with a fresh layer to improve heat transfer between the GPU and the heatsink. If you’re looking to optimize your PC further, consider exploring how to enable the Home section in the Settings app in Windows 11. This feature provides a convenient overview of your system settings and allows for quick access to frequently used options.
Returning to our thermal paste topic, once you’ve successfully reapplied it, you’ll notice a noticeable improvement in your graphics card’s performance and stability.
Cleaning the GPU and Heatsink
Properly cleaning the GPU and heatsink is crucial for effective thermal paste application. Begin by powering down your PC and unplugging it from the power outlet for safety. Next, remove the graphics card from the PCIe slot. Use isopropyl alcohol (90% or higher) and cotton swabs to gently clean the GPU die and heatsink base.
Wipe away any old thermal paste, dirt, or debris, ensuring the surfaces are spotless. Pay particular attention to the edges and corners where thermal paste may accumulate. Allow the surfaces to dry completely before applying new thermal paste.
Importance of Removing Old Thermal Paste and Debris
Removing all traces of old thermal paste and debris is essential for optimal heat transfer. Old thermal paste can degrade over time, losing its effectiveness. Debris, such as dust or lint, can act as insulators, hindering heat dissipation. By thoroughly cleaning the GPU and heatsink, you ensure that the new thermal paste will make direct contact with both surfaces, maximizing heat transfer and improving cooling performance.
Applying Thermal Paste
Applying thermal paste is a crucial step in reapplying thermal paste on your graphics card. It helps improve heat transfer between the GPU and the heatsink, ensuring optimal cooling performance.
There are various types of thermal paste available, each with its properties. Some common types include:
- Silicone-based thermal paste: Affordable and easy to apply, but has a lower thermal conductivity compared to other types.
- Ceramic-based thermal paste: Higher thermal conductivity than silicone-based paste, but more expensive and can be harder to apply.
- Liquid metal thermal paste: Offers the highest thermal conductivity but requires extreme caution during application due to its electrical conductivity.
Applying Thermal Paste Correctly
To apply thermal paste correctly, follow these steps:
- Clean the GPU and heatsink: Remove any existing thermal paste or debris using a cotton swab and isopropyl alcohol.
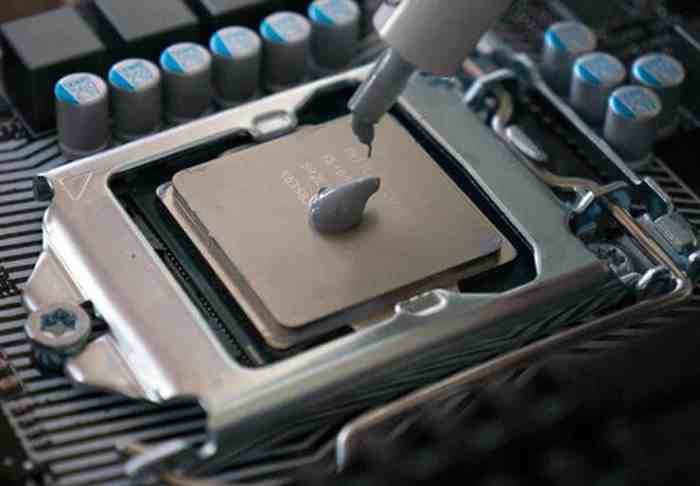
- Apply a small amount of thermal paste: Use a pea-sized amount of thermal paste and place it in the center of the GPU die.
- Spread the thermal paste evenly: Use a clean cotton swab or a plastic card to gently spread the thermal paste over the entire surface of the GPU die.
- Avoid over-applying: Excess thermal paste can interfere with heat transfer. Use only enough to cover the surface of the GPU die.
Reassembly of Graphics Card
After cleaning the GPU and heatsink, it’s time to reassemble the graphics card. This process is generally the reverse of disassembly.
Reattaching the Heatsink
- Align the heatsink with the GPU and carefully place it on top.
- Secure the heatsink using the screws or brackets that were removed during disassembly.
- Tighten the screws evenly to ensure the heatsink is properly secured.
Reinstalling the Graphics Card
- Insert the graphics card back into the PCIe slot on the motherboard.
- Push down on the card until it clicks into place.
- Secure the graphics card using the screws that were removed during disassembly.
- Connect the power cables to the graphics card.
- Close the computer case.
Troubleshooting
If you encounter any issues during the reapplication of thermal paste, here are some common problems and their solutions:
- Insufficient thermal paste application: If you do not apply enough thermal paste, it will not create a good thermal connection between the GPU and the heatsink, resulting in poor heat dissipation. Ensure you apply a pea-sized amount of thermal paste to the center of the GPU die.
- Excessive thermal paste application: Applying too much thermal paste can create a mess and interfere with the proper operation of the graphics card. It can also lead to electrical shorts if it comes into contact with sensitive components. Use only a small amount of thermal paste, and remove any excess before reassembling the graphics card.
- Uneven thermal paste application: If the thermal paste is not applied evenly, it will not create a uniform thermal connection between the GPU and the heatsink. This can lead to uneven cooling and potential hotspots. Spread the thermal paste evenly across the surface of the GPU die using a clean cotton swab or a credit card.
- Air bubbles in the thermal paste: Air bubbles in the thermal paste can create gaps between the GPU and the heatsink, reducing heat transfer. Ensure you press down firmly on the heatsink when reassembling the graphics card to remove any air bubbles.
- Wrong thermal paste type: Not all thermal pastes are created equal. Some are more conductive than others, and some are designed for specific applications. Use a high-quality thermal paste that is compatible with your graphics card and its cooling system.
Testing and Monitoring
Once you have reapplied thermal paste to your graphics card, it is important to test it to ensure that it is working properly. You can do this by running a graphics-intensive game or benchmark. If the graphics card is working properly, you should see a significant performance improvement.
It is also important to monitor the temperature of your graphics card to ensure that it is not overheating. You can do this by using a software program such as HWMonitor. If the temperature of the graphics card is too high, you may need to reapply thermal paste or take other steps to improve cooling.
Troubleshooting
If you are experiencing problems with your graphics card after reapplying thermal paste, there are a few things you can do to troubleshoot the issue.
- Make sure that the thermal paste is applied correctly.
- Make sure that the graphics card is properly seated in the PCI-Express slot.
- Check the power supply to make sure that it is providing enough power to the graphics card.
- Update the drivers for your graphics card.
- If you are still having problems, you may need to contact the manufacturer of your graphics card for support.
Additional Tips

In addition to the steps Artikeld above, here are a few additional tips to optimize thermal paste application and maintain your graphics card for long-term performance:
Use the Right Amount of Thermal Paste
Using too much thermal paste can trap air bubbles, reducing heat transfer efficiency. Conversely, using too little paste can create gaps, allowing heat to build up. Aim for a thin, even layer that covers the entire surface of the GPU die.
Apply Thermal Paste in a Pea-Sized Dot
When applying thermal paste, place a pea-sized dot in the center of the GPU die. This will ensure that the paste spreads evenly when the heatsink is installed.
Applying thermal paste to your graphics card can give it a much-needed performance boost. Similarly, when working with large datasets in Python, concurrency and parallelism can significantly speed up your code’s execution. These techniques allow multiple tasks to run simultaneously, maximizing resource utilization and reducing processing time.
After enhancing your Python code, don’t forget to reapply thermal paste to your graphics card for optimal performance.
Spread the Thermal Paste Evenly
Use a clean cotton swab or a plastic card to spread the thermal paste evenly over the surface of the GPU die. Avoid using your fingers, as this can introduce oils and dirt.
Reinstall the Graphics Card Properly, How to Reapply Thermal Paste on Your Graphics Card to Improve Performance
When reinstalling the graphics card, make sure to align it correctly and tighten the screws evenly. Loose screws can cause the card to overheat.
Monitor Your Graphics Card’s Temperature
After applying new thermal paste, monitor your graphics card’s temperature using software such as GPU-Z or MSI Afterburner. If the temperature is significantly higher than before, there may be an issue with the thermal paste application or other factors.
Clean Your Graphics Card Regularly
Over time, dust and debris can accumulate on your graphics card, reducing its cooling efficiency. Clean your graphics card regularly using compressed air or a soft brush to remove any buildup.
Conclusion
By following the steps in this article, you can effectively reapply thermal paste to your graphics card and enhance its performance. Regular maintenance is crucial to ensure optimal cooling and prevent overheating issues that can lead to reduced performance or even damage to your graphics card.
Remember, reapplying thermal paste is a relatively simple procedure that can significantly improve your graphics card’s lifespan and efficiency. Make it a part of your regular maintenance routine and enjoy a smoother, more stable gaming experience.
Ultimate Conclusion

By following the steps in this guide, you’ll be able to reapply thermal paste on your graphics card with confidence, ensuring optimal cooling and unlocking its full potential. Remember, regular maintenance is key to keeping your graphics card running smoothly for years to come.
FAQ Overview: How To Reapply Thermal Paste On Your Graphics Card To Improve Performance
How often should I reapply thermal paste?
Reapplying thermal paste every 2-3 years is recommended to maintain optimal cooling and prevent overheating.
What type of thermal paste should I use?
Look for high-quality thermal paste with good thermal conductivity and low viscosity. Consider factors like price, brand reputation, and user reviews.
How do I know if my graphics card needs new thermal paste?
Signs of overheating, such as frequent crashes, performance throttling, or excessive fan noise, can indicate the need for reapplying thermal paste.