How To Record Podcasts On Ipad Part Ii: The Apps
How to record podcasts on iPad part II: The apps – So, you’ve got your iPad and you’re ready to start recording your own podcast, but where do you even begin? We’ve covered the basics of podcasting on iPad in Part I, and now it’s time to dive into the heart of the process: choosing the right app.
Think of it like picking the perfect microphone for your voice – the right app can make all the difference in the quality and ease of your podcast creation.
This guide will walk you through everything you need to know about podcast recording apps on iPad, from choosing the best one for your needs to mastering the essential features. We’ll explore popular options, discuss key features to consider, and even offer some tips for getting the most out of your chosen app.
By the end, you’ll be equipped with the knowledge to record and edit your own podcast like a pro, all from the comfort of your iPad.
Choosing the Right Recording App
You’ve got your iPad set up and ready to record your podcast, but with so many different apps available, how do you choose the right one? This part of the series will explore the key features to consider when selecting a podcast recording app for iPad and provide a comparison of popular options.
App Features to Consider
When selecting a podcast recording app, there are a few key features you’ll want to look for.
- Audio Quality:The app should offer high-quality audio recording, with features like noise reduction and audio editing to help you achieve a professional sound.
- Ease of Use:The app should be intuitive and easy to use, even if you’re not a tech expert.
- Multi-Track Recording:If you plan on recording with multiple guests, you’ll need an app that supports multi-track recording.
- Editing Features:Look for an app that offers basic editing features like trimming, cutting, and adding fades. Some apps also offer more advanced features like equalization (EQ) and compression.
- Integration with Other Services:Many podcasting apps integrate with other services like SoundCloud, Spotify, and Apple Podcasts.
Popular Podcast Recording Apps for iPad
There are a variety of podcast recording apps available for iPad, each with its own set of strengths and weaknesses. Here’s a look at some of the most popular options:
Anchor
Anchor is a free, cloud-based podcasting app that makes it easy to record, edit, and publish your podcast.
- Strengths:Easy to use, integrates with other services like Spotify and Apple Podcasts, and offers basic editing features.
- Weaknesses:Limited audio editing features, and the free version includes ads.
GarageBand
GarageBand is a free music creation app that can also be used for podcasting.
- Strengths:Offers a wide range of audio editing features, including multi-track recording, equalization, and compression.
- Weaknesses:Can be a bit overwhelming for beginners, and the interface is not as streamlined as some other podcasting apps.
Rode Reporter
Rode Reporter is a dedicated podcasting app from the audio equipment company Rode.
Okay, so you’ve got your iPad and you’re ready to record your podcast, but which app should you use? There are tons of options out there, but before you jump in, you might want to check out how to enable and disable iCloud Private Relay in iOS 15 and macOS Monterey, How to enable and disable iCloud Private Relay in iOS 15 and macOS Monterey.
This can help keep your podcasting data secure and private. Once you’ve got that sorted, you can dive into the world of podcasting apps and start creating!
- Strengths:Offers high-quality audio recording, noise reduction, and basic editing features.
- Weaknesses:Limited integration with other services, and the app is not free.
Ferrite Recording Studio
Ferrite Recording Studio is a powerful podcasting app that offers a wide range of features.
- Strengths:Offers advanced audio editing features, multi-track recording, and integration with other services.
- Weaknesses:Can be expensive, and the interface can be a bit complex.
AudioNote
AudioNote is a popular app for recording lectures and meetings, but it can also be used for podcasting.
- Strengths:Offers high-quality audio recording, noise reduction, and the ability to sync audio recordings with notes.
- Weaknesses:Limited editing features, and the app is not free.
Apps with Specific Features
Some podcasting apps offer specific features that may be useful for your podcast. For example, the app Hindenburg Journalistoffers advanced audio editing features, including noise reduction, equalization, and compression. Spreaker Studioallows you to schedule and publish your podcast directly to Spreaker. Choosing the right podcast recording app is important for creating a high-quality podcast.
Consider your needs and budget when making your decision.
Setting Up Your Recording Environment
Alright, you’ve got your apps ready, and you’ve chosen the perfect one for your podcast. Now it’s time to create the perfect recording space. Just like a good musician needs a well-tuned instrument, your podcast needs a great recording environment to sound its best.
Think of your recording environment as the foundation of your podcast’s audio quality. A good recording environment can make your podcast sound professional and engaging, while a bad one can make it sound muffled, distracting, and even unprofessional.
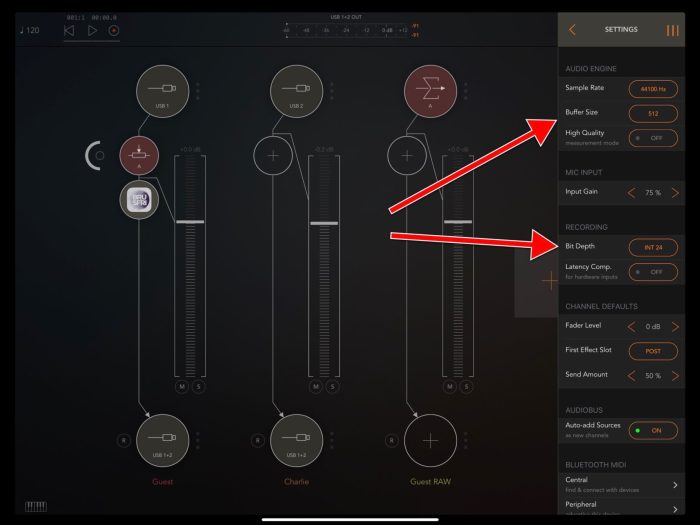
Optimizing Your iPad Settings
It’s important to optimize your iPad settings for recording to ensure the best possible audio quality. You’ll want to adjust the volume levels and select the appropriate microphone input.
- Adjusting Volume Levels:First, make sure the volume on your iPad is set to an appropriate level. You want to be able to hear your voice clearly, but not so loud that it distorts. Use the volume slider on the side of your iPad to fine-tune the sound.
- Selecting the Appropriate Microphone Input:Next, you’ll need to select the correct microphone input. This is usually found in the settings of your recording app. Choose the option that corresponds to the microphone you’re using, whether it’s the built-in microphone on your iPad or an external microphone.
So, you’ve got your iPad ready to record, but which app should you use? There are a ton of options out there, but it’s worth checking out the Vision Pro gestures: How to master Apple headset’s UI for some inspiration on intuitive interfaces.
Think about how you want to interact with your recording app, whether it’s with touch, voice, or a combination of both. Once you’ve got a feel for what works best, you can dive into the world of podcasting apps and find the perfect one for your needs.
Using a Pop Filter, Headphones, and a Quality Microphone
A pop filter is a must-have for any podcast recording setup. It helps reduce the popping sounds that can occur when you pronounce certain words, like “p” or “b.” It’s a simple mesh screen that sits in front of your microphone and helps to diffuse the air pressure from your voice.
You can find a pop filter online or at most music stores.Headphones are another essential part of a good recording setup. They allow you to monitor your audio in real time, ensuring that you’re not recording any unwanted noise or distortion.
You’ll also be able to hear your own voice clearly, which will help you to adjust your speaking volume and delivery.Finally, a good microphone can make a big difference in the quality of your podcast. There are a lot of different microphones on the market, so it’s important to choose one that’s right for your needs and budget.
If you’re just starting out, a USB microphone is a good option. They’re easy to connect to your iPad and provide good audio quality.
Creating a Quiet and Clutter-Free Recording Environment
A quiet and clutter-free recording environment is crucial for creating a high-quality podcast. You want to eliminate any background noise that could distract your listeners.
- Choose a Quiet Room:Find a quiet room in your house or apartment. A bedroom or a spare room is often a good choice.
- Minimize Distractions:Remove any distractions from the room, such as toys, books, or other clutter.
- Close the Door:Close the door to the room to prevent noise from coming in from other areas of your home.
- Turn Off Electronics:Turn off any electronics that could create noise, such as TVs, computers, or phones.
- Use Sound-Absorbing Materials:If your room is particularly noisy, you can use sound-absorbing materials to help dampen the sound. This could include blankets, curtains, or even egg cartons.
Recording Your Podcast Episode

Alright, you’ve got your app set up and your recording space is ready. Now it’s time to actually record your podcast! This is where the fun (and maybe a little bit of nerves) really begins.
Starting and Managing Your Recording
Once you’ve got your app open and your recording environment is ready, it’s time to hit that big, red “record” button. Most podcast apps have a simple interface that makes it easy to start and stop recording. You’ll usually see a large, prominent button that clearly indicates the recording function.
When you’re ready, press the record button and start talking. The app will begin recording your audio. If you need to pause the recording, simply press the pause button. This will stop the recording temporarily, allowing you to take a break or adjust something in your environment.
To resume recording, press the play button. Most podcast apps will allow you to restart the recording if you make a mistake. If you need to start over, simply press the “stop” button, and then press “record” again.
So you’ve got your iPad and you’re ready to record your podcast, but which app should you use? There are a ton of options out there, and it can be tough to choose. If you’re feeling overwhelmed by all the choices, check out this handy tip for navigating between browser tabs quickly – it’ll save you time when you’re researching podcasting apps! Once you’ve picked the perfect app, you’ll be on your way to creating amazing content.
Optimizing Your Audio Quality
The quality of your audio is super important for a good podcast. Here are a few tips to make sure your recordings sound great:
- Speak clearly and enunciate. This may seem obvious, but it’s crucial for listeners to understand what you’re saying. Make sure you’re speaking at a normal pace and not rushing through your words.
- Maintain a consistent distance from the microphone. If you’re too close, your audio will sound distorted. If you’re too far away, it will sound muffled. Experiment with different distances to find what works best for your voice and your microphone.
- Use headphones. This will help you monitor your audio and make sure you’re not picking up any unwanted background noise. You’ll be able to hear what your listeners will hear. This is especially helpful if you’re recording in a busy environment.
- Avoid background noise. If you’re recording in a quiet space, that’s great! But if you’re recording in a noisy environment, try to minimize the noise as much as possible. You can try recording in a quiet room, using a noise-canceling microphone, or editing out background noise later in your editing software.
Editing Your Podcast Episode
Alright, you’ve recorded your podcast episode! Now it’s time to polish it up and make it sound amazing. Editing your podcast is crucial for creating a professional and engaging listening experience. Here’s how to use your recording app’s built-in features to edit your podcast episode like a pro:
Removing Unwanted Noise
Removing unwanted noise, like background hums or coughs, can dramatically improve the quality of your podcast. Most recording apps offer noise reduction tools that can help you clean up your audio.
- Noise Gate:This feature automatically silences audio below a certain threshold, effectively eliminating background noise when you’re not speaking.
- Noise Reduction:This feature analyzes your audio and reduces unwanted frequencies, making your podcast sound clearer.
Silence Gaps
Silence gaps, like long pauses or moments of dead air, can make your podcast feel clunky. Here’s how to remove them:
- Trim:Use the trim feature to shorten or lengthen sections of your audio, allowing you to remove unnecessary silence.
- Fade:You can fade out the end of a sentence or a section of audio to create a smoother transition.
Adjusting Audio Levels
Audio levels are crucial for a balanced and clear listening experience. You’ll want to make sure your voice is loud and clear, but not too loud.
- Gain:Adjust the gain to increase or decrease the overall volume of your audio.
- Compressor:A compressor helps even out volume fluctuations, making your podcast sound more consistent.
- Limiter:A limiter prevents audio from exceeding a certain volume, ensuring that your podcast doesn’t clip or distort.
Adding Music, Sound Effects, and Transitions
Enhancing your podcast with music, sound effects, and transitions can make it more engaging and memorable.
- Music:Use music to set the mood, introduce segments, or provide a background soundtrack.
- Sound Effects:Sound effects can add humor, excitement, or a sense of realism to your podcast.
- Transitions:Transitions can be used to move smoothly between different sections of your podcast, like fading out one track and fading in another.
Exporting and Sharing Your Podcast: How To Record Podcasts On IPad Part II: The Apps
You’ve finally finished recording and editing your podcast episode, and now it’s time to share it with the world! This involves exporting your podcast in a format that’s compatible with various podcast platforms and then uploading it to your chosen hosting service.
Exporting Your Podcast, How to record podcasts on iPad part II: The apps
To export your podcast, you’ll need to choose a suitable audio format. The most common formats for podcasts are MP3 and AAC. MP3 is widely supported and offers a good balance between file size and audio quality. AAC, on the other hand, can provide higher quality audio at a smaller file size, but it might not be as universally supported as MP3.
- MP3:This is the most popular audio format for podcasts, offering a good balance between file size and audio quality. It’s widely supported by various podcast platforms and players.
- AAC:This format can provide higher quality audio at a smaller file size compared to MP3. However, it might not be as universally supported as MP3, so it’s essential to check if your chosen hosting platform supports it.
Uploading Your Podcast
Once you’ve exported your podcast, you need to upload it to a hosting platform. Popular podcast hosting services include SoundCloud, Spotify, and Apple Podcasts. Each platform has its own set of requirements and upload procedures.
- SoundCloud:This platform is a popular choice for podcasters, offering a free plan with basic features and paid plans with more advanced features. To upload your podcast to SoundCloud, you’ll need to create an account and follow the instructions on their website.
- Spotify:Spotify is a popular music streaming service that also offers podcast hosting. You can submit your podcast to Spotify through their website, and they’ll review it before making it available to listeners.
- Apple Podcasts:Apple Podcasts is a dedicated podcast platform that’s integrated into Apple devices. To submit your podcast to Apple Podcasts, you’ll need to create an account with iTunes Connect and follow the submission guidelines.
Promoting Your Podcast
After uploading your podcast, it’s time to promote it and reach a wider audience. There are various strategies you can use to promote your podcast, including:
- Social Media:Share your podcast on social media platforms like Twitter, Facebook, and Instagram. Use relevant hashtags and engage with your followers.
- Email Marketing:Build an email list and send out newsletters promoting your podcast episodes. You can also include links to your podcast on your website or blog.
- Cross-Promotion:Collaborate with other podcasters or influencers in your niche to promote each other’s podcasts. You can also guest appear on other podcasts or invite guests to your show.
- Podcast Directories:Submit your podcast to directories like Podcast Addict, Podchaser, and Listen Notes to increase its visibility and reach a broader audience.
Advanced Recording Techniques
Now that you’ve mastered the basics of recording podcasts on your iPad, let’s dive into some more advanced techniques that can elevate your audio quality and expand your creative possibilities.
External Audio Interfaces
External audio interfaces connect to your iPad via a Lightning or USB-C port and provide a professional-grade audio connection for your microphone and headphones. These interfaces offer several benefits, including improved audio quality, reduced noise, and more control over your recording setup.
- Enhanced Audio Quality:Interfaces typically have high-quality preamps, which boost the microphone signal and provide a cleaner, more detailed sound. This is particularly helpful for capturing subtle nuances in your voice or instruments.
- Reduced Noise:External interfaces often feature noise-canceling circuitry that helps minimize unwanted background noise, leading to a cleaner and more professional-sounding recording.
- More Control:Many interfaces offer volume controls for your microphone and headphones, allowing you to adjust levels precisely during recording. They may also include features like phantom power for condenser microphones and direct monitoring for real-time audio feedback.
Recording Multiple Audio Tracks
Recording multiple audio tracks simultaneously allows you to create more dynamic and engaging podcasts. This is particularly useful for collaborative podcasts with multiple hosts or for incorporating guest interviews.
- Collaborative Podcasts:By recording each host’s audio on a separate track, you can easily edit, mix, and adjust their individual audio levels for a balanced and professional sound.
- Guest Interviews:Recording your guest’s audio on a separate track provides flexibility in editing and mixing. You can easily remove any unwanted background noise or adjust their audio levels to match your own.
- Sound Effects:Recording sound effects on separate tracks allows you to add them later in your editing software, providing greater control over their placement and volume.
Using iPad Accessories
iPad accessories can significantly enhance your recording setup, providing better sound quality, stability, and overall convenience.
- Microphones:While the built-in microphone on your iPad is sufficient for basic recording, investing in a dedicated microphone can significantly improve your audio quality. Consider options like a lavalier microphone for hands-free recording, a USB microphone for plug-and-play convenience, or a condenser microphone for capturing detailed audio.
- Stands:A microphone stand provides stability and allows you to position your microphone at the optimal distance for recording. You can find adjustable stands that allow you to customize the height and angle for your specific needs.
- Pop Filters:Pop filters are essential for reducing plosives, those sharp bursts of air that occur when you pronounce words like “p” or “b.” These filters help prevent unwanted pops and clicks from reaching your microphone, resulting in a smoother and more professional sound.
Troubleshooting Common Issues

Okay, so you’ve got your podcasting setup all dialed in on your iPad, but what happens when things go awry? Don’t worry, it happens to the best of us! In this section, we’ll cover some common podcasting problems and how to fix them.
Microphone Malfunctions
Microphone issues are among the most common problems podcasters face. Sometimes, it’s a simple fix, and sometimes it requires a little more digging. Here are some common scenarios and their solutions:
- No sound:Make sure your microphone is plugged in securely and that the volume is turned up on your iPad. If you’re using a Bluetooth microphone, ensure it’s paired correctly and has sufficient battery life.
- Distorted sound:Check if the microphone is too close to your mouth, which can cause clipping. If you’re using an external microphone, try adjusting the gain settings in your recording app. Also, ensure the microphone isn’t picking up any unwanted background noise.
- Static or buzzing:This could be caused by interference from other electronic devices. Try moving your recording setup away from potential sources of interference, like Wi-Fi routers or electrical outlets. You can also try using a shielded microphone cable.
Audio Distortion
Audio distortion can happen for several reasons, including a faulty microphone, incorrect recording settings, or even a problem with your iPad’s audio processing. Here are some tips for dealing with distortion:
- Reduce background noise:A quiet recording environment is key to clear audio. Use a pop filter to reduce plosives, and consider using a noise gate in your editing software to eliminate unwanted background sounds.
- Adjust recording levels:If your audio is clipping, it’s a sign that your recording levels are too high. Reduce the input gain in your recording app. Conversely, if your audio is too quiet, increase the input gain.
- Check for audio processing issues:If you’re experiencing distortion that can’t be resolved by adjusting your recording setup, it could be a problem with your iPad’s audio processing. Try restarting your iPad or updating your operating system.
App Crashes
Sometimes, podcasting apps can crash, especially if you’re using a lot of features or if your iPad is running low on memory. Here are some things you can try:
- Close and reopen the app:Sometimes a simple restart can fix the problem.
- Force quit the app:If the app is unresponsive, force quit it by double-clicking the home button and swiping up on the app preview.
- Restart your iPad:If force quitting the app doesn’t work, restarting your iPad can often resolve the issue.
- Update the app:Outdated apps can sometimes be buggy. Check for updates in the App Store.
Utilizing iPad Apps for Podcast Promotion
Now that you’ve got your podcast recorded and edited, it’s time to get it out there for the world to hear! The iPad is a powerful tool for promoting your podcast, especially with the many social media apps available.
Social Media Promotion
Social media is a great way to connect with your audience and promote your podcast. You can use platforms like Twitter, Instagram, and Facebook to share clips of your episodes, announce new episodes, and interact with listeners.
- Twitter:Twitter is a great platform for sharing short, engaging content. You can use it to post links to your podcast episodes, share interesting quotes from your show, and engage with other podcasters.
- Instagram:Instagram is a visual platform, so you can use it to share images and videos related to your podcast. You can also use Instagram Stories to share behind-the-scenes content or to run polls and ask your listeners questions.
- Facebook:Facebook is a great platform for building a community around your podcast. You can create a Facebook page for your show and use it to share updates, connect with listeners, and host live Q&A sessions.
Podcast Analytics
Podcast analytics tools can provide you with valuable insights into your audience and how they are interacting with your content. This information can help you to improve your podcast and make it more appealing to your listeners.
- Apple Podcasts Connect:Apple Podcasts Connect provides analytics for your podcast on Apple Podcasts. You can track downloads, listens, and other metrics to see how your podcast is performing.
- Chartable:Chartable is a popular podcast analytics platform that provides detailed insights into your audience, including demographics, listening habits, and episode performance.
- Podtrac:Podtrac is another popular analytics platform that provides data on podcast downloads, listens, and audience engagement.
Podcast Collaboration
Collaborating with other podcasters can help you to reach a wider audience and build a stronger community around your content.
- Guest Appearances:You can appear as a guest on other podcasts to promote your own show and connect with new listeners.
- Cross-Promotion:You can partner with other podcasters to promote each other’s shows.
- Podcast Networks:Joining a podcast network can give you access to a wider audience and provide you with support and resources.
Future Trends in Podcast Recording on iPad

We’ve covered a lot of ground on how to record podcasts on your iPad, but the world of technology is constantly evolving. So, what does the future hold for podcasting on this versatile device? Let’s explore some emerging trends and exciting possibilities.
The Rise of AI-Powered Features
AI is already making waves in podcasting, and its impact on iPad recording is only going to grow. Imagine apps that automatically transcribe your recordings, suggest relevant s for your show, and even help you edit out filler words and awkward pauses.
These features will not only save you time but also enhance the quality and reach of your podcast.
New Apps and Features
The app landscape for podcasting on iPad is already robust, but we can expect to see even more innovative apps and features emerge. For example, we might see apps that offer:
- Advanced audio effects and filters for creating unique soundscapes.
- Integrated social media sharing and analytics to help you promote your podcast and understand your audience.
- Collaboration tools that allow multiple people to record and edit podcasts together seamlessly.
Evolving Distribution and Consumption
The way we listen to podcasts is also changing. The rise of streaming services like Spotify and Apple Music means podcasts are increasingly integrated into our music listening habits. This shift is likely to lead to:
- More immersive listening experiences:Expect to see podcasts with richer audio quality, sound effects, and even interactive elements.
- Greater emphasis on visual content:Podcasts are increasingly incorporating video elements, creating a more engaging experience for listeners.
- New opportunities for monetization:As podcasts become more integrated with streaming services, we can expect to see new ways for creators to monetize their content, such as through subscriptions, sponsorships, and in-app purchases.
Last Recap

Recording a podcast on iPad can be an incredibly rewarding experience, offering creative freedom and accessibility. By choosing the right app and mastering its features, you can elevate your podcast’s audio quality, streamline your workflow, and share your unique voice with the world.
Remember, it’s all about finding the right tools and techniques that work best for you. So, grab your iPad, pick your favorite app, and start recording your own podcast today!
Key Questions Answered
What are some good free podcast recording apps for iPad?
There are several excellent free podcast recording apps available, including Anchor, Rodecaster, and GarageBand. These apps offer a good balance of features and ease of use, making them ideal for beginners.
Can I record a podcast with multiple people on my iPad?
Yes, you can! Many podcast recording apps support multi-track recording, allowing you to record multiple audio sources simultaneously. This is great for collaborative podcasts or interviews.
How do I add music and sound effects to my podcast?
Most podcast recording apps have built-in features for adding music and sound effects. You can either record your own audio or import pre-recorded tracks from your iPad’s library.