How To Clone Your Mac Hard Drive
How to Clone Your Mac Hard Drive is a valuable skill for any Mac user, offering peace of mind and protection against data loss. Whether you’re upgrading to a new Mac, preparing for a hard drive failure, or simply want a reliable backup, cloning your hard drive is an essential step.
This guide will walk you through the entire process, from choosing the right tools to verifying your cloned drive.
Cloning your Mac hard drive involves creating an exact copy of your existing drive, including your operating system, applications, and all your files. This ensures that you have a complete and functioning replica of your Mac, ready to be used on a new drive or in case of an emergency.
This process is particularly useful for users who want to upgrade their Mac’s storage, replace a failing hard drive, or simply have a reliable backup in case of data loss.
Understanding the Process
Cloning a Mac hard drive essentially creates an exact copy of your existing hard drive, including your operating system, applications, and all your files. It’s like making a mirror image of your Mac’s entire storage.
Reasons for Cloning
Cloning your Mac hard drive can be beneficial for several reasons:
- Data Backup:Cloning is a reliable way to create a backup of your entire system. If your hard drive fails, you can easily restore your data and operating system from the clone.
- System Migration:If you’re upgrading to a new Mac with a larger hard drive, cloning your old drive lets you transfer everything seamlessly. You don’t have to reinstall your operating system and applications.
- Troubleshooting:If your Mac is experiencing problems, a clone can be a lifesaver. You can boot from the clone and see if the issue persists, helping you identify the source of the problem.
- Selling or Giving Away Your Mac:When you’re selling or giving away your Mac, cloning your hard drive allows you to keep your personal data safe and prevent any accidental sharing of sensitive information.
Benefits of Cloning
Cloning your Mac hard drive offers several advantages:
- Fast and Efficient:Cloning is generally faster than backing up your data manually, especially if you have a large amount of data. You can create a complete backup in a relatively short time.
- Complete System Backup:Cloning ensures a complete backup of your entire system, including the operating system, applications, and user data. You don’t have to worry about missing any crucial files or settings.
- Easy Restoration:Restoring your system from a clone is straightforward. You can boot from the clone drive and restore your data and operating system without reinstalling everything.
- Reduced Downtime:If your hard drive fails, restoring from a clone minimizes downtime. You can be back up and running quickly, with minimal data loss.
Choosing the Right Tools

Cloning your Mac hard drive requires the right tools, and there are several methods available, each with its own advantages and disadvantages. Understanding these methods and choosing the right tool for your specific needs is crucial for a successful cloning process.
Different Cloning Methods
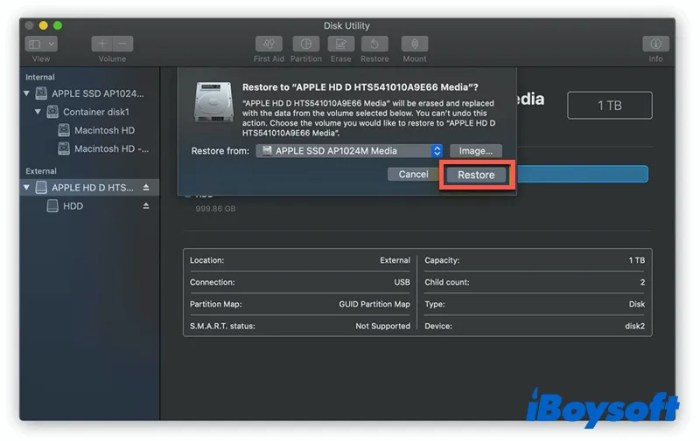
- Disk Utility: Built into macOS, Disk Utility is a user-friendly option for cloning your hard drive. It allows you to create a bootable clone of your entire drive, including the operating system, applications, and user data.
- Third-Party Cloning Software: Several third-party cloning applications are available, offering features like incremental backups, scheduling, and advanced disk management options. Popular examples include Carbon Copy Cloner, SuperDuper!, and Clonezilla.
- Time Machine: Apple’s Time Machine is primarily designed for backups, but it can also be used to clone your Mac hard drive. It creates incremental backups of your entire drive, allowing you to restore your Mac to a previous state if needed.
Comparing Cloning Methods
| Method | Pros | Cons |
|---|---|---|
| Disk Utility | Free, built-in, user-friendly | Limited features, no scheduling, no incremental backups |
| Third-Party Cloning Software | Advanced features, scheduling, incremental backups | Paid, requires installation, learning curve |
| Time Machine | Incremental backups, user-friendly, free | Not specifically designed for cloning, requires external drive, can be slow |
Choosing the Right Cloning Tool
- Determine your cloning needs: Consider the frequency of cloning, the size of your hard drive, and the features you require.
- Evaluate your budget: Third-party cloning software typically comes with a price tag, while Disk Utility and Time Machine are free.
- Read reviews and comparisons: Research different cloning tools and compare their features, user experience, and compatibility with your Mac.
- Consider the learning curve: Some cloning tools have a steeper learning curve than others. Choose a tool that aligns with your technical skills.
Preparing for the Clone
Before you dive into the cloning process, it’s crucial to take some precautionary steps to ensure a smooth and successful operation. These steps will help protect your data and prepare your system for the cloning process.
Backing Up Important Data
Always back up your important data before cloning your Mac hard drive. Cloning involves copying the entire contents of your source drive, including all files, applications, and system settings. While the cloning process aims to create an exact replica, unforeseen issues can arise, potentially leading to data loss.
Therefore, having a reliable backup is essential to safeguard your valuable data.You can back up your data using various methods, including:
- Time Machine:Apple’s built-in backup solution, Time Machine, is a convenient and reliable way to back up your entire Mac. It creates incremental backups, storing changes made over time, allowing you to restore your Mac to a specific point in the past.
- External Hard Drive:You can manually back up your data to an external hard drive. This method offers flexibility and control, allowing you to choose specific files or folders to back up.
- Cloud Storage:Cloud storage services like iCloud, Dropbox, or Google Drive provide a convenient way to store your data online. This is a good option for backing up important documents, photos, and other files, but it may not be suitable for backing up your entire hard drive.
Partitioning the Target Drive
Partitioning your target drive is a crucial step in the cloning process. It involves dividing the drive into multiple sections, each with its own operating system or data storage. This allows you to install different operating systems on the same drive, or to dedicate specific sections for different purposes.For example, you can create a separate partition for your macOS installation, another for your personal data, and a third for applications.
This approach provides a more organized and efficient way to manage your storage space.When partitioning your target drive, consider the following:
- Size of Partitions:Determine the appropriate size for each partition based on your needs. Allocate sufficient space for your operating system, applications, and personal data.
- Format:Ensure the target drive is formatted in the correct format for your Mac. Typically, this would be APFS (Apple File System) or HFS+ (Hierarchical File System Plus).
Preparing for the Cloning Process
Before you begin cloning your Mac hard drive, it’s important to review a checklist to ensure you have everything in place:
- Backup Your Data:This is the most crucial step. Ensure you have a complete backup of your important data before starting the cloning process.
- Choose the Right Tools:Select a cloning software that meets your needs and is compatible with your Mac. Consider factors like features, ease of use, and cost.
- Partition Your Target Drive:Partition your target drive into appropriate sections to optimize storage and organization.
- Connect Your Drives:Connect both your source and target drives to your Mac. Ensure they are properly connected and recognized by your system.
- Check System Requirements:Ensure your Mac meets the minimum system requirements for the cloning software you’ve chosen.
- Close Unnecessary Applications:Close all unnecessary applications and programs on your Mac to avoid conflicts during the cloning process.
- Disconnect External Devices:Disconnect all external devices, such as printers, scanners, and external hard drives, to prevent interference with the cloning process.
The Cloning Process

Now that you’ve selected your cloning tool and prepared your source and destination drives, it’s time to initiate the cloning process. This is the heart of the operation, and the steps involved can vary slightly depending on the specific tool you’ve chosen.
However, the general principles remain consistent.
Initiating the Cloning Process
Once you’ve selected your cloning tool, you’ll typically be presented with a straightforward interface. This interface will guide you through the process of choosing your source and destination drives. You’ll need to ensure that the destination drive has enough space to accommodate the entire contents of your source drive.
Once you’ve selected the drives, you’ll be able to initiate the cloning process.
Monitoring the Cloning Process
The cloning process can take some time, especially if you’re working with a large hard drive. Most cloning tools provide a progress bar or other visual indicator to let you know how far along the process is. This is a good opportunity to take a break and relax, knowing that your computer is hard at work creating a perfect copy of your Mac’s hard drive.
Troubleshooting Common Cloning Errors
While cloning is generally a straightforward process, you may encounter some errors along the way. These errors can range from simple issues like insufficient disk space to more complex problems like drive corruption.
Cloning your Mac’s hard drive is a super useful thing to do, especially if you’re upgrading to a new computer or just want a backup. But, if you’re looking for a fun way to spruce up your iPhone photos, you should definitely check out How to use iOS 11’s new Live Photos effects.
Once you’re back to your Mac, you can use a tool like Carbon Copy Cloner to create a perfect clone of your hard drive. That way, you’ll have a complete copy of your files, apps, and settings, just in case anything happens to your original drive.
- Insufficient Disk Space: This is a common error, especially if you’re cloning a large hard drive to a smaller one. Ensure your destination drive has enough space to accommodate the entire contents of your source drive.
- Drive Corruption: If your source drive is corrupted, you may encounter errors during the cloning process. This is a serious issue that can be difficult to resolve. Consider running a disk repair tool on your source drive before attempting to clone it.
- Software Conflicts: In rare cases, software conflicts can interfere with the cloning process. This is more likely to occur if you’re using a third-party cloning tool. Try disabling any unnecessary software before initiating the cloning process.
- Hardware Errors: If your source or destination drive is experiencing hardware errors, you may encounter errors during the cloning process. This is a serious issue that can be difficult to resolve. Consider replacing the faulty drive if possible.
Verifying the Clone
After you’ve finished cloning your Mac hard drive, it’s crucial to make sure the clone is working correctly. You want to ensure that all your data is intact and that the cloned drive can boot your Mac.
Verifying the Clone’s Integrity
You can verify the clone’s integrity by using a disk utility tool to compare the original drive with the cloned drive. This process will check if the two drives contain the same data.
To verify the clone, you can use Disk Utility, which is a built-in tool on macOS. Open Disk Utility and select the original drive and the cloned drive. Then, click on the “Verify Disk” button for each drive. If the verification process is successful, you’ll see a message indicating that the disk is verified.
If you encounter any errors during the verification process, it means that the clone was not successful. You’ll need to repeat the cloning process, ensuring that you’re using the right tools and following the correct steps.
Testing the Cloned Drive
Once you’ve verified the clone’s integrity, you can test the cloned drive by booting your Mac from it. This will ensure that the cloned drive is bootable and that all your applications and data are working correctly.
Cloning your Mac’s hard drive is a great way to back up your data and make sure you can easily restore your system if something goes wrong. If you ever forget your password, you can use Disk Utility to wipe your hard drive and reinstall macOS, but make sure you have a recent clone before you do that.
You can find a detailed guide on how to reset your Mac password here , which will be helpful if you ever need to reset your Mac. Once you’ve got a clone, you can relax knowing that your data is safe and you can easily restore your system if needed.
To boot from the cloned drive, you’ll need to restart your Mac while holding down the Option key. This will bring up a menu of bootable drives. Select the cloned drive and your Mac will boot from it.
If your Mac boots successfully from the cloned drive, you can start using it as your primary drive. You can then disconnect the original drive and keep it as a backup in case you need to restore your data.
Regularly Verifying the Clone
It’s essential to regularly verify your cloned drive to ensure that it’s still working correctly. You should verify your clone at least once a month to catch any potential errors early on.
Regular verification helps ensure that your data is safe and secure. If you discover any issues during the verification process, you can take steps to fix them before they become major problems.
Verifying your clone is a simple but crucial step in ensuring the safety and security of your data. By following these steps, you can have peace of mind knowing that your data is protected.
Using the Cloned Drive
You’ve successfully cloned your Mac’s hard drive, and now you’re ready to use it. Whether you’re looking to boot from the clone, use it as a backup, or manage it effectively, this section will guide you through the process.
Booting from the Cloned Drive, How to Clone Your Mac Hard Drive
Booting from your cloned drive allows you to use a completely independent copy of your Mac’s operating system and data. This can be useful for troubleshooting problems, testing new software, or even running a different version of macOS. To boot from the cloned drive, you’ll need to adjust your Mac’s boot order.
- Restart your Mac and hold down the Optionkey. This will bring up the Startup Manager.
- Select the cloned drive from the list of available boot volumes. It will usually be labeled with the name you gave it during the cloning process.
- Press Returnto boot from the selected drive.
Using the Cloned Drive as a Backup
Your cloned drive serves as a valuable backup solution. In case of a hard drive failure or data loss, you can restore your Mac from the clone. This process involves reinstalling macOS on your original hard drive and then restoring your data from the clone.
- Connect the cloned drive to your Mac.
- Start the macOS installation process from a bootable USB drive or internet recovery.
- During the installation, select the option to restore from a backup.
- Choose the cloned drive as the source of the backup.
- Follow the on-screen instructions to complete the restore process.
Managing the Cloned Drive Effectively
Maintaining your cloned drive ensures its continued usefulness as a backup and a reliable source for your data. Here are some tips for managing your cloned drive effectively:
- Regularly update the clone: After significant changes to your original drive, such as installing new software or adding large files, update your clone to reflect those changes. This ensures your backup remains current and accurate.
- Store the clone securely: Keep your cloned drive in a safe and accessible location, separate from your primary hard drive. This protects your data from accidental damage or theft.
- Monitor the clone’s health: Regularly check the health of your cloned drive using utilities like Disk Utility. This helps you identify any potential issues early on and take appropriate action.
- Keep the clone up-to-date: If you’re using the cloned drive to boot your Mac, make sure you keep it updated with the latest macOS updates and security patches. This ensures you have the most up-to-date software and security features.
Advanced Cloning Techniques
Cloning your Mac’s hard drive is a great way to back up your data and ensure that you can restore your system in case of a disaster. However, basic cloning techniques may not be enough for all situations. You might need more advanced techniques to handle specific scenarios.
This section delves into some of these advanced cloning methods, equipping you with more powerful tools for managing your data.
Using Disk Images
Disk images are essentially snapshots of your entire hard drive, capturing every bit of data and its structure. They offer a comprehensive backup solution that’s ideal for complete system restoration or for transferring your entire operating system and applications to a new drive.
Disk images are highly versatile and can be used for various purposes:* Complete system backups:Create a disk image to back up your entire system, including the operating system, applications, and user data.
System migration
Migrate your operating system and applications to a new drive.
Testing new software
Create a disk image of your current system to test new software without affecting your main drive.
Cloning your Mac’s hard drive is a great way to back up your data, but it can be a bit of a pain. If you’re planning on setting up a new Mac for your family, though, it might be worth checking out 6 reasons to set up Apple’s Family Sharing ASAP – it could save you a lot of time and hassle.
Once you’ve got everything set up, cloning your Mac’s hard drive will be a breeze.
Virtual machines
Create a disk image to run your Mac operating system in a virtual machine environment.Several tools are available for creating disk images, including:* Disk Utility:A built-in macOS utility that allows you to create disk images of your entire hard drive or individual partitions.
Carbon Copy Cloner
A popular third-party application that offers advanced features for creating disk images, including scheduling and incremental backups.
SuperDuper!
Another popular third-party application that provides a user-friendly interface for creating disk images and cloning your hard drive.
Disk images are the gold standard for creating a complete backup of your Mac’s hard drive.
Cloning Specific Partitions or Folders
Sometimes, you might not need to clone your entire hard drive. You might only need to clone specific partitions or folders. This can be useful for backing up specific data or for transferring only certain applications to a new drive.* Cloning specific partitions:Some cloning tools allow you to select specific partitions to clone.
This is useful for backing up your user data partition or for transferring only your applications to a new drive.
Cloning specific folders
You can use tools like Disk Utility or third-party file synchronization applications to create copies of specific folders. This is a good option for backing up important data or for transferring files to a new drive.
Cloning specific partitions or folders is a more efficient and targeted approach for backing up or transferring data.
Cloning a Mac Hard Drive to a Different Type of Drive
Cloning your Mac’s hard drive to a different type of drive can be challenging, especially if the new drive has a different format or capacity. This scenario requires advanced techniques and tools.* Using a different format:If you’re cloning your hard drive to a drive with a different format (e.g., from an HDD to an SSD), you’ll need to use a cloning tool that supports both formats.
Using a different capacity
If you’re cloning your hard drive to a drive with a different capacity, you’ll need to ensure that the new drive is large enough to hold all of your data.
Using a different interface
If you’re cloning your hard drive to a drive with a different interface (e.g., from a SATA drive to a Thunderbolt drive), you’ll need to use a cloning tool that supports both interfaces.
Cloning a Mac hard drive to a different type of drive requires careful planning and the use of specialized tools.
Security Considerations
Cloning your Mac hard drive is a great way to back up your data and ensure you have a working copy of your system. However, it’s also important to consider the security implications of cloning. You’re essentially creating a copy of your entire hard drive, including all your personal data, passwords, and other sensitive information.
If the cloned drive falls into the wrong hands, it could be a security risk.
Protecting the Cloned Drive
Protecting your cloned drive from unauthorized access is essential to prevent data breaches. Here are some tips:
- Physical Security:Store the cloned drive in a secure location, like a locked drawer or safe. This prevents theft and unauthorized access.
- Password Protection:If you’re using an external hard drive, set a strong password to protect it. This will prevent anyone from accessing the data without your permission.
- Data Encryption:Encrypting the cloned drive is the most effective way to protect your data. This means scrambling the data so that it’s unreadable without the correct decryption key.
Encrypting the Cloned Drive
There are several methods for encrypting your cloned drive. Here are some popular options:
- FileVault:FileVault is Apple’s built-in disk encryption tool. It’s available on all macOS versions and encrypts the entire drive, including your system files and user data. To use FileVault, go to System Preferences > Security & Privacy > FileVaultand follow the on-screen instructions.
- Third-Party Encryption Software:Many third-party encryption software options are available for macOS. These programs typically offer advanced features like hardware encryption and multi-user access control. Some popular options include:
- Disk Utility:Apple’s Disk Utility includes a built-in encryption feature. It’s a good option for basic encryption needs.
- VeraCrypt:VeraCrypt is a free, open-source encryption tool that offers robust security features. It’s compatible with macOS and supports multiple encryption algorithms.
- BitLocker:BitLocker is Microsoft’s encryption tool, available on macOS through third-party software. It’s a reliable option for protecting sensitive data.
Troubleshooting and Support
Cloning a Mac hard drive is generally a smooth process, but sometimes things can go wrong. Don’t worry, though! Most issues are easy to fix. This section covers common cloning problems and how to solve them. We’ll also discuss where to find help if you need it.
Common Cloning Problems and Solutions
Here are some common cloning problems and their solutions:
- Insufficient Disk Space:Make sure your destination drive has enough space to hold all the data from your source drive. If it doesn’t, you’ll need to free up space on the destination drive or use a larger drive.
- Cloning Errors:Cloning errors can occur due to various reasons, such as a faulty drive, corrupted data, or software bugs. If you encounter an error, try running the cloning process again. If the error persists, check the drive’s health using Disk Utility or a third-party tool.
If the drive is faulty, you’ll need to replace it.
- Slow Cloning Speed:The speed of the cloning process can vary depending on the size of the source drive, the speed of the drives, and the performance of your computer. If the cloning process is taking too long, try using a faster drive or a more powerful computer.
You can also try restarting your computer and running the cloning process again.
- Inaccessible Cloned Drive:If you can’t access the cloned drive after the cloning process is complete, make sure it’s properly connected to your computer. You may also need to format the drive and reinstall macOS.
Seeking Professional Assistance
If you’re unable to resolve the problem yourself, you can always seek professional assistance. There are many resources available online and offline, including:
- Apple Support:Apple offers a variety of support options, including phone, email, and online chat. You can also visit an Apple Store for in-person assistance.
- Third-Party Support:Many third-party software developers offer support for their cloning products. You can usually find their contact information on their website or within their software.
- Online Forums:There are many online forums where you can find help from other Mac users. You can search for forums related to Mac cloning or data recovery.
Seeking professional assistance can save you time and frustration. They can diagnose the problem, provide solutions, and ensure your data is safe.
Conclusion: How To Clone Your Mac Hard Drive

Cloning your Mac hard drive is a powerful tool for data protection and system maintenance. By creating an exact copy of your drive, you can easily restore your system in case of a hardware failure, software malfunction, or accidental data loss.
Cloning your Mac hard drive is a great way to protect your data and ensure a smooth transition in case of a system failure. By following the steps Artikeld in this guide, you can create a reliable clone that will give you peace of mind.
The Importance of Regular Backups and Disaster Recovery Planning
Regular backups are essential for protecting your data and ensuring that you can recover your system in the event of a disaster. In addition to cloning your hard drive, consider using Time Machine or other backup solutions to create regular snapshots of your data.
This will help you recover your data even if your cloned drive is corrupted or damaged.
Exploring Further Resources for Advanced Cloning Techniques
Cloning your Mac hard drive is a valuable skill, and there are many advanced techniques you can explore to enhance your cloning process. For example, you can learn how to clone your drive to a different format, like APFS to HFS+, or how to use advanced cloning tools to create bootable clones.
Last Point
Cloning your Mac hard drive is a powerful tool for protecting your data and ensuring smooth transitions. By understanding the process, choosing the right tools, and following the steps Artikeld in this guide, you can confidently clone your Mac hard drive and have peace of mind knowing your data is safe.
Remember, regular backups and disaster recovery planning are crucial for maintaining data integrity. Explore further resources for advanced cloning techniques and keep your Mac running smoothly.
Commonly Asked Questions
What happens to my original hard drive after cloning?
Your original hard drive remains unchanged. The cloning process creates a copy of the data, so you can continue using your original drive as normal.
Can I clone my Mac hard drive to a smaller drive?
You can, but you might need to delete some files or applications from the source drive to make it fit on the smaller drive.
How often should I clone my Mac hard drive?
It’s recommended to clone your hard drive at least once a month, or more frequently if you make significant changes to your system or data.