How To Back Up And Restore Your Mac Using Time Machine
How to back up and restore your Mac using Time Machine is a crucial skill for any Mac user. Time Machine is Apple’s built-in backup utility that automatically creates snapshots of your entire system, including your files, applications, and settings.
It’s like having a safety net for your digital life, ensuring you can recover from any disaster, whether it’s a hard drive failure, accidental deletion, or even a malware attack.
This guide will walk you through the process of setting up Time Machine, performing backups, restoring files or your entire system, and optimizing your backup strategy. We’ll also cover common Time Machine issues and provide solutions for troubleshooting backup errors.
By the end of this guide, you’ll be confident in your ability to keep your Mac data safe and secure.
Introduction to Time Machine
Time Machine is Apple’s built-in backup utility that automatically creates copies of your Mac’s data, ensuring that you can restore your system to a previous state in case of data loss or system failure. Think of it as a safety net for your digital life.Time Machine offers several advantages that make it an essential tool for Mac users.
Benefits of Using Time Machine
Time Machine provides a range of benefits, making it a valuable tool for protecting your data and system.
- Data Recovery:In the event of a hard drive failure, accidental deletion, or software corruption, Time Machine allows you to restore your entire system or individual files to a previous point in time, minimizing data loss.
- System Restore:If your Mac encounters a software issue or becomes unstable, Time Machine can restore your system to a previous working state, eliminating the need for a fresh installation and preserving your data.
- Version History:Time Machine maintains a history of changes made to your files, enabling you to revert to earlier versions of documents, photos, or any other file. This is particularly useful for recovering from accidental edits or working on projects with multiple iterations.
- Simplicity and Automation:Time Machine is designed to be user-friendly and runs automatically in the background, ensuring regular backups without requiring manual intervention.
How Time Machine Works, How to back up and restore your Mac using Time Machine
Time Machine operates by creating incremental backups of your data. It does not copy the entire contents of your hard drive every time a backup is performed. Instead, it only copies new or modified files, making the backup process efficient and time-saving.Time Machine stores backups on an external drive, such as a hard drive, SSD, or network volume.
This ensures that your backups are stored separately from your main hard drive, protecting them from accidental deletion or damage.
“Time Machine backs up your entire Mac, including your system files, applications, user accounts, and documents.”
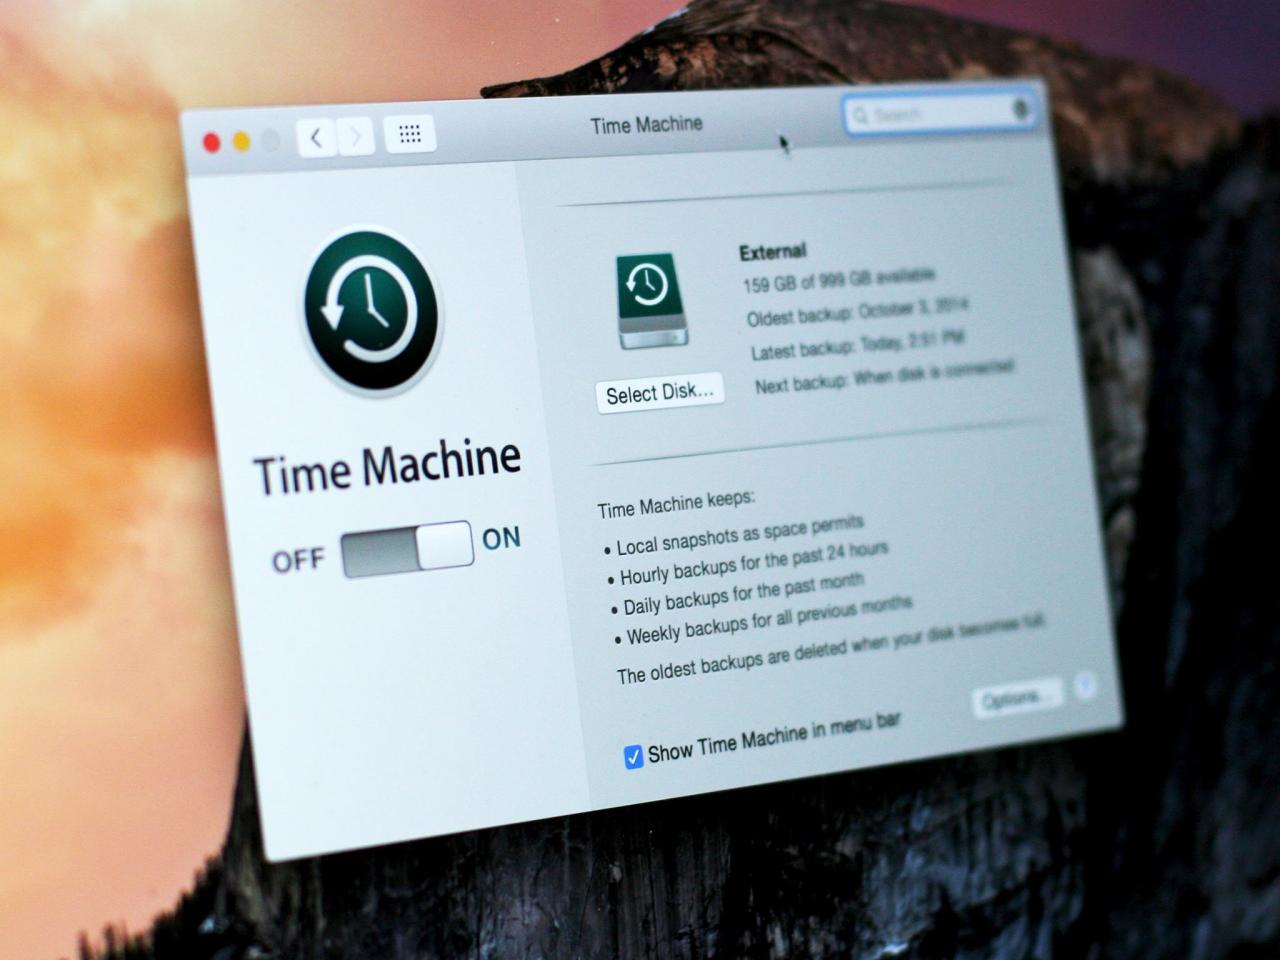
Setting Up Time Machine
Setting up Time Machine is easy and straightforward. You’ll need an external drive to store your backups, and Time Machine will automatically handle the rest.
Choosing a Backup Destination
The first step in setting up Time Machine is choosing where to store your backups. You’ll need an external drive, which can be a hard drive, a solid-state drive, or even a network volume.
- External Hard Drive:This is the most common option for Time Machine backups. External hard drives are relatively inexpensive and offer plenty of storage space. Look for a drive with at least as much storage space as your Mac’s internal drive.
- Solid-State Drive (SSD):SSDs are faster than hard drives, so they can speed up your backups. However, they are also more expensive. If you need a faster backup solution, an SSD is a good option.
- Network Volume:You can also use a network volume, such as a NAS (Network Attached Storage) device, as your Time Machine backup destination. This is a good option if you want to store your backups on a central location that is accessible from multiple computers.
Time Machine is your best friend for keeping your Mac safe. It’s like a safety net, so if something goes wrong, you can easily restore your data. But what if your new MacBook Pro is having trouble with software updates?
That’s where this guide comes in handy: How to fix software updates on your brand-new MacBook Pro. Once you’ve tackled those updates, you can get back to backing up your Mac with Time Machine and relax knowing your data is safe and sound.
Configuring Time Machine Settings
Once you’ve chosen a backup destination, you can configure Time Machine’s settings. This includes specifying how often you want Time Machine to back up your data, how much storage space you want to use for backups, and which files and folders you want to include or exclude from your backups.
- Backup Frequency:By default, Time Machine backs up your data hourly. You can change this to back up every day, every week, or only when you manually initiate a backup.
- Storage Space:Time Machine will use as much storage space as needed to store your backups. You can set a limit on the amount of storage space that Time Machine can use.
- File and Folder Exclusion:You can exclude certain files and folders from your Time Machine backups. This is useful for files that you don’t need to back up, such as temporary files or large media files.
Choosing an Appropriate Backup Drive
The backup drive you choose will significantly impact your backup performance and reliability.
- Storage Capacity:Make sure the drive has enough storage space for all of your data. It’s a good idea to choose a drive with at least as much storage space as your Mac’s internal drive.
- Speed:The speed of your backup drive will impact how quickly your backups are created. SSDs are faster than hard drives, so they are a good choice for backups if you need speed.
- Reliability:Choose a backup drive from a reputable manufacturer and make sure it’s properly formatted and tested before using it for Time Machine backups.
Performing a Backup
Once you’ve set up Time Machine, it’s time to start backing up your Mac. Time Machine will automatically back up your data on a regular schedule, ensuring you have a copy of your important files.
Time Machine is a lifesaver when it comes to backing up your Mac, but sometimes you need to troubleshoot other tech issues. If you’re getting an “805” error code in Mario Kart Tour on your iOS device, check out this guide How to fix ‘805’ error codes in Mario Kart Tour for iOS for a fix.
Once you’ve got that sorted out, you can feel confident knowing your Mac data is safe and sound thanks to Time Machine.
Automatic Backups
Time Machine automatically backs up your Mac hourly while you’re actively using it. This ensures that you have a recent backup of your data, even if you haven’t explicitly triggered a backup. These hourly backups are crucial for capturing the latest changes to your files.
However, if your Mac has been inactive for a while, Time Machine will switch to a daily backup schedule. This ensures that your data is backed up regularly, even if you’re not actively using your Mac.
Manually Triggering a Backup
You can manually trigger a Time Machine backup at any time, which is useful if you’ve made significant changes to your data and want to ensure they’re backed up immediately. To manually initiate a backup, simply click the Time Machine icon in the menu bar, which looks like a clock with an arrow.
From the menu, select “Back Up Now”. Time Machine will begin backing up your Mac, and you can monitor its progress in the Time Machine window.
Restoring from a Backup
Time Machine makes it easy to restore your Mac to a previous state. You can restore individual files, folders, or even your entire system to a specific point in time. This is especially useful if you accidentally delete something important or your Mac experiences a problem.
Restoring Files and Folders
Time Machine allows you to restore individual files or folders to their previous state. This is useful if you accidentally delete a file or make changes that you want to undo. To restore files and folders:
- Open Time Machine by clicking the Time Machine icon in the menu bar or by pressing Command + Shift + H.
- Select the drive containing your Time Machine backup.
- Browse through the backup history to find the date and time you want to restore from.
- Select the files or folders you want to restore.
- Click the “Restore” button.
Restoring Your Entire System
If your Mac is experiencing problems, you can restore your entire system to a previous state. This will return your Mac to the way it was at the time of the backup. To restore your entire system:
- Start your Mac in Recovery Mode by holding down Command + R during startup.
- Select “Restore from Time Machine Backup” from the menu.
- Select the drive containing your Time Machine backup.
- Select the backup you want to restore from.
- Follow the on-screen instructions to complete the restoration process.
Time Machine Backup Strategies
Time Machine is a powerful tool for backing up your Mac, but it can also consume a significant amount of storage space. Here are some strategies for optimizing your Time Machine backups and ensuring you have the best possible protection for your data.
Excluding Files and Folders
It’s possible that you don’t need to back up every single file on your Mac. To optimize your backups and save space, you can exclude specific files or folders from Time Machine backups.
Time Machine is a lifesaver for your Mac, automatically backing up your data so you can restore files or even your entire system if something goes wrong. But what about your camera photos? If you want to see where those pics were taken, check out this guide on how to make your regular camera photos show up on a map.
Once you’ve got your photos mapped, don’t forget to back up that Time Machine drive, too!
- Open Time Machine preferences in System Preferences.
- Click on the “Options” button.
- Click on the “+” button to add files or folders you want to exclude.
- Select the files or folders you want to exclude from backups and click “Choose.”
For example, you might exclude large video files, temporary files, or system files that you can easily reinstall.
Managing Backup Storage Space
Time Machine backups can grow over time, especially if you have a large amount of data. To manage backup storage space, you can use the following strategies:
- Use an external drive with enough space: It’s important to ensure your external drive has enough space for your backups. You can choose a drive with a larger capacity or use multiple drives to store your backups.
- Delete older backups: Time Machine keeps multiple versions of your backups, which can take up a lot of space. You can delete older backups to free up space. To do this, go to Time Machine preferences and click on the “Options” button.
You can then choose how many backups to keep or manually delete older backups.
- Compress your backups: By compressing your backups, you can reduce the amount of space they take up. This is a good option if you have a lot of data and are concerned about storage space. To compress your backups, go to Time Machine preferences and click on the “Options” button.
Then, check the box next to “Compress backups.”
- Use iCloud to store your backups: If you have a large amount of data, you can use iCloud to store your Time Machine backups. This will free up space on your external drive. To do this, go to Time Machine preferences and click on the “Options” button.
Then, check the box next to “Use iCloud to store backups.” However, note that iCloud storage is limited and you may need to purchase additional storage space to store all your backups.
Optimizing Backup Frequency
The frequency of your Time Machine backups can impact how much storage space they take up. By adjusting the backup frequency, you can strike a balance between data protection and storage efficiency.
- Hourly backups: Hourly backups provide the most comprehensive protection, as they capture every change made to your files. However, they can also consume a significant amount of storage space.
- Daily backups: Daily backups are a good balance between data protection and storage efficiency. They capture all changes made to your files throughout the day, but they don’t consume as much space as hourly backups.
- Weekly backups: Weekly backups are a good option if you don’t make frequent changes to your files. They capture all changes made to your files throughout the week, but they consume less space than daily or hourly backups.
Time Machine Troubleshooting
Time Machine is a great tool for backing up your Mac, but sometimes things can go wrong. If you’re having trouble with Time Machine, there are a few things you can try to fix the issue. This section will cover some common Time Machine issues and how to troubleshoot them.
Troubleshooting Backup Errors
Backup errors can happen for a variety of reasons, including a full backup drive, network connectivity issues, or corrupted data. Here’s how to identify and fix some common Time Machine backup errors:
- Check your backup drive.Make sure your backup drive is plugged in, turned on, and has enough free space. If your backup drive is full, Time Machine will stop backing up until you free up some space.
- Check your network connection.If you’re backing up to a network drive, make sure your network connection is stable. A slow or unstable connection can cause backup errors.
- Check for corrupted data.Corrupted data on your Mac can also cause Time Machine backup errors. Try running Disk Utility to repair any disk errors.
- Restart your Mac.Sometimes, restarting your Mac can fix Time Machine backup errors.
- Run Time Machine diagnostics.If you’re still having trouble, you can run Time Machine diagnostics to get more information about the error. To do this, open Time Machine preferences and click the “Options” button. Then, click the “Verify Backup” button. This will scan your backup drive for errors and attempt to fix them.
Addressing Backup Failures
Backup failures can be frustrating, but there are ways to address them and get your backups working again.
- Identify the cause of the failure.The first step is to figure out why your backups are failing. Check the Time Machine error messages for clues.
- Try a different backup drive.If you’re using an external hard drive, try using a different one. This can help rule out a problem with the drive itself.
- Disable any antivirus software.Antivirus software can sometimes interfere with Time Machine backups. Try temporarily disabling your antivirus software and see if that fixes the problem.
- Reinstall Time Machine.If you’re still having trouble, you can try reinstalling Time Machine. To do this, open the Applications folder and drag the Time Machine application to the Trash. Then, restart your Mac and Time Machine will be reinstalled.
Time Machine Alternatives
Time Machine is a great backup solution for Mac users, but it’s not the only option out there. There are several other backup solutions available, each with its own strengths and weaknesses. In this section, we’ll discuss some of the most popular Time Machine alternatives and compare them to Time Machine.
Cloud Backup Services
Cloud backup services are a popular alternative to Time Machine. These services store your data on remote servers, which means you can access it from anywhere. They also offer features that Time Machine doesn’t, such as versioning and encryption.
- Advantages:
- Data is stored off-site, so it’s protected from disasters like fires or floods.
- You can access your data from anywhere with an internet connection.
- Many cloud backup services offer versioning, which means you can restore your data to any previous point in time.
- Some cloud backup services offer encryption, which helps protect your data from unauthorized access.
- Disadvantages:
- You need a reliable internet connection to use a cloud backup service.
- Cloud backup services can be expensive, especially if you need to back up a large amount of data.
- You may need to pay extra for features like versioning and encryption.
Some popular cloud backup services include:
- Backblaze: Backblaze is a popular cloud backup service that offers unlimited storage for a flat monthly fee. It’s easy to use and has a strong track record of reliability.
- Carbonite: Carbonite is another popular cloud backup service that offers unlimited storage for a flat monthly fee. It has a user-friendly interface and a wide range of features, including versioning and encryption.
- IDrive: IDrive is a cloud backup service that offers a variety of plans, including unlimited storage. It’s a good option for users who need to back up a large amount of data.
Local Backup Software
Local backup software stores your data on a local drive, such as an external hard drive or a network drive. This is a good option if you’re concerned about privacy or if you need to access your data quickly.
- Advantages:
- Local backup software is usually faster than cloud backup services.
- You don’t need an internet connection to use local backup software.
- Local backup software can be more affordable than cloud backup services.
- Disadvantages:
- Your data is not protected from disasters that affect your local computer.
- You need to manually manage your backups.
Some popular local backup software options include:
- SuperDuper!: SuperDuper! is a popular local backup software that’s easy to use and offers a variety of features, including scheduling and incremental backups.
- Clonezilla: Clonezilla is a free and open-source disk imaging software that can be used to create full backups of your entire hard drive. It’s a good option for users who need to create a bootable backup of their system.
- Acronis True Image: Acronis True Image is a comprehensive backup solution that offers both local and cloud backup options. It has a wide range of features, including disk imaging, file syncing, and ransomware protection.
Other Backup Options
In addition to cloud backup services and local backup software, there are other backup options available for Mac users.
- Disk Cloning: Disk cloning creates an exact copy of your hard drive, including your operating system, applications, and data. This is a good option for creating a bootable backup of your system or for quickly restoring your system to a previous state.
- File Syncing Services: File syncing services, such as Dropbox, Google Drive, and OneDrive, can be used to back up your files to the cloud. However, they’re not designed for full system backups and they may not be as reliable as dedicated backup services.
Data Security and Privacy

Backups are crucial for protecting your data, but it’s equally important to ensure the security and privacy of those backups. Time Machine offers several features and strategies to safeguard your data.
Protecting Data Privacy
Time Machine encrypts your backups by default, ensuring that only you can access the data. This encryption uses a unique password that you set during the initial setup. Even if someone physically gains access to your backup drive, they won’t be able to access your data without knowing the password.
Securing Time Machine Backups
To further strengthen the security of your Time Machine backups, consider these recommendations:* Use a strong password:Choose a complex password that includes a combination of uppercase and lowercase letters, numbers, and symbols. Avoid using easily guessable information like your name or birthday.
Enable FileVault
FileVault is a built-in Mac feature that encrypts your entire hard drive, including your Time Machine backups. This adds an extra layer of protection in case your computer is stolen or lost.
Use a secure backup location
Store your Time Machine backups in a secure location, such as an encrypted external hard drive or a cloud storage service. Avoid storing backups on easily accessible locations like shared network drives.
Keep your Mac and Time Machine up to date
Regularly update your Mac’s operating system and Time Machine to benefit from the latest security patches and bug fixes.
Be cautious about sharing your backups
Avoid sharing your Time Machine backups with others, as this could compromise your data privacy.
Advanced Time Machine Features: How To Back Up And Restore Your Mac Using Time Machine

Time Machine offers several advanced features that go beyond the basic backup and restore functionalities. These features provide greater flexibility and control over your backups, allowing you to tailor them to your specific needs and preferences.
Network Backups
Network backups enable you to store your Time Machine backups on a remote server instead of a local hard drive. This is particularly useful if you want to:
- Back up multiple Macs to a single location.
- Ensure your backups are protected in case of a local disaster, such as a fire or theft.
- Access your backups from anywhere with an internet connection.
To set up a network backup, you need a computer running macOS or a Time Capsule, which is a dedicated device for Time Machine backups. You can also use a NAS (Network Attached Storage) device or a cloud storage service.
To configure a network backup, open Time Machine preferences and select “Choose Disk.” Then, select the network volume you want to use for backups.
Note: Network backups can be slower than local backups, especially if you have a slow internet connection or a large amount of data to back up.
Time Machine with Multiple Macs
Time Machine can be used to back up multiple Macs to the same location, such as a Time Capsule or a NAS device. This is a convenient way to manage backups for multiple users in a household or small office.
When you back up multiple Macs to the same location, each Mac will have its own separate backup set. This means that you can restore data from one Mac to another, but you can’t restore data from one user’s backup to another user’s backup.
To back up multiple Macs to the same location, you need to follow these steps:
- Connect the Time Capsule or NAS device to your network.
- On each Mac, open Time Machine preferences and select “Choose Disk.”
- Select the Time Capsule or NAS device as the backup destination.
Time Machine for Data Migration
Time Machine can be used to migrate data from one Mac to another. This is a convenient way to transfer your files, applications, and settings to a new Mac. To migrate data using Time Machine, you need to follow these steps:
- Connect the Time Capsule or external drive containing the Time Machine backup to the new Mac.
- Open Time Machine preferences and select “Restore From Backup.”
- Select the backup you want to restore from.
- Follow the on-screen instructions to complete the migration process.
Time Machine will transfer all the data from the backup to the new Mac, including your files, applications, and settings. This can be a time-consuming process, especially if you have a large amount of data to transfer.
Wrap-Up
With Time Machine, you can rest assured knowing that your data is protected. You’ll have peace of mind knowing that even if something unexpected happens, you can easily restore your Mac to a previous state. Whether you’re a seasoned Mac user or just getting started, mastering Time Machine is a must.
It’s a simple, yet powerful tool that can save you from a lot of headaches down the road.
FAQ
What happens if my backup drive runs out of space?
Time Machine will automatically start deleting the oldest backups to make space for new ones. You can also manually manage your backup storage by deleting specific backups or excluding certain files and folders from backups.
Can I use an external hard drive or a network drive for my Time Machine backups?
Yes, you can use either an external hard drive or a network drive for your backups. An external hard drive is generally the easiest option, while a network drive can be more convenient if you have multiple Macs or want to access your backups from different locations.
Is Time Machine secure?
Time Machine uses encryption to protect your data. Your backups are only accessible by you, and your data is protected from unauthorized access.