8 Illuminating NeoPixel Projects to Ignite Your Arduino and Raspberry Pi Adventures
Prepare to be mesmerized by 8 Illuminating NeoPixel Projects for Arduino and Raspberry Pi! This electrifying journey will unveil the wonders of NeoPixels, empowering you to craft dazzling displays and interactive wonders that will light up your imagination.
From beginner-friendly basics to advanced feats of engineering, this guide is your passport to a world of vibrant LEDs and endless possibilities. Get ready to illuminate your path with NeoPixels!
Introduction to NeoPixels
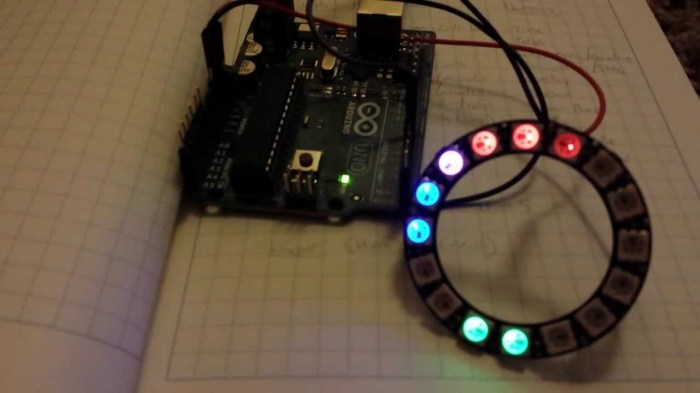
NeoPixels are individually addressable LEDs that have gained immense popularity in the world of electronics and DIY projects. These tiny, colorful lights can be controlled individually, allowing you to create dynamic and eye-catching displays. They are compatible with both Arduino and Raspberry Pi microcontrollers, making them incredibly versatile for a wide range of projects.
Key Features
- Individually addressable:Each NeoPixel has its own built-in controller, allowing you to control each LED independently.
- Full-color spectrum:NeoPixels can produce a wide range of colors, including red, green, blue, and white.
- Compact size:These LEDs are incredibly small, making them ideal for projects with space constraints.
- Daisy-chainable:NeoPixels can be easily connected together in a daisy-chain configuration, reducing the amount of wiring required.
Basic NeoPixel Projects
NeoPixel projects are a great way to get started with electronics and programming. They’re easy to use and can be used to create a wide variety of projects, from simple lighting effects to complex animations.In this section, we’ll provide some simple and beginner-friendly NeoPixel projects to showcase basic NeoPixel functionality.
We’ll include code examples and step-by-step instructions so you can get started right away.
Single-Color LED Blinker
This project is a simple LED blinker that uses a single NeoPixel. It’s a great way to get started with NeoPixels and learn how to control them using code.To build this project, you’ll need:
- 1 NeoPixel
- 1 Arduino Uno or compatible microcontroller
- 1 220-ohm resistor
- Jumper wires
Connect the NeoPixel to the Arduino as shown in the diagram below. The resistor is used to limit the current flowing through the NeoPixel.“`Arduino Uno
NeoPixel
GND |
GND
|
VCC
D6 |
DIN“`Once you've connected the NeoPixel, upload the following code to the Arduino:“`#include <Adafruit_NeoPixel.h>#define LED_PIN 6#define LED_COUNT 1Adafruit_NeoPixel strip(LED_COUNT, LED_PIN, NEO_GRB + NEO_KHZ800);void setup() strip.begin(); strip.show();void loop() strip.setPixelColor(0, strip.Color(255, 0, 0)); strip.show(); delay(500); strip.setPixelColor(0, strip.Color(0, 0, 0)); strip.show(); delay(500);“`This code will cause the NeoPixel to blink red on and off. You can change the color of the LED by changing the values in the `setPixelColor()` function.<h3>Multi-Color LED Rainbow</h3>This project is a simple rainbow effect that uses multiple NeoPixels. It's a great way to learn how to control multiple NeoPixels and create more complex animations.To build this project, you'll need:
Connect the NeoPixels to the Arduino as shown in the diagram below. The resistor is used to limit the current flowing through the NeoPixels.“`Arduino Uno |
NeoPixels
GND |
GND
|
VCC
D6 |
|---|
DIN“`Once you’ve connected the NeoPixels, upload the following code to the Arduino:“`#include Venture into the realm of advanced NeoPixel projects, where you’ll explore the boundless capabilities of these versatile LEDs. Prepare to be amazed by projects that showcase intricate animations, captivating effects, and seamless sensor integration. Harness the power of NeoPixels to create mesmerizing animated patterns that dance and shimmer before your eyes. From cascading rainbows to pulsating waves, the possibilities are endless. Experiment with different color palettes, animation speeds, and patterns to design unique and captivating displays. Elevate your projects to the next level by incorporating sensors and interactivity. Use motion sensors to trigger dynamic lighting effects, or connect your NeoPixels to sound sources to create a symphony of light and music. The possibilities are endless, empowering you to craft immersive and engaging experiences. Unlock the true potential of NeoPixels by integrating them with sensors. Monitor environmental conditions, such as temperature and humidity, and translate these readings into stunning visual representations. Utilize sensors to create responsive lighting systems that adapt to their surroundings, enhancing both functionality and aesthetics. Connecting NeoPixels to Arduino and Raspberry Pi is simple, but there are some important considerations to keep in mind. First, you’ll need to gather the necessary components: To connect NeoPixels to an Arduino, you’ll need to use a breadboard and jumper wires. To connect NeoPixels to a Raspberry Pi, you’ll need to use a GPIO expansion board. In the vast world of NeoPixels, there are several libraries that can help you harness their potential. Let’s explore some popular choices and their unique advantages: -*FastLED Renowned for its speed and efficiency, FastLED provides a comprehensive set of functions for controlling NeoPixels with ease. -*Adafruit_NeoPixel An intuitive library from Adafruit, designed to simplify NeoPixel programming for beginners. -*NeoPixelBus Ideal for projects with multiple NeoPixel strips, NeoPixelBus enables you to manage them simultaneously and efficiently. Apart from libraries, there are invaluable resources available to assist you in your NeoPixel adventures: -*Adafruit NeoPixel Tutorial A comprehensive guide from Adafruit, covering everything from basic wiring to advanced animations. -*NeoPixel Community Forum A vibrant online community where you can connect with fellow NeoPixel enthusiasts, troubleshoot issues, and share ideas. -*NeoPixel Troubleshooting Guide A handy reference for resolving common problems encountered when working with NeoPixels. With these resources at your disposal, you’re well-equipped to embark on your NeoPixel projects with confidence and success. NeoPixels can be integrated with various electronic components to enhance their functionality and create interactive projects. This integration allows for greater control and customization of the NeoPixels’ behavior and enables them to interact with the physical world. Some common types of components that can be integrated with NeoPixels include sensors, actuators, and communication modules. Sensors can be used to detect various environmental conditions, such as temperature, humidity, light, or motion. By integrating sensors with NeoPixels, you can create projects that respond to changes in the environment, such as changing the color of the NeoPixels based on temperature or lighting conditions. For example, you could create a project that uses a temperature sensor to change the color of the NeoPixels from blue to red as the temperature increases. Actuators are devices that can convert electrical signals into physical movement or actions. They can be used to control motors, solenoids, or other mechanical devices. By integrating actuators with NeoPixels, you can create projects that interact with the physical world, such as moving objects or triggering events. For example, you could create a project that uses a motor and NeoPixels to create a rotating light display. Communication modules allow NeoPixels to communicate with other devices, such as computers, smartphones, or other microcontrollers. This enables you to control the NeoPixels remotely or integrate them into larger systems. For example, you could create a project that uses a Bluetooth module to control the NeoPixels from a smartphone app. Unleash your creativity and craft unique NeoPixel designs that stand out. Consider the layout, patterns, and color schemes to create eye-catching displays. Experiment with different arrangements, such as circular patterns, waves, or geometric shapes. Explore various color combinations to evoke specific moods or themes. NeoPixel projects are not just limited to hobbyist projects; they have a wide range of real-world applications across various industries. From home automation to wearable devices and interactive displays, NeoPixels are making a significant impact in the real world. Troubleshooting and optimization are essential for successful NeoPixel projects. By understanding common problems and implementing optimization techniques, you can ensure your projects perform optimally and efficiently. To optimize your NeoPixel projects, consider the following techniques: As you delve into these 8 NeoPixel projects, you’ll master the art of connecting, configuring, and programming these versatile LEDs. Whether you’re a seasoned pro or just starting your electronic escapades, you’ll find inspiration and knowledge to elevate your projects to new heights. So, embrace the brilliance of NeoPixels and let your creativity shine through! With these projects as your guide, the world of Arduino and Raspberry Pi will become a vibrant canvas for your illuminated masterpieces. What are NeoPixels? NeoPixels are addressable LEDs, meaning each LED can be controlled individually, allowing for dynamic and customizable lighting effects. Why use NeoPixels with Arduino or Raspberry Pi? Arduino and Raspberry Pi are popular microcontrollers that provide an easy way to control and program NeoPixels, enabling a wide range of projects. Can I use these projects with other microcontrollers? While these projects are specifically designed for Arduino and Raspberry Pi, the principles can be adapted to other microcontrollers with similar capabilities.Advanced NeoPixel Projects
Animated Patterns
Interactive Installations
Sensor Integration
Hardware Setup and Configuration
Arduino Setup
Raspberry Pi Setup
NeoPixel Libraries and Resources
Integration with Other Components: 8 Illuminating NeoPixel Projects For Arduino And Raspberry Pi
Sensors
Actuators
Communication Modules
Custom NeoPixel Designs
Layout Considerations
Pattern Design
Color Schemes, 8 Illuminating NeoPixel Projects for Arduino and Raspberry Pi
Real-World Applications
![]()
Home Automation
Wearable Devices
Interactive Displays
Troubleshooting and Optimization
Common Problems and Solutions
Optimization Techniques
Ultimate Conclusion
Questions Often Asked


