7 Essential Adobe After Effects Tools Every User Should Master
7 Essential Adobe After Effects Tools Every User Should Master – Get ready to unlock the power of Adobe After Effects with our essential toolkit! We’ll dive into 7 must-have tools that will transform your animations, motion graphics, and visual storytelling. Let’s get started and elevate your After Effects skills to the next level.
Keyframing Basics
Keyframing is the foundation of animation in After Effects. It allows you to create movement and change over time by setting keyframes, which are specific points in time where you define the properties of a layer. Keyframing is used to create basic animations like position, scale, rotation, and opacity changes.Different
types of keyframes include:
-
-*Static keyframes
Set a specific value at a specific time.
-*Linear keyframes
Create a smooth transition between two keyframes.
-*Bezier keyframes
Allow for more complex and customizable motion paths.
Timeline Navigation and Organization
The timeline is the central hub of After Effects, where you manipulate and organize your compositions. Navigating and organizing the timeline efficiently is crucial for seamless workflow and effective editing.
Navigating the timeline involves using the playhead, zoom controls, and keyboard shortcuts. The playhead indicates the current frame being played and can be dragged or scrubbed to move through the timeline. Zoom controls allow you to zoom in and out of the timeline to focus on specific areas or get an overview of the entire project.
Creating and Managing Layers
- Create new layers by clicking the “New Layer” button or using the keyboard shortcut (Cmd/Ctrl + Y). Layers can contain various types of content, such as video footage, images, shapes, and text.
- Organize layers by grouping them into folders using the “Layer” menu or the “Folder” button. Grouping layers helps keep your timeline tidy and makes it easier to manage complex compositions.
- Manage layer properties by selecting the layer and adjusting its settings in the “Properties” panel. This includes controlling layer opacity, position, scale, rotation, and other effects.
Compositions
- Compositions are nested timelines that can be used to create complex animations or combine multiple elements. To create a new composition, click the “New Composition” button or use the keyboard shortcut (Cmd/Ctrl + N).
- Organize compositions by creating folders in the “Project” panel. This helps keep your project organized and easy to navigate.
- Link compositions to each other using the “Composition” menu or the “Link to Composition” button. Linking compositions allows you to edit one composition while seeing its effects in another composition.
Efficient Timeline Management
- Use keyboard shortcuts to quickly navigate and manipulate the timeline. For example, use the arrow keys to move the playhead, and use the “J” and “K” keys to trim layers.
- Set markers on the timeline to indicate important points or sections. Markers can be used for quick navigation and as reference points for adding keyframes or effects.
- Use the “Timeline” menu to access advanced timeline management options, such as setting custom frame rates, adjusting timecode, and managing work areas.
Masks and Shape Layers
Masks and shape layers are essential tools for isolating, manipulating, and creating specific elements in After Effects. Understanding their different types and uses can greatly enhance your workflow.
Masks
Masks allow you to selectively hide or reveal portions of a layer, isolating specific areas for editing or effects. There are two main types of masks:
- Layer Masks:Attached to a specific layer, allowing you to mask its contents directly.
- Track Mattes:Independent of any layer, enabling you to mask multiple layers simultaneously.
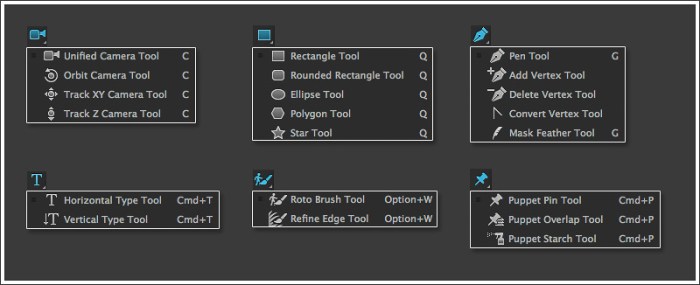
Masks can be created and manipulated using the Mask tool, the Pen tool, or the Shape tool. They provide precise control over the shape and position of the masked area.
Shape Layers
Shape layers are vector-based layers that allow you to create custom shapes for animation or masking. They offer a wide range of options for shape creation and manipulation, including:
- Freeform Drawing:Draw shapes using the Pen tool or the Brush tool.
- Geometric Shapes:Create predefined shapes like rectangles, ellipses, and stars.
- Path Operations:Combine and modify shapes using operations like add, subtract, and intersect.
Shape layers are ideal for creating dynamic animations, complex masks, and custom effects. They provide flexibility and precision in controlling the shape and movement of elements.
Text Animation and Typography
Text animation and typography are essential skills for any After Effects user. They allow you to create visually appealing and engaging text animations that can enhance your videos and presentations.
There are a variety of methods for creating and animating text in After Effects, including:
- Using the Character Animator tool to create character animations
- Applying text presets to quickly create common text effects
- Using expressions to create custom text animations
When creating text animations, it’s important to consider typography best practices. This includes choosing fonts that are easy to read and visually appealing, and using colors and styles that complement your overall design.
Character Animation
Character Animator is a powerful tool that allows you to create character animations from scratch. You can use Character Animator to create simple or complex animations, and you can even import your own artwork to create custom characters.
To create a character animation, simply import your artwork into Character Animator and create a puppet. You can then use the puppet’s controls to animate your character.
Text Presets
Text presets are a quick and easy way to create common text effects. After Effects comes with a variety of text presets that you can apply to your text layers.
To apply a text preset, simply select your text layer and choose a preset from the Text Presets menu.
Expressions
Expressions are a powerful way to create custom text animations. Expressions allow you to control the properties of your text layers using mathematical formulas.
To create an expression, simply select your text layer and open the Expression Editor. You can then enter your expression into the Expression Editor.
Typography Best Practices
When creating text animations, it’s important to consider typography best practices. This includes:
- Choosing fonts that are easy to read and visually appealing
- Using colors and styles that complement your overall design
- Avoiding using too much text in your animations
- Making sure your text is legible at all sizes
Effects and Presets
After Effects offers an extensive collection of effects that allow you to manipulate and enhance your footage. These effects range from simple color adjustments to complex simulations and 3D transformations.
Applying effects is straightforward. Simply drag and drop the desired effect from the Effects Panel onto your footage in the Timeline. You can then customize the effect’s parameters to achieve the desired result. Effects can be stacked and combined to create complex visual effects.
Presets
Presets are pre-configured sets of effect parameters that can be applied to your footage with a single click. They offer a quick and easy way to create common effects, such as color correction, transitions, and motion graphics. You can create your own presets or download presets created by other users.
Motion Tracking and Stabilization: 7 Essential Adobe After Effects Tools Every User Should Master
Motion tracking is a technique used in video editing and post-production to track the movement of an object or a specific area within a video clip. It allows you to add dynamic effects, stabilize shaky footage, or even replace or remove objects from a scene.
After Effects offers several motion tracking methods, including point tracking, which tracks specific points within a scene, and plane tracking, which tracks the movement of an entire plane. The choice of method depends on the complexity of the movement and the desired results.
Accurate Motion Tracking
- Use high-quality footage with clear and distinct features for tracking.
- Identify stable reference points within the scene to anchor the tracking.
- Adjust tracking parameters such as search area and smoothness to optimize accuracy.
- Manually refine the tracking data if necessary to ensure precise results.
3D Camera and Lighting
D cameras and lighting in After Effects provide unparalleled control over the depth and realism of your animations. Understanding these tools allows you to create immersive and visually stunning 3D scenes, enhance visual storytelling, and bring your ideas to life.
Creating 3D Scenes
Creating a 3D scene involves setting up a virtual camera, defining a 3D space, and adding 3D objects. After Effects offers various camera types, including perspective and orthographic, allowing you to choose the best perspective for your scene. You can also adjust camera settings such as focal length, aperture, and field of view to control the depth of field and overall look of your animation.
Lighting Your Scene, 7 Essential Adobe After Effects Tools Every User Should Master
Lighting is crucial for bringing depth and realism to your 3D scenes. After Effects provides a range of lighting tools, including point lights, spot lights, and ambient lights, each with its own unique properties. You can control the intensity, color, and direction of each light to create specific moods and effects.
Proper lighting can enhance the visibility of objects, cast shadows, and create highlights, adding depth and dimension to your animations.
Rendering Your Animation
Once your 3D scene is complete, you need to render it to create a final video file. After Effects offers various rendering options, allowing you to choose the quality and format of your output. You can also adjust settings such as resolution, frame rate, and compression to optimize your animation for different platforms and purposes.
Enhancing Visual Storytelling
Mastering 3D camera and lighting techniques empowers you to create visually compelling and immersive animations that enhance your visual storytelling. By controlling the perspective, lighting, and depth of your scenes, you can guide the viewer’s attention, create emotional impact, and bring your ideas to life in a truly captivating way.
Expressions and Scripting
Expressions and scripting are powerful tools in After Effects that allow you to automate tasks, create dynamic animations, and enhance interactivity. Expressions are mathematical formulas that can be applied to any property in After Effects, allowing you to control its behavior based on other properties, time, or user input.
Scripting, on the other hand, allows you to extend the functionality of After Effects by writing custom scripts using JavaScript, Python, or C++.
Using Expressions
Expressions can be used for a wide variety of tasks, including:
- Automating repetitive tasks, such as creating keyframes or adjusting property values over time.
- Creating dynamic animations that respond to user input or other events.
- Generating complex effects that would be difficult or impossible to create manually.
For example, you could use an expression to create a bouncing ball animation by applying a sine wave to the position property of a layer. Or, you could use an expression to create a text animation that changes color based on the current time.
Scripting in After Effects
After Effects supports scripting using JavaScript, Python, and C++. Scripting can be used to:
- Extend the functionality of After Effects by adding new features or tools.
- Automate complex tasks or workflows.
- Create custom effects or plugins.
For example, you could write a script to create a batch of new compositions based on a template, or to automatically export a series of videos in different formats.Expressions and scripting are essential tools for any After Effects user who wants to automate tasks, create dynamic animations, or extend the functionality of the software.
Collaboration and Team Projects
Collaborating on After Effects projects can be a great way to share ideas, distribute workload, and improve the quality of your final product. However, it can also come with its own set of challenges.One of the biggest benefits of collaborating on After Effects projects is that it allows you to tap into the expertise of other artists.
If you’re working on a particularly complex project, having someone else to bounce ideas off of can be invaluable. Additionally, collaborating can help you to stay motivated and on track, as you’ll have others to hold you accountable.Of course, there are also some challenges to collaborating on After Effects projects.
One of the biggest challenges is keeping track of all the different versions of your project. If you’re not careful, it can be easy to lose track of who made what changes and when. Additionally, collaborating can sometimes lead to creative differences, which can be difficult to resolve.If
you’re thinking about collaborating on an After Effects project, there are a few things you can do to make the process as smooth as possible. First, it’s important to set up a clear workflow and communication plan. This will help to ensure that everyone knows what they’re responsible for and how to communicate with each other.
Additionally, it’s important to use a version control system, such as Git, to keep track of all the different versions of your project. This will make it easy to revert to a previous version if necessary.Despite the challenges, collaborating on After Effects projects can be a great way to improve the quality of your work and learn from others.
If you’re willing to put in the effort, it can be a rewarding experience.
*Tips for sharing assets, reviewing changes, and maintaining project consistency
When collaborating on an After Effects project, it’s important to have a system for sharing assets, reviewing changes, and maintaining project consistency. Here are a few tips:*
-*Use a shared storage location
This will ensure that everyone has access to the same files and can easily share assets.
-
-*Use a version control system
This will help to keep track of all the different versions of your project and make it easy to revert to a previous version if necessary.
-*Establish a review process
This will help to ensure that everyone is on the same page and that changes are made in a consistent manner.
-*Use templates and style guides
This will help to ensure that all of the elements in your project are consistent in terms of style and appearance.
By following these tips, you can help to make the collaboration process smoother and more efficient.
Exporting and Rendering
After Effects offers a range of export options to cater to various platforms and purposes. Understanding these options and choosing the appropriate settings is crucial for optimizing the quality and efficiency of your exports.
Choosing Export Settings
When exporting your After Effects composition, you’ll encounter a plethora of export settings that can seem daunting. However, understanding their purpose and how they impact your final output is essential.* Format:Select the desired file format for your export, such as MP4, MOV, or AVI.
Each format has its own advantages and limitations, so choose wisely based on your specific needs.
Codec
The codec determines how your video is compressed and encoded. Different codecs offer varying levels of compression and quality, so choose the one that best suits your requirements.
Resolution
Specify the output resolution of your video, which affects its size and quality. Higher resolutions result in larger file sizes but sharper images.
Frame Rate
Set the frame rate of your exported video, which determines the number of frames displayed per second. Higher frame rates result in smoother motion, but also increase file size.
Bitrate
The bitrate controls the amount of data used to encode your video. Higher bitrates result in better quality but larger file sizes.
Optimizing Render Quality
To achieve the best possible render quality, consider the following tips:* Use High-Quality Footage:Start with high-resolution, well-lit footage to ensure your final output is sharp and clear.
Enable Motion Blur
Motion blur adds realism to your animations by simulating the blur that occurs when objects move quickly.
Increase Render Resolution
Rendering at a higher resolution than your final output can improve image quality, especially when scaling down.
Use a Lossless Codec
Lossless codecs, such as PNG or TIFF, preserve all the data in your composition, resulting in the highest possible quality.
Reducing Render Times
If you’re experiencing long render times, try these techniques to speed things up:* Use a Preview Render:Preview renders generate a low-quality version of your video quickly, allowing you to check for errors before committing to a full render.
Reduce Composition Complexity
Remove unnecessary layers, effects, and plugins to reduce the processing load.
Enable Multi-Processing
If your computer has multiple cores, enable multi-processing to distribute the render across multiple threads.
Use a Render Farm
For large or complex projects, consider using a render farm, which distributes the rendering across multiple computers, significantly reducing render times.
Tips and Tricks for Workflow Efficiency
Mastering Adobe After Effects involves not only understanding its essential tools but also optimizing your workflow for maximum efficiency. This section explores insider tips and tricks that will help you streamline your creative process, save time, and avoid common pitfalls.
By leveraging keyboard shortcuts, customizing your workspace, and employing best practices, you can significantly enhance your productivity and produce high-quality animations with ease.
Keyboard Shortcuts
- Use “C” to create a new composition, “N” for a new layer, and “P” to preview your animation.
- Navigate the timeline quickly with “J” (previous frame), “K” (next frame), “L” (play/pause), and “U” (rewind).
- Transform layers with “W” (position), “E” (rotation), “R” (scale), and “T” (opacity).
Workspace Customization
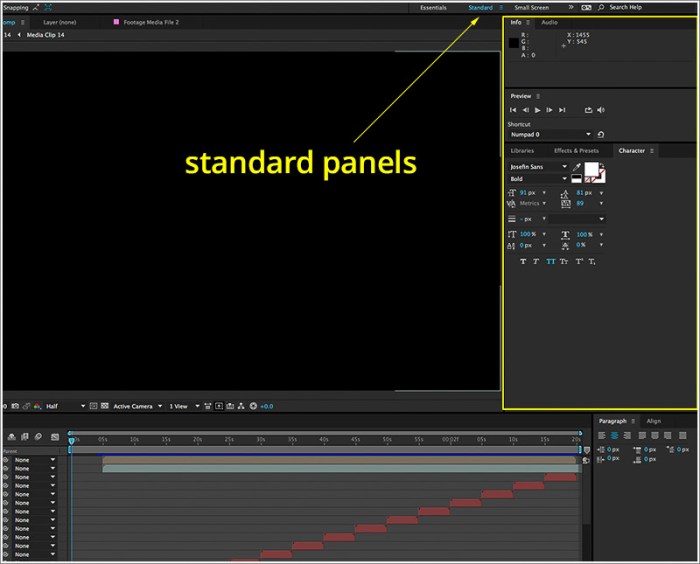
- Tailor your workspace to your needs by adding or removing panels from the interface.
- Use the “Window” menu to access different panels, such as the Timeline, Effects & Presets, and Character panels.
- Create custom workspaces to save your preferred panel arrangements for different tasks.
Best Practices
- Organize your project by using layers and groups to keep your timeline clutter-free.
- Utilize expressions to automate repetitive tasks and save time on complex animations.
- Preview your animations regularly to identify any issues early on and make necessary adjustments.
Final Conclusion
With these 7 essential tools under your belt, you’ll be equipped to create stunning visuals that captivate your audience. After Effects awaits your creative touch, so embrace these tools and unleash your imagination. The world of animation is your canvas, and we’re here to guide you every step of the way.
Questions Often Asked
What are the benefits of using keyframing in After Effects?
Keyframing allows you to control the movement and changes of your elements over time, creating smooth and dynamic animations.
How can masks help me in After Effects?
Masks let you isolate specific areas of your footage or compositions, allowing you to apply effects, adjustments, or animations to those areas selectively.
What are some tips for optimizing render times in After Effects?
Use preview rendering to test your animations, reduce the resolution or frame rate for faster renders, and take advantage of hardware acceleration if available.

